
Adding plus/minus buttons to a Shopify quantity selector is usually straightforward if your theme already supports it, and still very doable if it does not. In most cases, I recommend first checking your theme customiser, then editing the theme code only if needed, because modern Shopify themes often include this natively.
I've worked on Shopify stores and built apps in this ecosystem for years, and this is one of those small UX changes that can make a surprisingly big difference. A quantity selector with clear plus and minus buttons reduces friction, feels more mobile-friendly, and makes it easier for customers to adjust basket quantities without typing into a tiny input field.
If your goal is to improve the cart and product page experience, this sits in the same bucket as better upsells, clearer shipping messaging, and faster cart interactions. If you are also looking at increasing average order value, read my guides on how to upsell on Shopify in 2026 and how to create Shopify cart drawer upsells.
How do I add a plus/minus button to the quantity selector in Shopify?
The quickest answer is this: go to Online Store - Themes - Customise and check whether your theme already has a quantity selector block or a setting called Show quantity selector. If it does, you may not need any custom code at all.
For older themes like Debut, or heavily customised themes, you may need to edit the product template, add some CSS, and add a small JavaScript snippet so the buttons increase and decrease the quantity value correctly.
What is the easiest no-code method?
The easiest method is to use your theme's built-in quantity selector. This is best for most merchants because it is quicker, safer, and less likely to break after a theme update.
Here is the standard path I recommend checking first:
- In Shopify admin, go to Online Store then Themes
- Click Customise on your live theme
- Open the product page template
- Look under Product information
- Click Add block and select Quantity selector if available
- Or, in older themes, enable Show quantity selector
- Save and test on desktop and mobile
This is the same basic approach that appears repeatedly in Shopify Community answers, and it still works because many themes expose the quantity control in the editor. If you are using a modern Online Store 2.0 theme like Dawn or a premium theme with updated product blocks, this is often all you need.
Which Shopify themes already support plus/minus quantity buttons?
Many Shopify themes already support quantity selectors, but the exact design varies. Some show plus/minus buttons by default, while others show a numeric input or hide the selector unless you enable it.
In my experience, merchants often assume they need custom code when the feature is already there. The real issue is usually that the block is disabled, hidden on a template, or styled poorly by custom CSS.
| Theme type | Typical quantity support | What to check first | Recommended action |
|---|---|---|---|
| Modern OS 2.0 themes | Often built in | Product information blocks | Enable the quantity selector in the customiser |
| Dawn and similar free themes | Usually built in | Main product section settings | Use native selector before editing code |
| Debut and older vintage themes | May need modification | Show quantity selector setting | Edit theme files if the UI is not plus/minus style |
| Heavily customised themes | Unpredictable | Product form markup and JS | Audit existing code before adding anything new |
If you are unsure what kind of theme architecture you have, duplicate the theme first and inspect the product form files. I always recommend creating a backup before touching quantity logic, especially if the store uses subscriptions, bundles, or custom cart scripts.
How do I add plus/minus buttons in Shopify without coding?
You can add them without coding if your theme exposes the control in the customiser. This is the safest option for non-technical merchants.
Here is the simple version again, with a bit more context:
- Go to Online Store then Themes
- Click Customise
- Open the relevant product template, not just the homepage preview
- Under Product information, click Add block
- Select Quantity selector if your theme offers it
- Save changes and test a real product page
Once enabled, customers can increase or decrease the quantity before adding the product to cart. On many themes, they can also adjust quantities later in the cart or cart drawer.
This matters because checkout friction is still a major issue in ecommerce. Depending on the source and sector, cart abandonment often sits around 70%, so even small usability improvements can help. A cleaner quantity control will not magically fix conversion on its own, but it does remove one unnecessary point of friction.
How do I add plus/minus buttons to the Shopify product page with code?
If your theme does not support this natively, you can add it with code by editing the product form markup, styling the controls, and wiring up the click behaviour with JavaScript. This is the best option when your theme is older or the built-in selector is too limited.
The general process is the same across most themes, but the exact file names vary. In older themes you might edit product-template.liquid, while in newer themes you may be working in a section like main-product.liquid or a product form snippet.
Step 1: Duplicate your theme first
The first step is to duplicate your theme. This gives you a safe fallback if anything breaks.
Go to Online Store - Themes, click the three dots on your current theme, and choose Duplicate. I do this on every store before editing templates, because even a small change to quantity inputs can affect add-to-cart behaviour.
Step 2: Find the quantity input in your product form
The next step is to find the existing quantity selector code. You are looking for an input with name="quantity" or a block of code related to the product form quantity.
Common places to check include:
sections/product-template.liquidsections/main-product.liquidsnippets/product-form.liquidsnippets/product-form-input.liquid
In Debut, you will often find this inside a condition such as {% if section.settings.show_quantity_selector %}. In newer themes, the markup may be wrapped in a quantity component with classes like quantity, quantity__button, or quantity__input.
Step 3: Replace or customise the existing markup
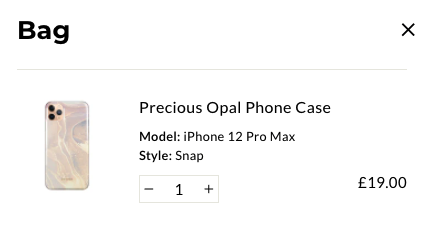
You can replace the default input with a plus/minus wrapper, but make sure the input still submits as name="quantity". If you remove or rename that attribute, the product form will not pass the quantity correctly.
Here is a simple example that works as a starting point for many themes:
<div class="qtydiv">
  <label for="Quantity-{{ section.id }}">Quantity</label>
  <div class="qtybox">
    <button type="button" class="btnqty qtyminus" aria-label="Decrease quantity">-</button>
    <input
      id="Quantity-{{ section.id }}"
      type="number"
      name="quantity"
      class="quantity-input"
      value="1"
      min="1"
      inputmode="numeric"
    >
    <button type="button" class="btnqty qtyplus" aria-label="Increase quantity">+</button>
  </div>
</div>
This version is better than older snippets because it uses real button elements and includes accessibility labels. I would avoid using plain spans or links for controls like this unless you have a very specific reason.
Step 4: Add CSS styling
The CSS controls the visual layout of the buttons and input. You can add this to base.css, theme.css, or theme.scss.liquid depending on your theme.
.qtydiv label {
  display: block;
  margin-bottom: 12px;
}

.qtybox {
  display: inline-flex;
  align-items: center;
  border: 1px solid #d1d1d1;
  border-radius: 6px;
  overflow: hidden;
}

.qtybox .btnqty {
  width: 42px;
  height: 42px;
  border: 0;
  background: #f7f7f7;
  cursor: pointer;
  font-size: 22px;
  line-height: 1;
}

.qtybox .btnqty:hover {
  background: #ececec;
}

.qtybox .quantity-input {
  width: 56px;
  height: 42px;
  border: 0;
  text-align: centre;
  appearance: textfield;
  -moz-appearance: textfield;
}

.qtybox .quantity-input::-webkit-outer-spin-button,
.qtybox .quantity-input::-webkit-inner-spin-button {
  -webkit-appearance: none;
  margin: 0;
}
You may need to adjust colours, spacing, and font sizes to match your theme. If the control looks broken, it is usually because the theme already has quantity styles that need overriding.
Step 5: Add JavaScript for the plus/minus clicks
The JavaScript should increment and decrement the input value while never allowing it to drop below the minimum. In 2026, I strongly prefer vanilla JavaScript over jQuery for new Shopify theme work unless the theme already depends on jQuery.
document.addEventListener('click', function(event) {
  if (!event.target.matches('.btnqty')) return;

  const box = event.target.closest('.qtybox');
  const input = box.querySelector('.quantity-input');
  const min = parseInt(input.getAttribute('min')) || 1;
  let value = parseInt(input.value) || min;

  if (event.target.classList.contains('qtyplus')) {
    value += 1;
  }

  if (event.target.classList.contains('qtyminus')) {
    value = Math.max(min, value - 1);
  }

  input.value = value;
  input.dispatchEvent(new Event('change', { bubbles: true }));
});
This approach is lightweight and theme-friendly. It also avoids one of the most common problems I see in older tutorials, which is relying on jQuery on themes that no longer load it.
Step 6: Test the full flow
After saving, test the product page properly. Do not just click the buttons once and assume it works.
- Increase and decrease quantity on desktop
- Test on mobile
- Add to cart and confirm the correct quantity is passed
- Try products with variants
- Check subscription or bundle products if installed
- Test in the cart and cart drawer as well
When I test this on client stores, the add-to-cart step is where issues usually appear. The buttons may change the visible number, but the form submits the wrong value if the input is outside the form or missing the correct name attribute.
How do I add plus/minus buttons in the Debut theme specifically?
For Debut, the usual path is to enable the quantity selector first, then replace the default quantity markup in product-template.liquid. Debut is still widely searched because many older stores continue to use it or use themes based on the same structure.
This is why so many search results for this keyword are Shopify Community threads about Debut. The process is not difficult, but you do need to be careful with selectors and file names.
- Go to Online Store - Themes - Customise
- Open the product page and enable Show quantity selector
- Go to Edit code
- Open
sections/product-template.liquid - Find the quantity selector block inside the product form
- Replace the old markup with a button-based quantity box
- Add CSS to your stylesheet
- Add the JavaScript to your theme JS file
What are the most common problems when adding a quantity selector in Shopify?
The most common problems are JavaScript conflicts, wrong input names, and theme CSS overriding the new controls. Most failures are not caused by the plus/minus logic itself, but by the way the theme form is structured.
Here are the issues I see most often:
-
The input is missing
name="quantity", so Shopify ignores it on add to cart - jQuery is not loaded, but the tutorial depends on it
- The code is added outside the product form, so the value is never submitted
- Custom CSS hides the buttons or makes them unclickable
- Cart drawer scripts override quantity behaviour
- App blocks or bundle apps replace the product form
If you run into conflicts with cart drawers, upsell apps, or custom Ajax cart code, inspect the browser console and test on an unpublished duplicate theme. I have seen stores where the product page quantity works perfectly, but the cart drawer silently resets the quantity because another script re-renders the line item.
Should I use jQuery or vanilla JavaScript?
Vanilla JavaScript is the better choice for most Shopify themes in 2026. Use jQuery only if your theme already loads it and depends on it.
The older version of this tutorial used jQuery, which was normal a few years ago. Today, many Shopify themes do not include jQuery at all, so copying an old snippet can lead to the classic problem of buttons doing nothing.
That said, if your theme is older and already built around jQuery, this kind of snippet can still work:
jQuery(document).ready(function($){
  $('.qtybox .btnqty').on('click', function(){
    var $input = $(this).siblings('.quantity-input');
    var min = parseInt($input.attr('min')) || 1;
    var qty = parseInt($input.val()) || min;

    if ($(this).hasClass('qtyplus')) {
      qty++;
    } else {
      qty = Math.max(min, qty - 1);
    }

    $input.val(qty).trigger('change');
  });
});
If you do use jQuery, make sure it is already present in the theme. I would not add jQuery just for a quantity selector.
Can I add plus/minus buttons to the cart page too?
Yes, you can add them to the cart page or cart drawer as well. In fact, this is often where the UX benefit is most obvious because customers are actively adjusting quantities before checkout.
For many themes, the cart already has quantity controls, but they may be visually weak or hidden behind a small input. If you are customising the cart, make sure the quantity update triggers the correct cart refresh method, especially if the store uses Ajax cart behaviour.
For instance, if a customer adds three units on the product page but decides to remove one in the cart, the plus/minus controls should update the line item cleanly without forcing a page reload. That smoother cart interaction can help reduce abandonment, particularly on mobile.

Is there a no-code Shopify app for quantity buttons?
Yes, there are apps that can help, but for this specific feature I would only use an app if your theme is awkward to modify or you also need advanced quantity rules. Using an app just for a basic plus/minus control is often overkill.
The latest research around this keyword mentions apps such as HulkApps and Ecomheroes as no-code options for quantity-related customisation. If you explore apps, use the Shopify App Store and check recent reviews, support responsiveness, and whether the app supports your theme and cart setup.
Start here: Shopify App Store.
In my experience building Shopify apps, merchants sometimes install an app for a tiny UI problem and end up adding script weight, app blocks, and another monthly bill. If all you want is a clean quantity selector, theme-level implementation is usually better.
| Approach | Best for | Pros | Cons |
|---|---|---|---|
| Theme customiser | Most merchants | Fast, safe, no code | Limited to theme options |
| Custom code | Older or customised themes | Flexible, lightweight, no app fee | Needs testing and maintenance |
| Shopify app | Merchants needing advanced rules | No-code setup, extra features | Can add cost and complexity |
What should I do if the plus/minus buttons are not working?
If the buttons are not working, first check whether the input is inside the product form and has the correct name="quantity" attribute. Then check for JavaScript errors and theme conflicts.
Use this quick troubleshooting checklist:
- Confirm the quantity input is inside the add-to-cart form
- Confirm the input has name="quantity"
- Check whether your theme loads jQuery if your code uses it
- Open browser developer tools and look for JS errors
- Inspect whether another script re-renders the product form
- Test on a duplicated theme with apps disabled where possible
- Clear cache and test in an incognito window
If the issue only happens in the cart drawer, the problem is often an Ajax refresh script rather than the quantity buttons themselves. If you are also optimising the cart experience, my guide on maximising revenue from Shopify product pages covers several related UX improvements.
Does adding plus/minus quantity buttons improve conversion?
It can improve conversion indirectly by making quantity changes easier, especially on mobile. I would frame it as a friction reduction improvement, not a silver bullet.
When I test stores, quantity controls matter most for products customers buy in multiples, such as consumables, craft supplies, stationery, food, or wholesale-friendly items. For single-purchase products, the impact is smaller, but the UI still feels more polished and easier to use.
If you want a bigger commercial lift, pair this change with stronger merchandising. That could mean product page upsells, cart drawer cross-sells, review placement, and better delivery communication. Relevant reads here are how to cross-sell matching variants, how to upsell on Shopify leveraging AI, and how to add a rush order option to Shopify.
What is my recommended way to add a plus/minus quantity selector in Shopify?
My recommendation is simple: use the native theme setting if it exists, and if it does not, add a lightweight custom implementation with accessible HTML, CSS, and vanilla JavaScript. That is the most maintainable route for most stores.
I would only reach for an app if you also need rules like minimum order quantities, pack-size increments, inventory-aware limits, or B2B quantity logic. For a standard DTC store, a clean theme-level quantity selector is usually enough.
The older tutorials ranking for this keyword are often thin, outdated, or too Debut-specific. The up-to-date approach is to check your theme architecture first, avoid unnecessary jQuery, preserve the name="quantity" input, and test the full add-to-cart flow before publishing.
If you are making broader UX improvements to your store, you may also find these useful: how to optimise your Shopify store for AI shopping agents and how to get your Shopify store into ChatGPT.
Final code example for a simple Shopify plus/minus quantity selector
If you want one clean starting point, use this structure and adapt the selectors to your theme. This is a practical baseline that is more current than the older snippets still floating around forum threads.
<div class="qtydiv">
  <label for="Quantity-{{ section.id }}">Quantity</label>
  <div class="qtybox">
    <button type="button" class="btnqty qtyminus" aria-label="Decrease quantity">-</button>
    <input id="Quantity-{{ section.id }}" type="number" name="quantity" class="quantity-input" value="1" min="1" inputmode="numeric">
    <button type="button" class="btnqty qtyplus" aria-label="Increase quantity">+</button>
  </div>
</div>

<style>
.qtybox { display:inline-flex; align-items:center; border:1px solid #d1d1d1; border-radius:6px; overflow:hidden; }
.btnqty { width:42px; height:42px; border:0; background:#f7f7f7; cursor:pointer; font-size:22px; }
.quantity-input { width:56px; height:42px; border:0; text-align:center; appearance:textfield; -moz-appearance:textfield; }
.quantity-input::-webkit-outer-spin-button,
.quantity-input::-webkit-inner-spin-button { -webkit-appearance:none; margin:0; }
</style>

<script>
document.addEventListener('click', function(event) {
  if (!event.target.matches('.btnqty')) return;
  const box = event.target.closest('.qtybox');
  const input = box.querySelector('.quantity-input');
  const min = parseInt(input.getAttribute('min')) || 1;
  let value = parseInt(input.value) || min;
  if (event.target.classList.contains('qtyplus')) value += 1;
  if (event.target.classList.contains('qtyminus')) value = Math.max(min, value - 1);
  input.value = value;
  input.dispatchEvent(new Event('change', { bubbles: true }));
});
</script>
Just remember that every Shopify theme is a little different. The markup above is a starting point, not a universal drop-in for every store. If your theme already has a quantity component, it is often better to customise that existing component rather than replacing it completely.