

You can turn off automatic variant selection on Shopify, but the exact method depends on your theme. In most cases, you need to edit your theme code, remove the logic that pre-selects the first variant, and add validation so customers must choose an option before adding to cart.
Shopify themes such as Dawn, Spotlight, and Flow often auto-select the first available variant by default. That behaviour helps Shopify show price, availability, SKU, and media immediately, but it is not always what merchants want.
In my experience building Shopify apps and working with product-page customisations, merchants usually want this off for one of three reasons: to reduce mistaken purchases, to keep the main product image visible, or to force a conscious size or colour choice. If you sell apparel, bundles, made-to-order products, or personalised items, this small UX change can make a big difference.

This guide covers the current best methods for 2026, including modern Online Store 2.0 themes, older themes, theme settings that may already exist, and no-code app alternatives. I will also show you what can break when you disable auto-selection, because that is the part most short tutorials leave out.
Why does Shopify automatically select the first variant?
Shopify auto-selects the first available variant because the product form needs a valid variant ID for pricing, inventory, media changes, and add-to-cart behaviour. It is a platform-level convenience, but the customer experience is not always ideal.
For example, if you sell socks in yellow, blue, red, and green, Shopify may load the first colour immediately. That means the page can show a variant image, price, and stock state before the shopper has made any decision at all.
This is useful in some stores, especially simple ones. But on stores with multiple options such as colour + size, it can create confusion. I have seen merchants get support tickets from customers who thought they ordered a medium in black, when the page had silently defaulted to small in navy.
It is also worth noting that Shopify is expanding variant capacity. Shopify has publicly discussed the move towards 2,048 variants per product, with broader availability rolling out over time. For many stores, though, the practical issue remains the same: more variants means more chances for accidental default selections. If variant limits are relevant to your catalogue, read our guide on how to remove the 100-variant limit on Shopify.
What is the best way to disable auto-selected variants on Shopify?
The best method is to edit your theme on a duplicate copy first, remove the checked or selected state from variant inputs, and then add a clear placeholder such as “Choose an option”. That approach is usually the most reliable for Dawn and other OS 2.0 themes.
If your premium theme already includes a setting like “Auto-select first available variant”, use that first. If not, code edits are the next best option. Apps are useful when you want a no-code setup or need more advanced option logic than Shopify variants handle well.
Before doing anything, create a backup: go to Online Store > Themes > Duplicate. I always recommend testing on the duplicate theme, because even a tiny change in the variant picker can affect price display, image switching, and add-to-cart validation.
How do I disable automatic variant selection in Dawn and other Online Store 2.0 themes?
In Dawn and similar OS 2.0 themes, you usually disable auto-selection by editing the variant picker snippets and preventing Shopify from marking the first value as checked or selected. You then add logic so no variant is considered active until the shopper chooses one.
This is the method that most closely matches what is ranking in Shopify Community right now, but I want to make it more practical and complete. The short version is: remove the default checked state, set selected_variant to null unless intentionally selected, and block add to cart until a choice is made.
Step 1: Duplicate your live theme
Always duplicate your theme before editing variant logic. Variant pickers are tied to multiple moving parts, so this is not a section to edit directly on a live storefront.
- Go to Online Store > Themes
- Click the three dots on your current theme
- Choose Duplicate
- Open the duplicate and click Edit code
Step 2: Find the variant picker files
Most modern themes store this logic in snippets such as product-variant-picker.liquid or product-variant-options.liquid. File names vary slightly by theme version, so use the search bar in the code editor.
Look for files and references such as:
- snippets/product-variant-picker.liquid
- snippets/product-variant-options.liquid
- sections/main-product.liquid
- product.selected_or_first_available_variant
- {% if value.selected %} checked {% endif %}
Step 3: Remove the default checked state
If your theme uses radio buttons or pills, the most common culprit is the checked attribute. Removing it stops Shopify from visually pre-selecting the first option.
In many Dawn-based themes, you will find code similar to this:
{% if value.selected %} checked {% endif %}Remove or comment out that line. This is the quick fix often mentioned in forum answers, and it works in many stores. However, it is not always enough on its own, because the product form may still resolve to product.selected_or_first_available_variant elsewhere.
Step 4: Set selected_variant only when the customer has actually selected one
The more complete solution is to make selected_variant blank unless the shopper explicitly selected a variant, or the product only has a default variant. This prevents hidden fallback behaviour.
You can add logic like this near the top of the product form or variant picker:
{% liquid
  assign is_variant_selected = false
  if request.url contains 'variant=' or request.url contains 'option_values=' or product.has_only_default_variant
    assign is_variant_selected = true
  endif

  assign selected_variant = null
  if is_variant_selected
    assign selected_variant = product.selected_or_first_available_variant
  endif
%}
Then update any places that rely on a selected variant so they only run when selected_variant is not blank. For example, checked states, selected dropdown options, price blocks, or variant media swaps.
Step 5: Add a placeholder option for dropdown selectors
If your theme uses dropdowns, add a “Please select” option at the top. This makes the UI clearer and gives you a real unselected state.
A typical pattern looks like this:
<select name="options[Size]" required>
  <option value="" selected="selected" disabled="disabled">Please select size</option>
  {% for value in option.values %}
    <option value="{{ value | escape }}">{{ value }}</option>
  {% endfor %}
</select>
This is much cleaner than relying on hidden workarounds. It also improves accessibility because the customer gets a visible prompt rather than an invisible default.
Step 6: Stop the Add to Cart button from working until a variant is selected
Disabling auto-selection is only half the job. You also need to make sure customers cannot add an incomplete variant combination to cart.
Depending on your theme, this may already happen automatically once no valid variant is selected. If not, add validation in your product form JavaScript so the button stays disabled until all required options are chosen.
A simple approach is to update the button text from “Add to cart” to “Select options” until a valid variant exists. This gives a better UX than simply hiding the button with CSS.
How do I turn off auto-selection in Spotlight or Flow?
In Spotlight and Flow, the principle is the same: remove the default selected state and stop the theme from falling back to the first available variant. The file names may differ slightly, but the logic is very similar.
Based on what is showing in Shopify Community threads, these themes often use files like product-variant-picker.liquid or product-variant-options.liquid. Search your theme for:
- value.selected
- product.selected_or_first_available_variant
- render 'product-variant-options'
- Unavailable or button label logic
In some Flow and Spotlight setups, you may also need to replace text such as “Unavailable” with “Make a selection” when no variant has been chosen yet. That small wording change matters, because “Unavailable” can wrongly imply the product is out of stock.
If your store uses swatches, test every combination carefully. I have seen swatch-based themes where removing the checked state visually worked, but the JavaScript still selected the first variant in the background.
Can I disable auto-selection without editing code?
Yes, sometimes. Some premium themes include a built-in setting to disable the first available variant from being auto-selected. If your theme has that option, it is usually the safest route.
Check this path first:
- Online Store > Themes > Customise
- Open a product template
- Look under the product form or product information settings
- Search for wording like “Auto-select first available variant”
Not every theme offers this. But if yours does, use it before touching Liquid or JavaScript.
Theme developers handle edge cases differently, so a built-in toggle is usually more stable across future updates. If you are not sure whether your theme supports it, check the theme documentation or ask the theme developer directly.
What about older Shopify themes like Debut, Minimal, or vintage themes?
Older Shopify themes often use the classic dropdown-based variant selector, and the old snippet method can still work. If your store uses a vintage theme, the original approach from older tutorials may still be relevant.
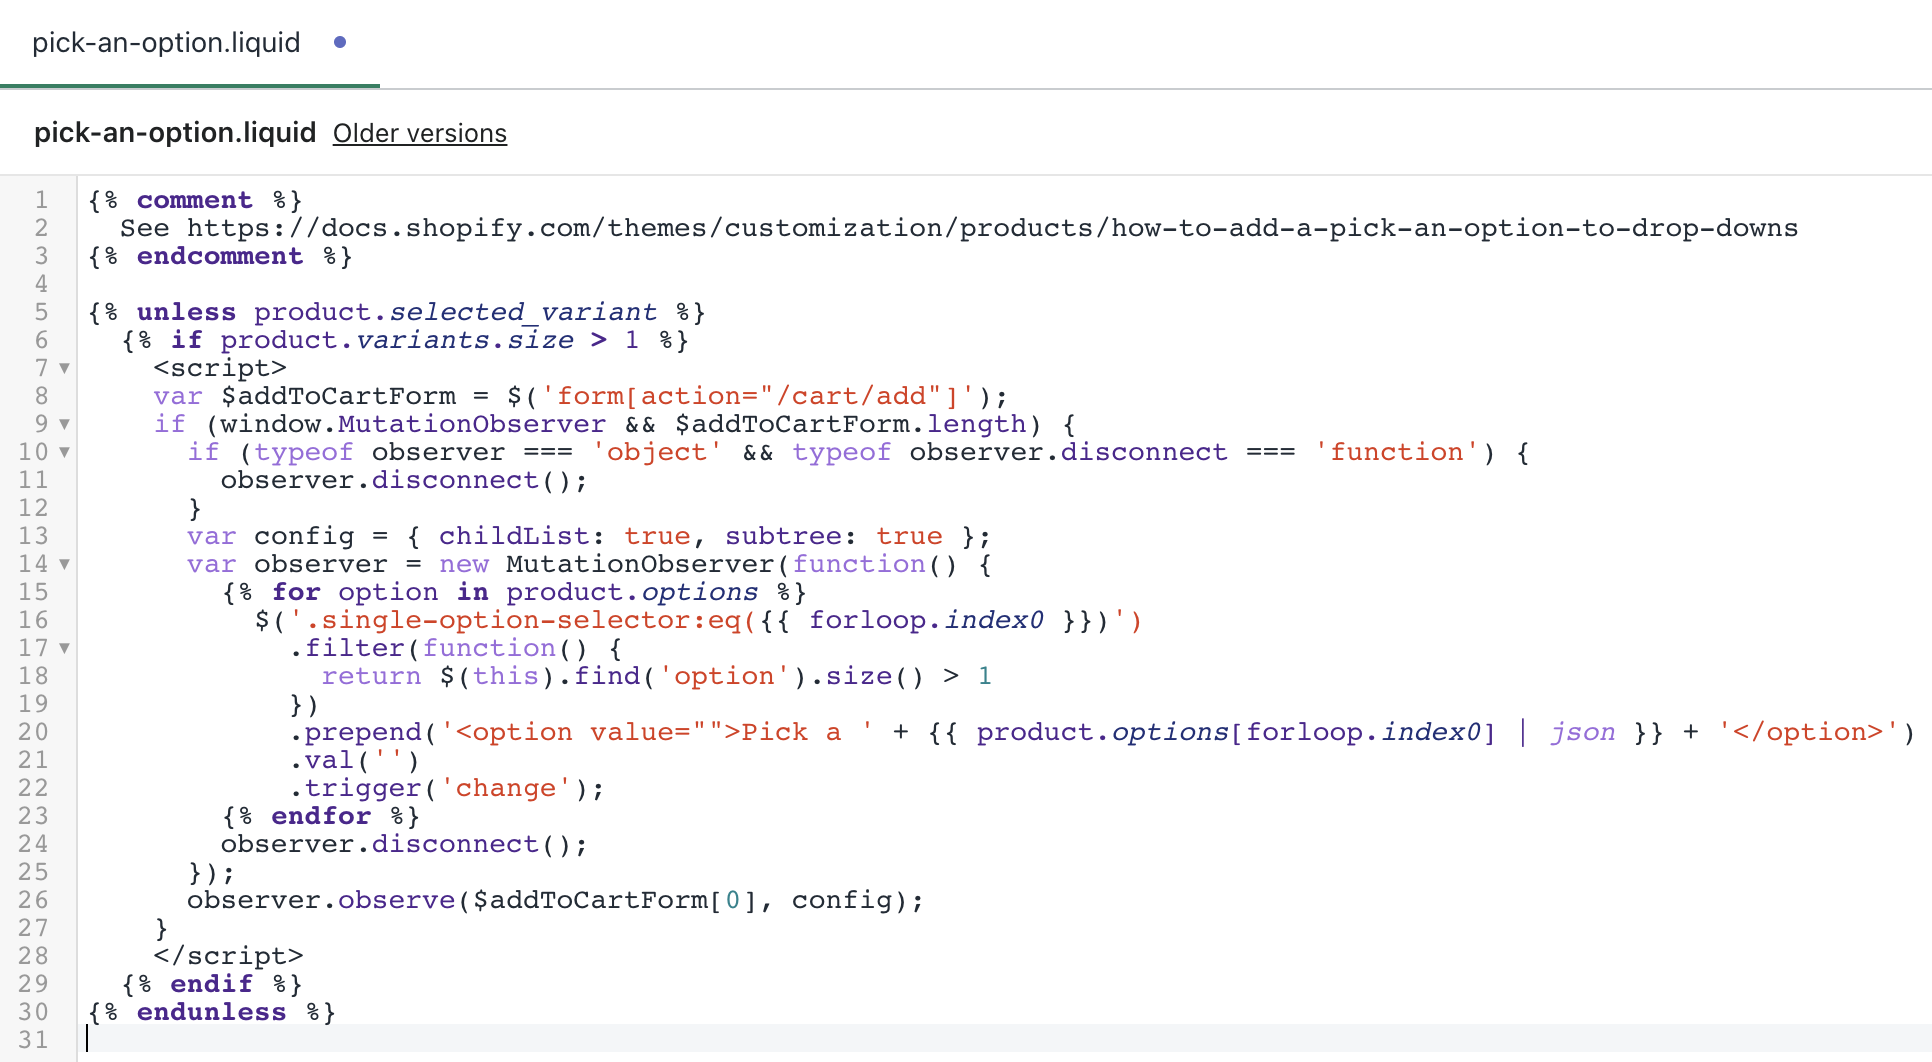
That method typically involves adding a helper snippet such as pick-an-option, rendering it before the closing body tag, and then changing the selected logic inside the product form. The original technique still appears in older videos and gists, including code from this long-circulated gist.
If your product form contains code like this:
<option {% if variant == product.selected_or_first_available_variant %} selected="selected" {% endif %} data-sku="{{ variant.sku }}" value="{{ variant.id }}">{{ variant.title }} - {{ variant.price | money_with_currency }}</option>Or this:
<option {% if variant == current_variant %} selected="selected" {% endif %} data-sku="{{ variant.sku }}" value="{{ variant.id }}">{{ variant.title }} - {{ variant.price | money_with_currency }}</option>You can replace it with:
<option {% if forloop.length <= 1 and variant == product.selected_or_first_available_variant %} selected="selected" {% endif %} data-sku="{{ variant.sku }}" value="{{ variant.id }}">{{ variant.title }} - {{ variant.price | money_with_currency }}</option>This older method can still be useful on legacy themes, but I would not use it as the first recommendation for OS 2.0 stores. Modern themes usually need a more complete approach because the variant picker is more deeply tied to JavaScript and dynamic sections.
What can break when I disable automatic variant selection?
Disabling auto-selection can affect price, stock messaging, media, and buy buttons. That is why quick one-line fixes sometimes create messy side effects.
Here are the main things to test after you make changes:
- Price display - does the product show a default price, a range, or nothing before selection?
- Compare-at price - does sale pricing still update correctly?
- Variant image switching - does the featured image remain until a choice is made?
- Add to cart - is the button disabled until a valid variant exists?
- Deep links - if someone lands on a URL with ?variant=, does that variant still load correctly?
- Sold-out combinations - are unavailable combinations handled clearly?
From a conversion point of view, the biggest win is often fewer mistaken orders. The biggest risk is friction. If you force a manual selection, make sure the prompt is obvious and the button state is clear.
If your issue is partly visual, you may also want to clean up related product-page behaviour. We have guides on hiding variant images from the product page in Shopify and setting a default product image on Shopify, both of which often come up alongside this change.
Is using CSS to hide the Add to Cart button a good solution?
No, not on its own. CSS can hide the button visually, but it does not fix the underlying variant logic. It should only be a cosmetic layer, not the main solution.
You may see snippets like this suggested:
<style>
body:has(.disabled-option:checked) .product-form__buttons button {
  display: none !important;
}
</style>
This can work as a quick visual patch, but it is not robust. Browser support for advanced selectors is better now than it used to be, but theme JavaScript and accessibility still matter more. I would always prefer proper Liquid and JavaScript validation over CSS-only fixes.
Should I use an app instead of editing my theme?
If you want a no-code option, an app can be worth it. Apps are especially useful when you need conditional options, text inputs, add-ons, or logic that goes beyond Shopify's native variant system.
In my experience, apps are the better route when merchants want to force selection while also adding customisation fields such as monograms, gift notes, file uploads, or linked options. If all you need is to stop the first variant being pre-selected, code is usually lighter. If you need a more advanced buying experience, an app is often faster and safer.
Which apps can help with variant selection and product options?
These apps can help you rebuild or extend the product option experience without relying on Shopify's default auto-selected variant behaviour. They are particularly useful when native variants are too rigid.
| App | Best for | Why use it |
|---|---|---|
|
Variant Option Product Options |
Basic no-code product options | Useful if you want to add extra option controls and reduce reliance on the theme's default picker. |
|
Globo Product Options |
Flexible custom fields and conditional logic | A good choice when you need option sets beyond standard Shopify variants. |
|
OPTIS Product Options |
Advanced option management | Useful for stores that need more control over custom options, validations, and product personalisation. |
If your real goal is broader product customisation rather than only disabling auto-selection, read our guide on how to create product add-ons for your Shopify store. That is often the more strategic fix.
What is my recommended setup for most Shopify stores?
For most stores, I recommend a code-based fix on a duplicate theme, plus clear add-to-cart validation. That gives you the cleanest product page without adding another app to manage.
My usual recommendation looks like this:
- Duplicate the theme
- Remove the default checked or selected state
- Set selected_variant = null until a real selection exists
- Add a visible Please select prompt
- Disable or relabel the Add to cart button until valid
- Test deep links, image switching, and sold-out variants
This setup is best for small to mid-sized stores that want a cleaner product-page UX without introducing app bloat. It is also easier to maintain if you already make occasional theme edits.
If your catalogue is more complex, especially with lots of variant combinations, hidden options, or custom fields, an app may save time. And if you are trying to simplify variant presentation overall, our article on how to hide product variants without deleting them in Shopify can help.
How should I test the change before publishing?
Test on desktop and mobile, and test like a real customer. Do not just click one product and assume it is done.
Here is the checklist I use:
- Open products with one option and with multiple options
- Test products with sold-out variants
- Test products with variant images
- Open a product from a collection page and from a direct URL
- Open a URL with ?variant= appended
- Try adding to cart with nothing selected
- Try selecting options in a different order, such as size before colour
- Check the product page on mobile Safari and Chrome
If you use upsell or cross-sell logic tied to variants, test that too. Variant state often affects recommendation widgets and offer triggers. We cover some of that in our post on cross-selling matching variants on Shopify.
Final thoughts on turning automatic selection off for Shopify variants
Turning automatic selection off is absolutely possible, but it is not a one-click Shopify setting for most themes. The best result comes from removing the theme's default selection logic and then handling the empty state properly.
In my experience, this change is worth it unless your store depends on instant price display with minimal friction. If your customers need to make a deliberate choice, especially for size, colour, or made-to-order products, forcing that selection can improve clarity and reduce wrong orders.
If you want the quickest path, check for a built-in theme setting first. If there is no setting, use a duplicate theme and implement the Dawn-style approach above. And if your needs go beyond standard variants, consider a product options app rather than trying to bend native Shopify variants too far.
For further reading, Shopify's own ecosystem discussions can be useful for theme-specific edge cases, especially on the Shopify Community. If you are working with OS 2.0 theme code, Shopify's developer docs at Shopify.dev are also worth keeping open while you test.