
Hiding variant images from the product page in Shopify is usually easiest with your theme’s built-in product media setting, but the right method depends on your theme, your gallery layout, and whether you want to keep non-variant lifestyle images visible.
In my experience building Shopify apps and working with lots of product page setups, this is one of those deceptively simple requests that can turn messy fast. Some merchants want to hide every non-selected variant image, others want to keep general product photos visible, and some only want the main image to change while thumbnails stay clean.
This guide covers all of those scenarios. I’ll show you the quick no-code option, when you need custom code, when CSS is enough, and when an app like Variant Image Automator is the most reliable route.
What does hiding variant images on Shopify actually mean?
Hiding variant images means only showing product media that is relevant to the currently selected variant, or only showing shared product images until a shopper chooses an option like colour or size.
On a typical Shopify product page, all media often appears in one gallery. That can create clutter when each colour has its own set of images. A shopper lands on the page and sees red, blue, green, and black product photos all mixed together, which makes the page feel busy and can confuse them about what they’re actually buying.
There are three common goals here:
- Hide all non-selected variant images after a shopper picks a variant
- Keep non-variant images visible while hiding only irrelevant variant photos
- Show only the selected variant’s images and nothing else
If you are also tidying up how options behave on the page, you might want to read How to Turn Automatic Selection Off for Product Variants on a Shopify Product Page. That often pairs well with cleaner image handling.
Why do merchants want to hide variant images from the product page?
Merchants hide variant images to make product pages cleaner, easier to understand, and more conversion-focused. The biggest benefit is that shoppers see the right images at the right time.
When I test product pages with large variant sets, the biggest issue is usually not missing content but too much content. If a product has 5 colours and 4 images per colour, that is already 20 gallery images before you add size charts, close-ups, or video. For many stores, that is overkill.
Cleaner galleries reduce visual noise. They also make swatch or dropdown selection feel more responsive because the media updates in a way that matches the shopper’s intent. That can reduce hesitation, especially on mobile where gallery space is limited.
It can also help with page performance, although you should be realistic here. Hiding images is not the same as preventing them from loading. In some themes, hidden images are still loaded in the DOM. So the UX benefit is often bigger than the speed benefit unless you implement a more advanced media-loading setup.
Can Shopify do this without an app?
Yes, many modern Shopify themes can hide non-selected variant media without an app. If you are using a newer theme like Dawn or another Online Store 2.0 theme, check the theme customiser first.
This is why the current search results are full of Shopify Community answers pointing merchants to a built-in setting. For many stores, that is genuinely the best answer. You do not need code if your theme already supports the behaviour you want.
How do I check if my Shopify theme has a built-in variant image setting?
Go to Online Store - Themes - Customise, open your product template, and look for a setting like “Hide other variants' media after selecting a variant”. If you see it, turn it on and test the product page.
This option is available in many newer themes, especially those based on Shopify’s newer product media architecture. It is the easiest and lowest-risk method because it does not require editing Liquid, JavaScript, or CSS.
- In Shopify admin, go to Online Store
- Click Themes
- Click Customise on your live or duplicated theme
- Open the Product template
- Find the product information or media gallery settings
- Enable Hide other variants' media after selecting a variant
- Save and test on desktop and mobile
In my experience, this works well for merchants using Dawn 9.0+ and similar themes. But it is not universal. Some third-party themes use custom gallery logic, and some only partially support variant-linked media.
What is the best way to hide variant images on Shopify?
The best way is to use your theme customiser if the setting exists, use custom code if you need precise behaviour, and use an app if you want a no-code setup across themes.
Here is the practical breakdown I use when advising merchants.
| Method | Best for | Skill level | Pros | Cons |
|---|---|---|---|---|
| Theme customiser setting | Modern OS 2.0 themes | Beginner | No code, fast to test, low risk | Not available on all themes, limited flexibility |
| Custom Liquid + JavaScript | Precise gallery control | Intermediate to advanced | Most flexible, can keep shared images visible | Theme-specific, easier to break during updates |
| CSS hiding | Very specific thumbnail positions | Beginner to intermediate | Quick to apply | Fragile, usually not dynamic by variant |
| App | Merchants who want no-code reliability | Beginner | Easy setup, theme compatibility support | Extra app cost, another dependency |
How do I hide variant images using Shopify theme code?
You can hide variant images using theme code by editing the product media loop in your Liquid files and, if needed, adding JavaScript to show the selected variant’s media dynamically.
This is the most flexible option, but it is also the easiest to get wrong. Always duplicate your theme first before editing code. I cannot stress that enough. A lot of product gallery issues come from making a small change in the wrong section file and then forgetting what was changed later.
Which files should I edit?
The files depend on your theme, but you will usually be looking at product.liquid, main-product.liquid, product-template.liquid, or a media snippet used by the product section.
In Dawn-style themes, product media is often rendered through section and snippet files rather than one old-style product template file. So do not assume every tutorial using product-template.liquid will match your setup.
How do I hide images that are attached to variants?
You can filter the product media loop so only non-variant images display by default. This is useful if you want lifestyle or general product images visible, but not all variant-specific shots.
A simplified example looks like this:
{% for media in product.media %}
  {% assign image = product.images | where: 'src', media.src | first %}
  {% if image.variants.size == 0 %}
    <img src="{{ image.src | img_url: 'large' }}" alt="{{ image.alt }}">
  {% endif %}
{% endfor %}
This approach can work, but the exact implementation varies by theme. Some themes use media objects rather than image objects, and some use gallery sliders that need extra classes and data attributes to function properly.
How do I show only the selected variant’s images?
You can output each variant’s media in its own wrapper and use JavaScript to toggle visibility when the variant changes. This gives you more control than a simple hide/show CSS rule.
A basic pattern looks like this:
{% for variant in product.variants %}
  <div id="variant-{{ variant.id }}" class="variant-image" style="display: none;">
    {% for image in variant.images %}
      <img src="{{ image.src | img_url: 'large' }}" alt="{{ image.alt }}">
    {% endfor %}
  </div>
{% endfor %}
And the JavaScript toggle:
document.querySelector('#ProductSelect').addEventListener('change', function(e) {
  var selectedVariantId = e.target.value;
  document.querySelectorAll('.variant-image').forEach(function(imageDiv) {
    imageDiv.style.display = 'none';
  });
  document.getElementById('variant-' + selectedVariantId).style.display = 'block';
});
This is illustrative rather than copy-paste universal. Modern themes often do not use #ProductSelect, and many variant pickers are custom web components or radio-button-based selectors. You may need to listen for variant change events used by your theme.
If you are already restructuring variants, these related guides may help: How to Hide Product Variants Without Deleting Them in Shopify and How to Remove the 100-Variant Limit on Shopify.
Can I use CSS to hide Shopify variant thumbnails?
Yes, but CSS is only a good option for very specific visual tweaks. It is not the best solution if you need thumbnails to change dynamically based on the selected variant.
CSS can hide thumbnails by position or class, for example:
.product-single__thumbnails li:nth-child(3) {
  display: none;
}

.product-single__thumbnails li:nth-child(n+2) {
  display: none;
}
This can be useful if you need a quick fix on an older theme or a one-off product template. But it is brittle. If the gallery order changes, your CSS rule may hide the wrong image. I only recommend this if you know the gallery structure is fixed and you are solving a narrow design problem.
If your real issue is image presentation rather than variant logic, you may also want to improve image consistency with How to Make Images the Same Size on Your Shopify Store or choose a better starting image with How to Set a Default Product Image on Shopify in 2026.
What is the best app for hiding variant images on Shopify?
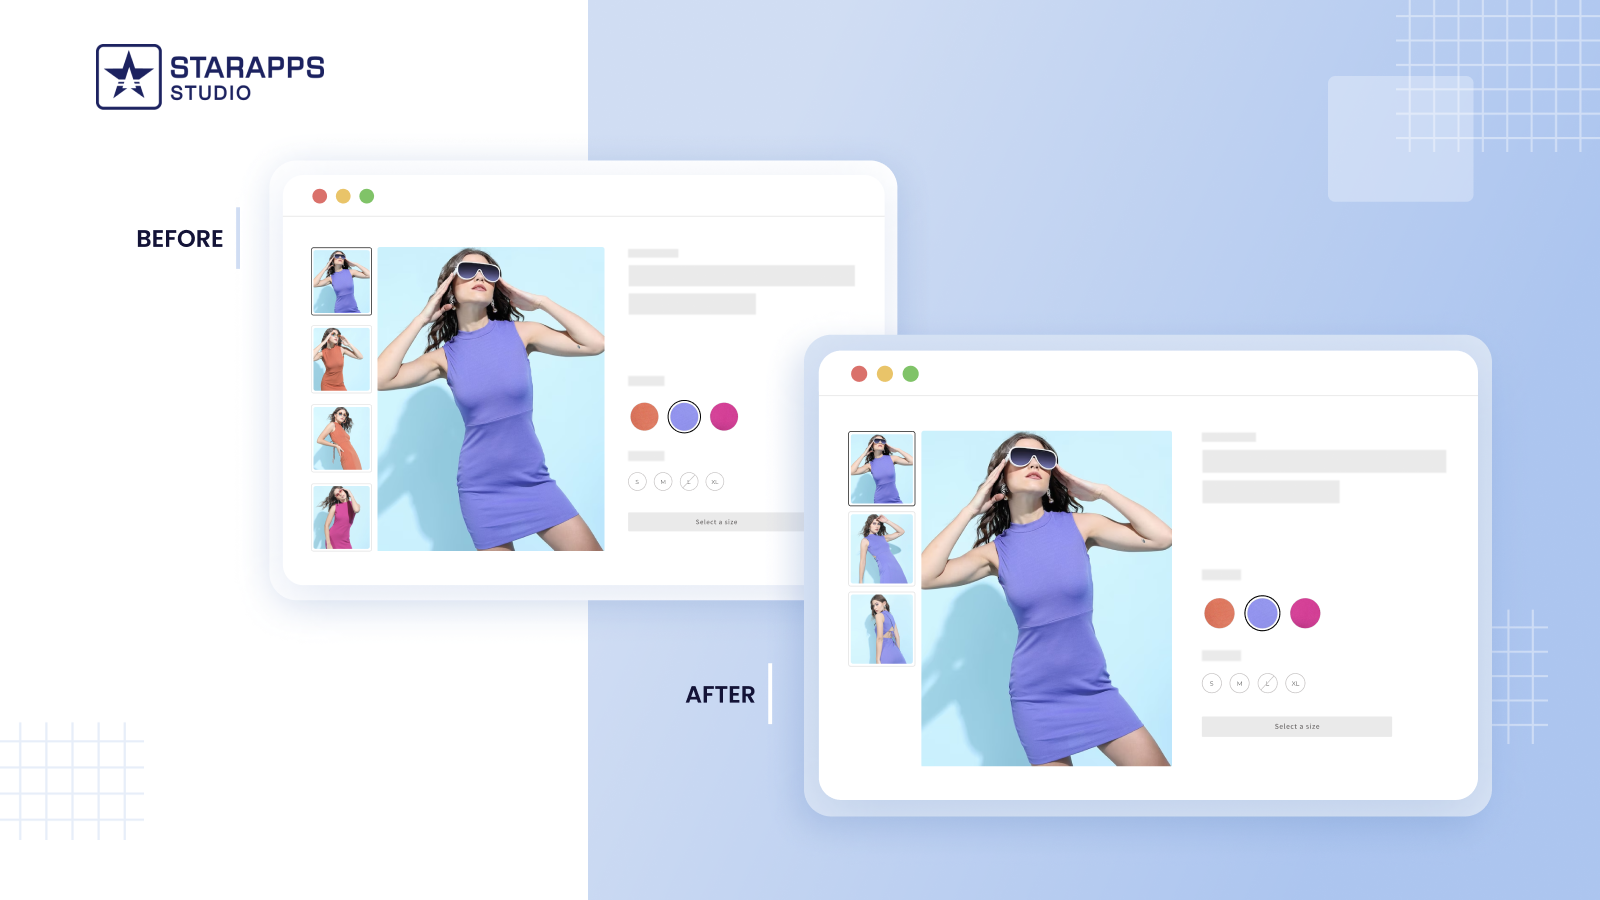
The best-known app for this job is Variant Image Automator. It is built specifically to show only relevant images for the selected variant without requiring theme edits.
For merchants who do not want to touch code, this is usually the cleanest route. I have seen plenty of stores spend more time trying to force a theme hack than they would have spent installing a purpose-built app in the first place.

Variant Image Automator is designed to auto-assign and display the right images for each variant. It is especially useful if your theme does not support variant media filtering natively or if you want a setup that is easier to maintain over time.
Why would I use an app instead of code?
Use an app if you want faster setup, less theme risk, and better compatibility with different gallery layouts, swatches, and product page apps.
- No theme code edits needed in most cases
- Auto-assign images to variants without manual tagging
- Works across many themes, including custom setups
- Supports multiple images per variant
- Easier to uninstall than custom code if you change direction later
According to the app listing, it has strong merchant adoption and a high review score. As always, check the latest pricing, compatibility notes, and reviews directly on the Shopify App Store before installing.
How should I organise product media before hiding variant images?
You should organise product media by grouping shared images separately from variant-specific images and making sure each variant is correctly linked to its own media in Shopify admin.
This is the part many tutorials skip. The functionality only works well if your product media is organised cleanly. If your red images are attached to blue variants, or your gallery includes duplicate uploads with inconsistent alt text, no theme setting or app can fully rescue the experience.
- Upload all product media in a logical order
- Attach relevant images to the correct variants
- Keep shared lifestyle or detail images unattached if you want them visible for all variants
- Test every variant on mobile and desktop
- Check what happens on page load before a variant is selected
In my experience, image order matters almost as much as image assignment. Some themes use the first media item as the default hero image, while others switch immediately to the first selected variant image.
What problems should I watch out for?
The most common problems are theme incompatibility, hidden images still loading, and accidentally hiding useful non-variant media like size charts or detail shots.
Here are the issues I see most often when merchants try to implement this themselves:
- The theme setting exists but does not behave as expected because the theme has custom swatches or a third-party gallery
- Non-variant images disappear too, even though you wanted to keep them
- Variant changes update the hero image but not the thumbnails
- Mobile sliders behave differently from desktop galleries
- Theme updates overwrite custom edits
- Accessibility suffers if hidden content is still focusable or announced incorrectly
If you are editing code, test keyboard navigation, zoom behaviour, and any image slider app you use. Product media is one of the most interconnected parts of a Shopify theme, especially when reviews, videos, badges, and upsell widgets are also present.
Does hiding variant images improve conversions?
It can improve conversions if it reduces confusion and helps shoppers understand exactly what they are buying. The biggest gains usually come from clarity, not from the hiding mechanic itself.
I would be cautious with dramatic conversion claims here. Every store is different. What I can say from experience is that stores with lots of colour or style variants often benefit from a cleaner gallery because the product page feels more intentional and easier to scan.
This matters even more if you are using upsells or cross-sells on the same page. A cluttered gallery competes for attention. A cleaner gallery makes supporting elements easier to absorb. If that is part of your strategy, you may also like How to Cross-Sell Matching Variants and Boost Your Shopify Store’s AOV in 2025.
Should I hire a developer or Shopify expert?
You should hire a developer if your theme does not support the behaviour you want, you need a custom gallery experience, or you have already tried app and theme settings without success.
If you are on a Shopify-made theme, start with Shopify’s own documentation and support resources. If you are on a third-party theme, the theme developer is often the best first stop because they know how their gallery is structured. For custom work, you can also use the Shopify Partner Directory.
My rule of thumb is simple:
- Use the customiser if it works
- Use an app if you want no-code reliability
- Use a developer if you need exact behaviour across a custom product page
What is my recommended approach for most Shopify stores?
My recommended approach is to check for the built-in theme setting first, then use an app if the result is not good enough, and only move to custom code when you need very specific logic.
That order saves time, reduces risk, and matches what most merchants actually need. The current search intent for this topic is very practical. People want the fastest route to clean product galleries, not a complicated engineering project unless it is necessary.
So if you want the short version of my real-world advice:
- Check your theme customiser for Hide other variants' media after selecting a variant
- Test whether it keeps or hides shared images the way you want
- If not, try Variant Image Automator
- If you need exact control, duplicate your theme and implement a custom Liquid and JavaScript solution
That is the most practical path for 2026. It covers modern Shopify themes, older third-party themes, and stores that need more than the default gallery behaviour.
Final thoughts on hiding variant images from the product page in Shopify
Hiding variant images from the product page in Shopify is no longer a purely custom-code task. Many themes now support it natively, but the best solution still depends on how your product media is structured and what you want shoppers to see before and after variant selection.
In my experience, the stores that get this right are the ones that think beyond the toggle itself. They organise media properly, test the gallery on mobile, and decide whether shared images should stay visible. That is what turns a basic variant setup into a genuinely better product page.
If you are making broader product page improvements, it is also worth reviewing related UX details like image sizing, default media, and variant behaviour. Small fixes there often have just as much impact as hiding the extra variant images.