
If you want a branded email address like [email protected] while using Shopify, the short answer is simple: Shopify does not provide full email hosting. You can use free email forwarding on a Shopify-managed domain, or connect a third-party email host such as Google Workspace, Zoho Mail, Microsoft 365, or Titan.
I have worked with Shopify stores for years and built apps in this ecosystem, and this is one of the most common setup questions I still get. Merchants often assume buying a domain through Shopify also gives them inboxes. It does not. What Shopify gives you is domain management, email forwarding, and the ability to connect a proper mail provider.
That distinction matters because a professional email address affects customer trust, deliverability, and brand consistency. If you are replying to customers from a personal Gmail address while your store uses a custom domain, it looks messy and can undermine confidence.
Do you get a custom email address with Shopify?
No, Shopify does not include full email hosting. Shopify lets you buy or connect a domain and create forwarding addresses, but you need a separate provider if you want to send and receive email from that address.
This is exactly how Shopify documents it in its own help centre. If your domain is managed by Shopify, you can add forwarding addresses in admin, but for a real mailbox you must connect an external provider. Shopify officially supports guided setup for email hosting on custom domains, and the process is now clearer than it used to be.
In practical terms, there are two different setups:
- Email forwarding - receive-only, usually free
- Email hosting - full inbox with send and receive, paid in most cases
What is the difference between email forwarding and email hosting?
Email forwarding sends messages on to another inbox. Email hosting gives you an actual mailbox on your domain with outgoing and incoming mail.
This is where many Shopify merchants get caught out. They create [email protected], test it, see the message arrive in Gmail, and assume everything is done. Then they hit reply and realise the email goes out from [email protected] instead of the branded address.
In my experience, forwarding is fine for a very early-stage store, especially if you only want a contact address on your website. But if you handle customer support, wholesale, returns, or supplier communication, proper email hosting is the better long-term setup.
| Feature | Email Forwarding | Full Email Hosting |
|---|---|---|
| Receive emails at your domain | Yes | Yes |
| Send from your domain | No | Yes |
| Usually free | Yes | Not always |
| Best for | Very small stores and startups | Professional support and team communication |
| Works directly in Shopify admin | Yes, for Shopify-managed domains | Partly, but requires external provider |
How do I get a custom email address like [email protected] if I am hosted with Shopify?
You need a custom domain first, then choose between forwarding or full hosting. If you only need incoming mail, use Shopify's forwarding. If you want a real inbox, connect a third-party mail host.
The process is straightforward once you separate the domain from the mailbox. Shopify can host your storefront and manage your domain DNS, but the mailbox itself sits elsewhere. That is normal, and it is the same setup I have seen across plenty of Shopify stores, from tiny one-product brands to larger teams.
- Get a custom domain connected to Shopify
- Decide whether you need forwarding or full hosting
- Add the required DNS records if using an email host
- Create your mailbox or forwarding address
- Test sending, receiving, and authentication
Do I need a custom domain before setting up email?
Yes, you need your own domain to use a branded email address. You cannot create a proper custom email address on the default yourstore.myshopify.com domain.
If you have not bought a domain yet, do that first. You can buy one through Shopify or connect one from another registrar. If you need help with domain structure, subdomains, or URL setup, I have covered related topics in How Best to Create Custom Urls on Shopify and How to Configure Subdomains for Shopify Store in 2026.
Once the domain is connected, Shopify-managed domains make forwarding especially easy. Third-party domains work too, but you will often spend a bit more time editing DNS manually.
How do I set up free email forwarding on Shopify?
Shopify offers free email forwarding for Shopify-managed domains. This lets you create addresses like [email protected] and forward them to Gmail, Outlook, or another inbox.
This is the fastest option and often the cheapest. For solo founders, it can be enough for a while. I still suggest using it only as a temporary solution if customer-facing communication matters to your brand.
- In Shopify admin, go to Settings > Domains
- Click Manage next to your Shopify-managed domain
- Find the Emails section
- Click Add forwarding email address
- Enter the prefix, such as hello or support
- Enter the destination inbox, such as your Gmail address
- Click Save
- Send a test email to confirm it works
Important limitation: forwarding alone does not give you a mailbox. You can receive messages sent to your branded address, but you cannot properly send from it unless you add a third-party service.
If you also send automated store emails, it is worth reviewing your broader email setup. Related guides that can help are How to Check Emails Sent to Your Customers from Shopify and Essential DMARC Email Setup for Shopify Merchants.
What is the best email hosting provider for Shopify?
The best email host for Shopify depends on your budget and workflow. For most merchants, Google Workspace is the easiest premium option, while Zoho Mail is often the best low-cost choice.
Shopify's own documentation commonly references Zoho Mail and Google Workspace, but they are not your only options. I have also seen merchants use Microsoft 365 and Titan successfully, especially when they already use those ecosystems elsewhere in the business.
| Provider | Starting price | Best for | Key notes |
|---|---|---|---|
| Google Workspace | From about $6/user/month | Best for most Shopify stores | Gmail interface, reliable deliverability, easy team collaboration |
| Zoho Mail | Free plan available on some tiers, paid plans available | Best for budget-conscious startups | Often supports up to 5 users on entry-level free offering, around 5GB/user |
| Microsoft 365 | Varies by plan | Teams already using Outlook and Office | Strong for established businesses and internal operations |
| Titan | Varies by provider | Simple business email setup | Often bundled by registrars or hosting providers |
Is Zoho Mail a good option for Shopify?
Yes, Zoho Mail is a strong low-cost option for Shopify merchants. It is especially good if you want a branded inbox without paying Google Workspace prices for every team member.
For small stores, Zoho can be excellent value. It usually gives you enough storage and the core features you need for support, order issues, and supplier communication. I have recommended it to merchants who want to look professional without adding another recurring cost too early.

Is Google Workspace worth it for Shopify stores?
Yes, Google Workspace is worth it if email is business-critical. It is usually the smoothest option for merchants who want reliability, familiar tools, and easy staff onboarding.
In my experience, Google Workspace tends to be the easiest recommendation when a store is growing. Gmail is familiar, search is excellent, and sharing access across support, operations, and founders is straightforward. If you are already living in Google Docs, Drive, and Meet, the value is obvious.
As of recent pricing references, plans still start at roughly $6 per user per month, though exact pricing can vary by region and plan. For many stores, that cost is justified by better professionalism and less friction.
How do I connect a third-party email host to my Shopify domain?
You connect your email host by adding DNS records to your domain. In most cases, that means MX records for mail delivery plus TXT and sometimes CNAME records for verification and authentication.
If your domain is managed in Shopify, the setup is often easier because Shopify provides guided steps for some providers. If your domain is registered elsewhere, you do the same job in that registrar's DNS panel instead.
- Choose your provider, such as Google Workspace or Zoho Mail
- Create your account with the provider
- Verify ownership of your domain
- Add the provider's MX records to route incoming mail
- Add any required TXT records for verification, SPF, or DMARC
- Add DKIM records if your provider gives them
- Wait for DNS propagation, which can take up to 48 hours
- Create your mailbox, such as [email protected]
- Update your Shopify sender email where needed
Shopify's own help article on email hosting and forwarding is worth keeping open while you do this. It covers the current admin flow and confirms that adding MX records can affect existing forwarding behaviour.
Which DNS records matter for Shopify email setup?
The key records are MX, SPF, DKIM, and DMARC. MX tells the internet where to deliver mail, while SPF, DKIM, and DMARC help prove that your messages are legitimate.
This part is more important now than it was a few years ago. Gmail and Yahoo have tightened sender requirements, especially for branded domains and bulk sending. Even if you are only sending support replies and order-related messages, authentication matters for deliverability.
- MX - routes incoming email to your provider
- SPF - says which servers are allowed to send on behalf of your domain
- DKIM - cryptographically signs outgoing messages
- DMARC - tells receiving servers how to handle suspicious mail
If you skip authentication, your messages are more likely to land in spam or fail checks entirely. I strongly recommend reading Essential DMARC Email Setup for Shopify Merchants once your inbox is live.
How do I update my sender email in Shopify after setting up hosting?
After your mailbox works, update your store email settings in Shopify. This helps ensure customer-facing notifications and account details use the correct branded address.
Go to your Shopify admin and review the store contact details and sender email settings. Depending on your setup, you may also want to check notification templates and test actual customer emails. If you are working on branded notifications too, these guides may help: How to Change the Language of Email Templates in Shopify and How to Customize Confirmation Emails Based on Products Ordered in Shopify.
Always test with a real order or a preview workflow after changing sender details. I have seen merchants set up the mailbox perfectly but forget to update the sender address inside Shopify, which defeats the point.
How long does Shopify email setup take?
Basic forwarding can take a few minutes. Full email hosting usually takes 30 to 90 minutes to configure, plus up to 48 hours for DNS propagation.
In my experience, most of the actual work is quick. The waiting is what causes confusion. Merchants often assume something is broken when the real issue is simply that DNS changes have not fully propagated yet.
If you need this working urgently, set expectations properly. You can often create the mailbox quickly, but you should not promise your team or clients that every message will route perfectly within five minutes.
What are the most common problems when setting up a custom email on Shopify?
The most common problems are incorrect DNS records, conflicting forwarding settings, and missing authentication. Most issues are fixable once you know where to look.
Here are the problems I see most often when helping merchants:
- Wrong MX records - mail never reaches your inbox
- Old forwarding still enabled - causes confusion or conflicts
- Missing SPF or DKIM - outgoing mail lands in spam
- Using a personal reply-to address - replies look unprofessional
- Editing the wrong DNS zone - common with third-party registrars
- Not waiting for propagation - setup appears broken too early
If you are troubleshooting order notifications specifically, it is also worth checking your broader Shopify email behaviour. These posts can help: How to Disable Order Confirmation in Shopify Settings and How to Change the Tracking Number on Automatic Notifications in Shopify.
How to solve domain email problems with A, CNAME and MX configurations
Domain email problems usually happen when DNS records conflict. If your website points to Shopify but your mail records point somewhere invalid, email can stop working even though the store itself loads fine.
This older issue still comes up, especially on domains previously hosted with cPanel or another web host before moving the storefront to Shopify. The exact IPs and DNS values depend on your provider, so be careful with dated tutorials. The principle is still useful though: website records and mail records are separate, and changing one should not accidentally break the other.
How to solve domain email problems
Start by checking what currently controls your mail. Look at your existing MX, A, CNAME, and TXT records before changing anything, and keep a copy so you can roll back if needed.
If your domain used to be hosted on cPanel, Plesk, or a traditional web host, there may be legacy records left behind. Those old records can conflict with Shopify or your chosen email host. I always recommend taking screenshots before editing DNS.
For Cpanel and similar web hosts:
If your domain still relies on a cPanel-style setup for mail, you may need to separate the website CNAME from the mail records. This is only relevant if your DNS is still partly managed in that environment.
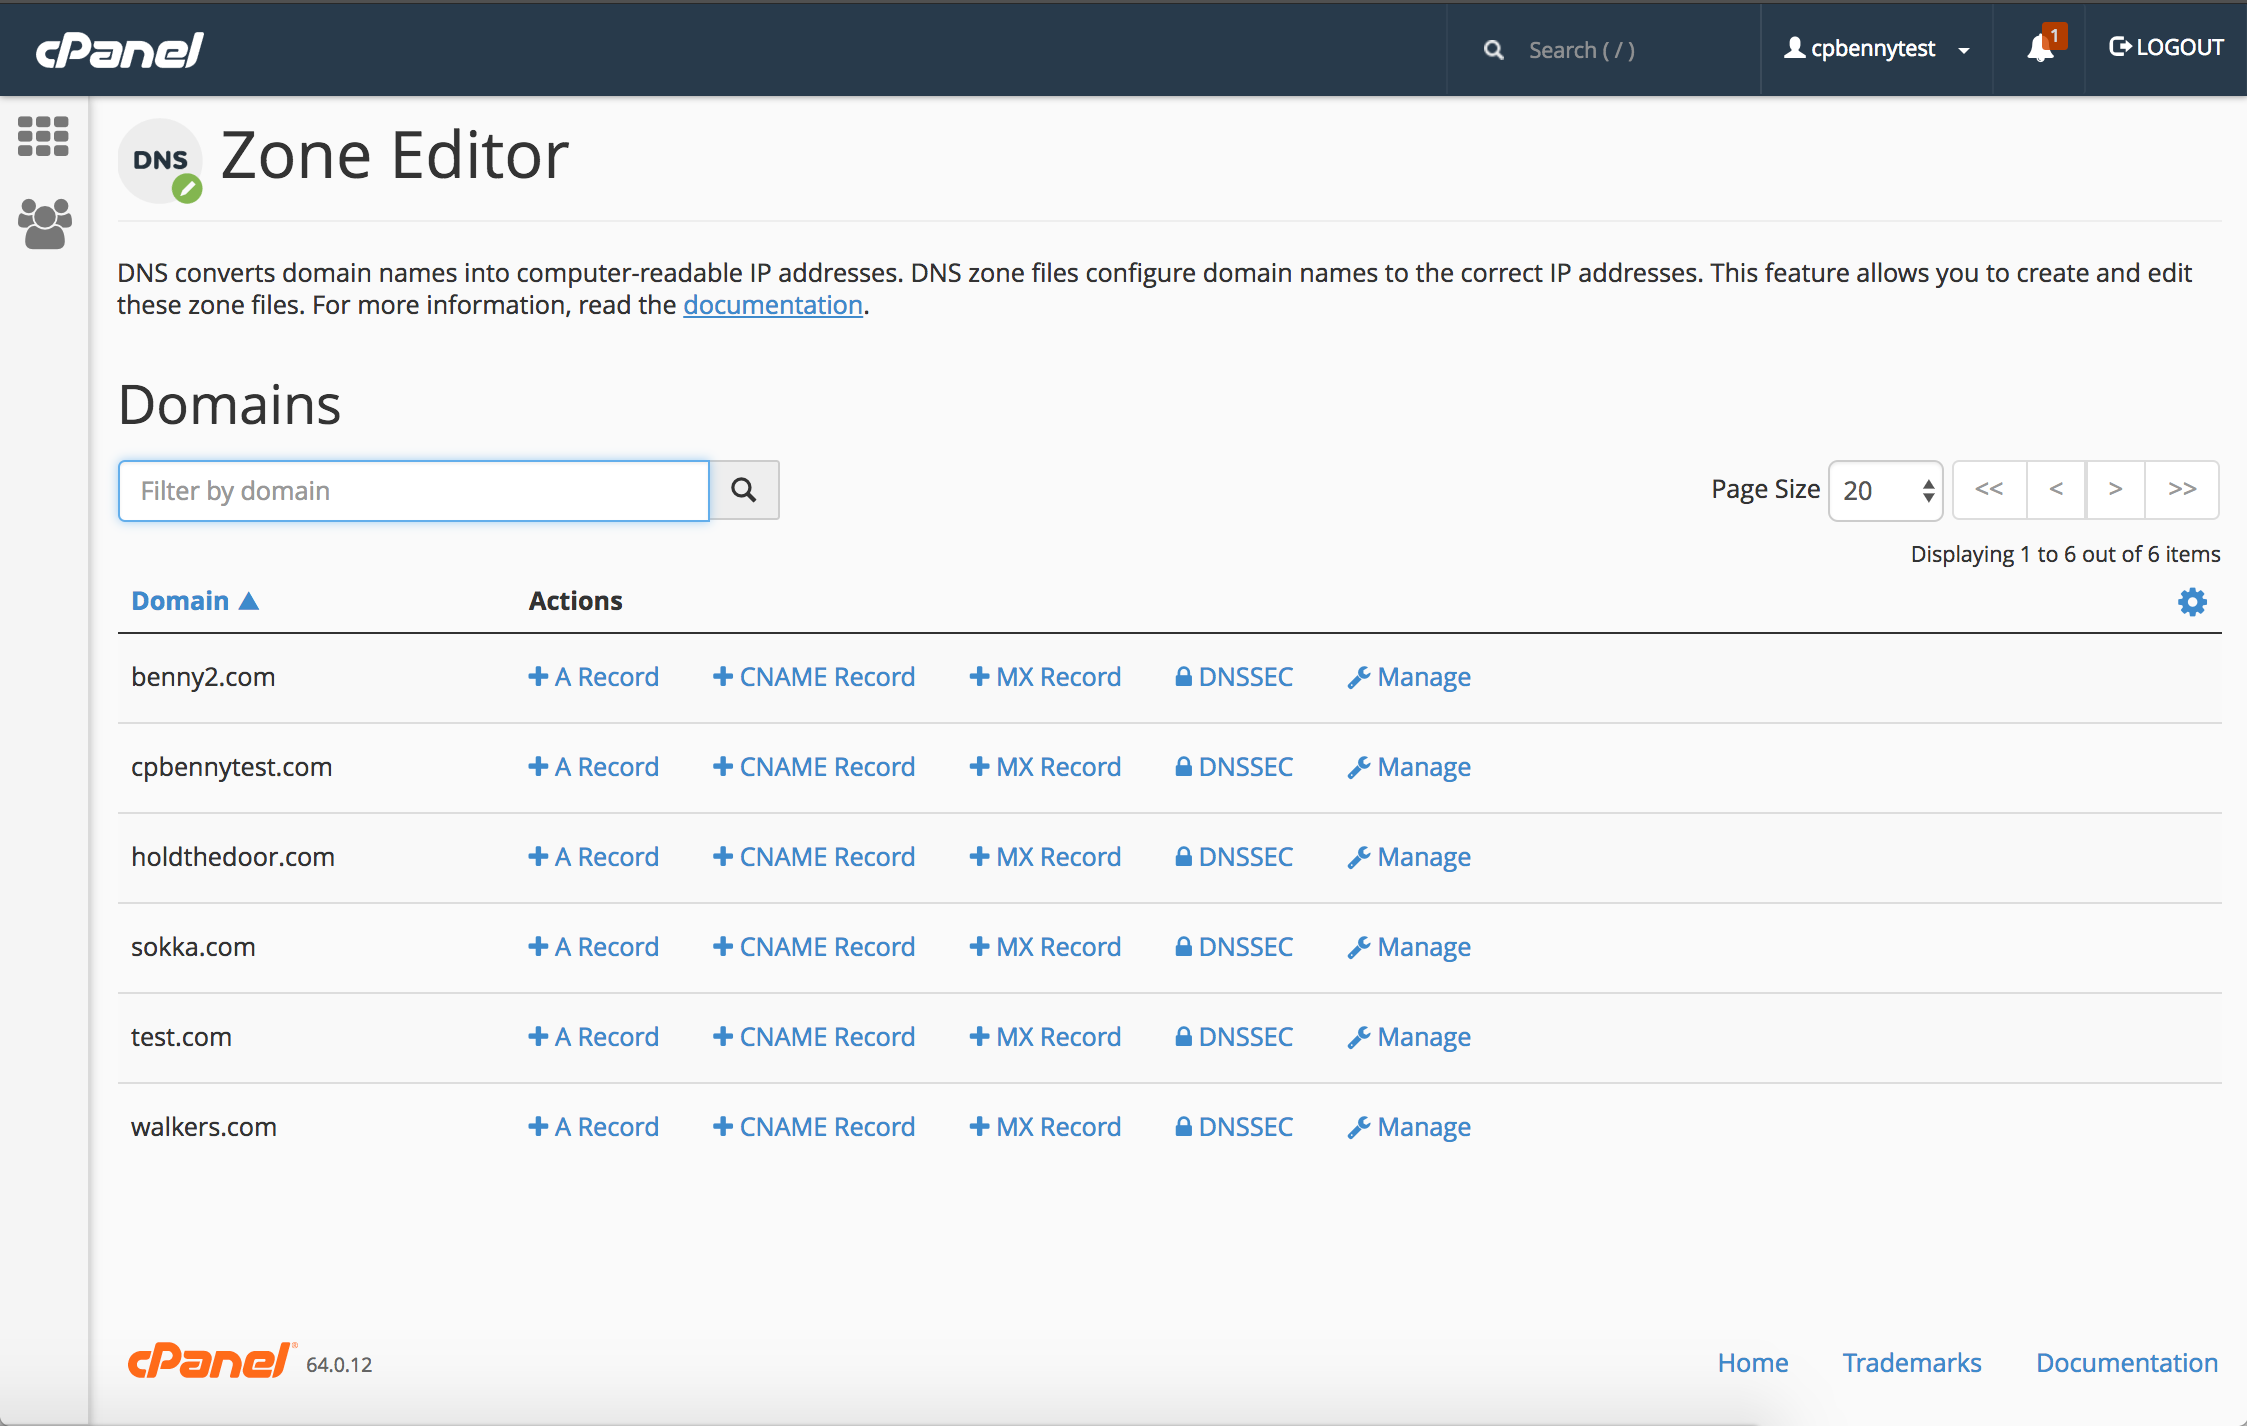
- Log in to cPanel and open the Advanced DNS Zone Editor or equivalent
- If you think previous edits were incorrect, consider resetting the zone only if you fully understand the impact
- Review the existing Zone File Records
- If mail.yourdomain.com is set as a CNAME, you may need to change it depending on your mail provider's instructions
- Check whether your root domain and mail host are pointing to the correct destinations
- Open the MX Entry section
- Confirm the MX record points to the correct mail host, often mail.yourdomain.com or your provider's server
- Keep the correct priority specified by your provider
- Make sure the email routing option is set appropriately, often Automatically Detect Configuration or the provider-specific equivalent
- Send a test email from an external address
The specific IP address and host values in old cPanel tutorials can become outdated, so do not copy them blindly. Always use the current DNS values from your email host. That matters far more than following a generic example.
If your domain is already connected to Shopify, you can often skip the storefront steps and focus only on the mail-related DNS. In other words, leave the Shopify web records alone and only adjust the MX, SPF, DKIM, and any mail subdomain records required by your provider.
If you are not comfortable editing DNS, get help. A Shopify Partner, a developer, or your email host's support team can usually sort this much faster than trial and error.
Is Shopify Email the same as email hosting?
No, Shopify Email is a marketing tool, not mailbox hosting. It helps you send campaigns and newsletters, but it does not replace Google Workspace or Zoho Mail.
This is another common source of confusion. Shopify Email is for promotional and marketing sends, with templates and reporting. It does not create inboxes like [email protected]. If you need better campaign templates, you might also like The Best Free Shopify Email Templates in 2026.
What is my recommended setup for most Shopify stores?
For most merchants, my recommendation is simple: use Google Workspace if email matters daily, or use Zoho Mail if you want the most budget-friendly professional setup.
If you are just launching and need to minimise spend, start with Shopify email forwarding. But as soon as you are handling support, supplier conversations, or wholesale enquiries, switch to full hosting. In my experience building Shopify apps and helping merchants configure stores, proper branded email is one of those small upgrades that punches above its weight.
It improves trust. It looks more polished. It also reduces confusion when staff members need shared access or when customers expect replies from the same address they contacted.
If you want the simplest path, this is the one I would follow:
- Buy or connect your domain
- Set up forwarding if you need a quick temporary fix
- Choose Google Workspace or Zoho Mail for a real inbox
- Add MX, SPF, DKIM, and DMARC properly
- Update your Shopify sender email and test everything
That gives you a setup that is professional, scalable, and much closer to what customers expect from a serious ecommerce brand in 2026.