The Shopify order status page is no longer just a basic confirmation screen. In 2026, it is a post-purchase touchpoint where you can reinforce your brand, reduce support queries, collect extra customer details, and even generate more revenue.
In my experience building Shopify apps and working with merchants on checkout-related features, this page is still badly underused. A lot of store owners focus heavily on product pages and cart drawers, but forget that the customer is often most engaged immediately after purchase, when trust is highest and payment details are already handled.
Shopify has also changed how this works. The old Additional Scripts and checkout.liquid approaches are effectively legacy now, and the modern route is through the checkout and accounts editor, app blocks, web pixels, and Checkout UI Extensions. If you are upgrading your checkout stack, this guide will show you the practical options that still work.
What is the Shopify order status page?
The Shopify order status page is the page customers see after checkout where they can review their order, check fulfilment progress, and return later for shipping updates. It is different from the initial thank you page, although Shopify groups both pages together in the same customisation system.
According to Shopify's order status page documentation, this page can show order details, tracking information, and options to receive shipping updates. If a supported carrier is used, customers can also see real-time shipment progress without contacting support.
That matters more than most merchants realise. A clear order status page can reduce "where is my order?" messages, improve trust, and create another chance to present relevant products or next steps.
How do I customize the order status page on Shopify?
The best way to customise the Shopify order status page is through the checkout and accounts editor. For more advanced use cases, you can use apps, Checkout UI Extensions, or legacy code only where it still applies historically.
If you want the short practical answer, there are 4 main methods merchants should know:
- Shopify admin and checkout editor for built-in branding and layout changes
- Page builder and app block apps for no-code enhancements
- Checkout UI Extensions for developer-led custom functionality
- Legacy code methods such as Additional Scripts and checkout.liquid, which are now deprecated or view-only
If you are starting from scratch today, I would strongly recommend focusing on methods 1 to 3. Method 4 is mainly relevant if you are auditing old customisations or planning a migration.
Method 1: How do I customize the order status page in Shopify admin?
The easiest method is to use Shopify's built-in checkout and accounts editor. This is the best option for most merchants because it is upgrade-safe, supported by Shopify, and does not rely on fragile custom code.
Shopify now treats the thank you and order status pages as part of its newer checkout extensibility framework. That means you can customise branding, add approved app blocks, and preview changes without touching template files.
How to access the checkout and accounts editor
You can access the editor from Settings > Checkout in your Shopify admin. From there, choose your checkout configuration and click Customize.
- Open Shopify Admin
- Go to Settings > Checkout
- Find the Configurations section
- Click Customize beside the active configuration
- Use the page selector to switch to Thank you or Order status
From there, you can adjust your branding and add supported app blocks. Shopify also lets you preview the experience against real order flows, which is useful when checking whether a block makes sense after purchase.
What can I change using the built-in editor?
With the built-in editor, you can customise the visual presentation and add approved functionality. This is ideal if you want a clean branded experience without developer overhead.
- Logo, colours, typography, and brand styling
- Layout blocks and page structure options
- App blocks for surveys, reviews, upsells, tracking, and more
- Pixels and event tracking through Shopify's newer systems
In my experience, merchants get the best results when they keep this page focused. The order status page should help customers track their order, feel reassured, and optionally take one useful next action. Too many widgets can make the page feel messy and hurt trust.
Who can use this method?
Most merchants can customise the thank you and order status pages with apps and branding controls. More advanced customisations for the earlier checkout steps still require Shopify Plus in many cases.
That distinction is important. A lot of articles still blur together checkout customisation and post-purchase customisation, but they are not the same thing. For this specific topic, the order status page is much more accessible than full checkout editing.
Method 2: What is the best no-code way to customise the order status page?
The best no-code option is to use page builder style apps or apps that provide app blocks for the thank you and order status pages. This is usually the fastest route for merchants who want upsells, surveys, tracking widgets, or social proof without hiring a developer.
Shopify itself points merchants towards App Store solutions for thank you and order status customisation. That reflects where the platform has moved: apps first, scripts second.
When should you use an app instead of built-in settings?
You should use an app when Shopify's default editor is not enough for your use case. Typical examples include post-purchase upsells, survey collection, review requests, or custom recommendation blocks.
I have seen this pattern repeatedly with merchants who want more than branding. They start with the default editor, realise they need extra logic or merchandising, and then add an app block layer on top.
Example: using an app for post-purchase upsells
One of the most practical uses of this page is to show a relevant offer after the order is placed. This works especially well for consumables, accessories, and low-friction add-ons.
![]()
SellUp is one option for adding post-purchase and upsell experiences. Because I build Shopify apps myself, I pay close attention to whether an app solves a single problem clearly or tries to do everything badly. In this case, the appeal is straightforward: show relevant offers after checkout without forcing merchants into a complicated setup.
If you are exploring this angle, I would also read our guides on how to upsell on Shopify in 2026, Shopify cart drawer upsells, and maximising revenue from product pages. The order status page works best when it is part of a broader AOV strategy, not a random add-on.

Comparison: built-in editor vs apps vs extensions
The right method depends on your technical ability, budget, and the kind of experience you want to create. Here is how I would compare them in practice.
| Method | Best for | Technical skill | Flexibility | My verdict |
|---|---|---|---|---|
| Shopify admin editor | Branding and simple enhancements | Low | Moderate | Best for most stores |
| App blocks / page builder apps | Upsells, surveys, reviews, tracking widgets | Low to medium | High | Best no-code growth option |
| Checkout UI Extensions | Custom workflows and bespoke logic | High | Very high | Best for developers and Plus-heavy teams |
| Additional Scripts / checkout.liquid | Legacy stores only | High | Previously high | Not worth building on now |
Method 3: How do developers customise the order status page with Checkout UI Extensions?
Developers customise the order status page with Checkout UI Extensions. This is the modern programmatic method for adding custom functionality to Shopify's thank you and order status pages.
According to Shopify's developer documentation, these extensions can render custom content on the page and access order-related data through the relevant APIs. That makes them suitable for use cases like custom surveys, product review prompts, loyalty messaging, or order-specific information panels.
What can Checkout UI Extensions do?
Checkout UI Extensions can add custom components in approved extension points on the page. They are far safer than old script injection because they run inside Shopify's supported framework.
- Display order-aware messages using order data
- Request feedback or NPS responses
- Prompt for reviews or referrals
- Show contextual recommendations
- Support tracking or event flows alongside web pixels
In my experience building apps, this is where Shopify is clearly heading. The platform wants customisation to be secure, performant, and upgrade-safe. Extensions fit that model far better than custom snippets pasted into a settings box.
When should merchants choose this route?
You should choose Checkout UI Extensions when you need logic that a standard app block cannot handle. This is especially useful for merchants with custom fulfilment flows, bespoke post-purchase messaging, or internal systems that need to surface information after checkout.
If you are not technical, I would not start here. It is usually better to validate the idea with an app first, then build a custom extension once the business case is proven.
Method 4: Can I still use Additional Scripts or checkout.liquid?
No, not for new builds. Additional Scripts is now effectively view-only for this use case, and checkout.liquid has been deprecated for the checkout flow and post-purchase pages.
This is one of the biggest changes merchants still get confused about. Many older tutorials recommend adding HTML, CSS, JavaScript, or Liquid directly to the order status page. That advice is outdated for modern Shopify stores.
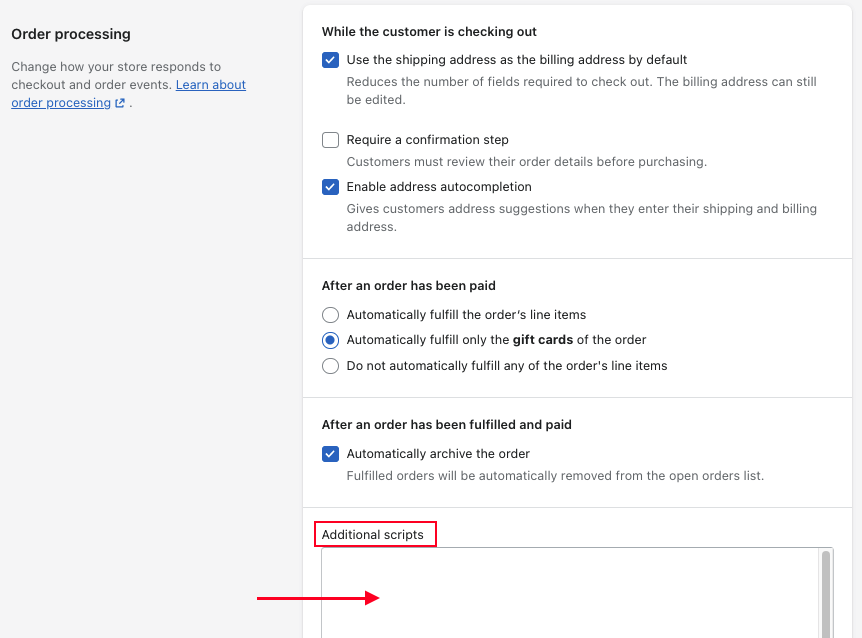
What happened to Additional Scripts?
As of late 2025, Shopify moved merchants away from the old Additional Scripts field for thank you and order status page customisation. The replacement stack is built around app pixels, web pixels, and app blocks.
That means if you previously used Additional Scripts for tracking, affiliate pixels, conversion tags, or custom content, you need to review what still works and migrate it properly. Shopify's own upgrade guidance in admin is the first place I would check.
- Open Shopify Admin
- Go to Settings > Checkout
- Review any legacy customisations and upgrade prompts
- Use Shopify's customisations report where available
What about checkout.liquid for Shopify Plus?
checkout.liquid is deprecated. Shopify Plus merchants now use Checkout Extensibility, Shopify Functions, and related APIs instead of editing checkout templates directly.
If you are on Plus, that does not mean you lost flexibility. It means the flexibility now comes through supported systems rather than direct template control. For many merchants, that is actually an improvement because it reduces breakage and makes Shop Pay compatibility easier to preserve.
If you are deciding whether these advanced features justify the upgrade, our guide on when to upgrade to Shopify Plus is a useful companion read.
How do I let customers opt in to order updates?
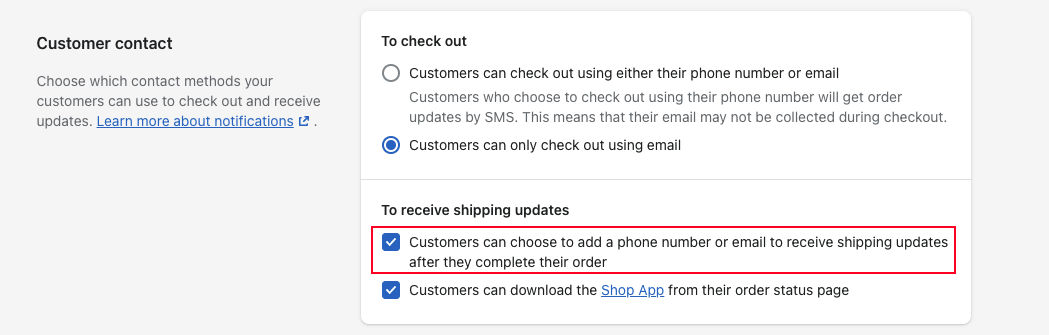
You can let customers opt in to order updates by enabling an additional contact method in Shopify checkout settings. This allows customers to add an email address or phone number on the order status page if they did not provide both during checkout.
This is one of those small settings that has a surprisingly practical impact. For stores with lots of mobile-first traffic, customers often check out with a phone number only, then later want email updates as well.
How to enable order updates for customers
Enable this setting in Shopify admin under checkout settings. It takes less than a minute to switch on.
- Go to Shopify Admin
- Select Settings > Checkout
- Find Customer contact
- Select Additional contact method
- Click Save
Once enabled, customers can add their email address or phone number from the order status page. That can help improve delivery communication and reduce missed updates.
How do I translate the order status page on Shopify?
You can translate the order status page through Shopify's language settings and checkout language content. If your store theme is already translated, much of the order status experience will follow that language automatically.
For merchants serving multiple regions, this matters a lot. A customer who buys in French or German but sees post-purchase messaging in English can feel like they have been pushed into a different system.
What text can you change?
You can change standard wording such as headings, labels, and system text under the Checkout and system language section. This is useful if you want to soften the tone or make it better fit your brand voice.
For example, you might want to change "Thank you, David" to "Thanks David" or use more formal wording for luxury brands. Small copy changes like this can make the page feel more consistent with the rest of your store.
Just be careful not to over-edit critical transactional language. In my experience, the best approach is to customise the tone while keeping the meaning crystal clear.
What is the URL of the Shopify order status page?
The order status page URL is unique to each order and customer. It contains order-specific identifiers, which is why there is no single public URL you can customise like a normal theme page.
If you want to see exactly what customers see, open a recent order in Shopify admin and use the view order status page option. That is the easiest way to preview the real customer-facing page for a live order.
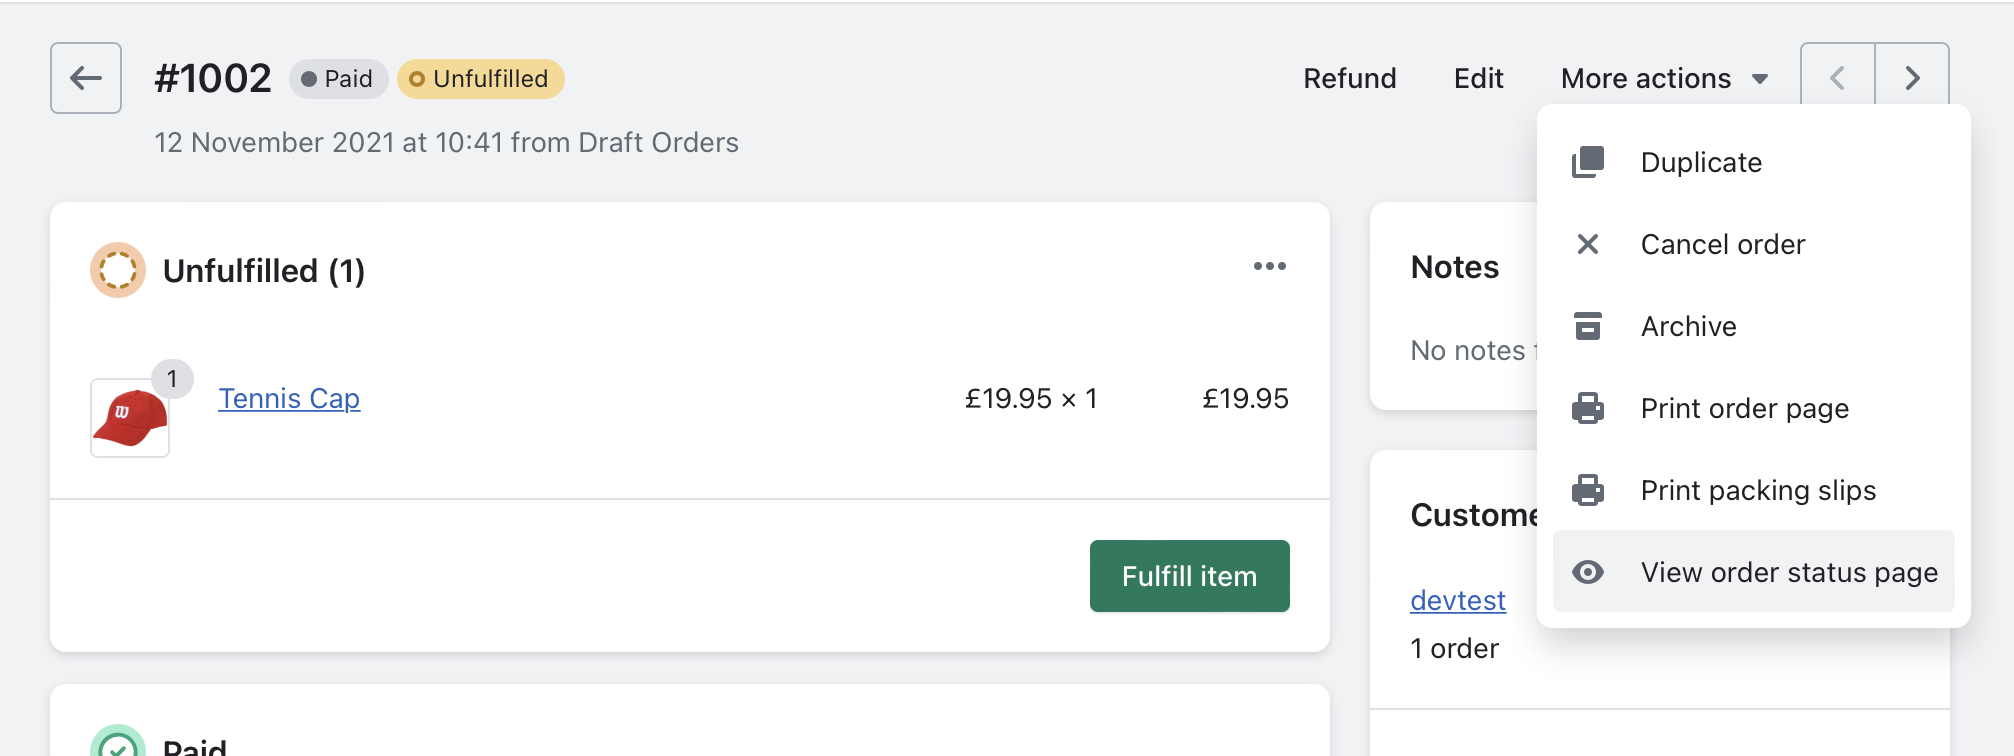
This unique URL structure is also why merchants sometimes get confused when trying to link to it manually in emails or navigation. Usually, Shopify handles this for you through its transactional emails and customer account flows.
What should I add to the order status page?
The best things to add are content blocks that improve clarity, reduce friction, or create a relevant next step. The page should not feel like a sales funnel first and a service page second.
When I test post-purchase experiences, the highest-performing additions are usually the simplest ones.
- Delivery or fulfilment expectations
- Tracking and support information
- Review or feedback requests
- Relevant cross-sells or upsells
- Loyalty, referral, or account creation prompts
If your business handles customised or made-to-order products, you may also want to connect this page with operational messaging. Our posts on tracking customised orders in Shopify and adding rush order options are useful if your fulfilment process is more complex than standard shipping.
What are the best practices for Shopify order status page customisation?
The best practices are to keep the page clear, branded, and useful. Focus on customer reassurance first, then monetisation second.
This is where many merchants go wrong. They treat the page like free ad space and forget that the customer's main question is still "Did my order go through and what happens next?"
Best practices I recommend
These are the principles I use when evaluating post-purchase implementations for Shopify stores.
- Keep the primary purpose obvious - order confirmation and tracking come first
- Use one main secondary action - such as a review request or relevant upsell
- Match your store branding - logo, colours, and tone should feel consistent
- Do not overload the page - too many widgets lower trust
- Track outcomes properly - use supported pixels and event tools
- Test by device type - mobile matters most for many stores
If you are also thinking about AI-driven merchandising and recommendations, our articles on AI-powered upsells, upselling on Shopify with AI, and optimising your Shopify store for AI shopping agents are worth reading next.
What mistakes should I avoid?
The biggest mistakes are relying on deprecated methods, cluttering the page, and treating it as an afterthought. A bad order status page creates confusion at the exact moment customers want reassurance.
Here are the most common problems I still see:
- Using old tutorials that recommend Additional Scripts for new setups
- Breaking consistency between storefront branding and post-purchase pages
- Adding too many offers instead of one relevant recommendation
- Ignoring translations for international stores
- Forgetting analytics migration when moving away from legacy scripts
If your tracking stack is messy, fix that before adding more layers. It is much easier to optimise a clean setup than to untangle years of pasted scripts later.
Which of the 4 methods is best for most Shopify merchants?
The best method for most Shopify merchants is the checkout and accounts editor combined with carefully chosen app blocks. It gives you enough flexibility for branding, tracking, and growth experiments without the maintenance burden of custom code.
If you are a developer or have a very specific workflow, Checkout UI Extensions are the modern advanced option. If you are still using Additional Scripts or checkout.liquid, treat that as technical debt to migrate rather than a foundation to keep building on.
That is the practical answer I would give any merchant today. Start simple, use supported tools, and make the order status page more useful before trying to make it more clever.