
The easiest way to add monogram options to products in Shopify is to use a product options app rather than native variants. In most cases, that gives you custom text fields, letter dropdowns, live previews, pricing add-ons and better order handling without having to edit theme code.
I build Shopify apps for a living, and I’ve seen this same problem come up again and again for stores selling jewellery, embroidered goods, gifts, wedding products and personalised homeware. Merchants want customers to enter initials, pick a monogram style, choose thread colour, maybe pay an extra fee, and then have all of that show up cleanly in the order. Shopify can support this, but not elegantly with variants alone.
If you want the short practical answer, use a dedicated app such as Zepto Product Personalizer or Infinite Options. If you are comfortable with Liquid and line item properties, you can also build a basic version yourself, but that route is usually slower to maintain and less polished for customers.
Why is adding monogram options in Shopify tricky?
Adding monogram options is tricky because Shopify variants are limited and are not designed for flexible personalisation inputs. Native variants work well for size and colour, but they are a poor fit for initials, engraving text, placement instructions and style previews.
Shopify products are limited to three option types and a finite set of variant combinations. That becomes a problem quickly if you want first, middle and last initials, plus font, plus thread colour, plus placement, plus gift box, plus rush production. In my experience, merchants often start by trying to force all of this into variants and then realise the product setup becomes impossible to manage.
There is also the customer experience issue. A monogram order needs clear inputs, validation and ideally a visual preview. If the form is clunky, customers hesitate, enter the wrong initials, or abandon the page altogether.
That is why most stores use either line item properties added through custom code, or a product options app that handles the front end and order data for you.
What is the best way to add monogram options to Shopify products?
The best way for most merchants is an app. It is faster to launch, easier to maintain, and usually gives you more control over pricing, previews and conditional logic than a custom-coded setup.
When I test stores with personalisation features, the best-performing setups usually have three things in common: simple inputs, clear pricing, and a preview or formatting guide. Apps are built specifically for that. They also reduce the chance of orders coming through with missing initials or confusing notes.
If you only need a single text field on a small number of products, custom code can work. But if you want a polished monogram workflow that can scale to multiple products or collections, an app is usually the most efficient option.
How do I add monogram options without an app?
You can add monogram options without an app by using Shopify line item properties in your theme. This is the lower-cost route, but it requires theme editing and gives you fewer advanced features.
First off, you can follow this guide to add cart line items. It includes approaches for sectioned and non-sectioned themes. You will need to work with the code a little, but it is a solid option if you want to handle the process natively without apps.
The caveat is that a native setup usually lacks live previews, conditional logic, pricing rules, validation and a more polished customer experience. You also need to maintain the code when your theme changes. If you switch themes later, you may need to reimplement the custom fields.
There is also a difference between collecting data and creating a good buying experience. A plain text input can technically capture initials, but that does not mean it will convert as well as a guided monogram builder.
What does the no-app method usually involve?
The no-app method usually involves adding custom form fields to the product template and passing that data as line item properties into the cart and order. It works, but it is a developer task rather than a merchant-friendly setup.
- Create inputs on the product form for initials, font choice, thread colour or placement.
- Name those inputs correctly so Shopify saves them as line item properties.
- Make sure the selected values appear in the cart and order admin.
- Add any validation with JavaScript if you want to limit character count or force required fields.
- Test thoroughly on mobile, accelerated checkout buttons and different themes.
If you are considering this route, Shopify community threads on metafields and customisation can help, including this discussion about creating a monogram metafield. Just be aware that metafields store data, while line item properties capture customer-specific order inputs. For monograms, order-specific inputs are usually what you actually need.
When should I use an app instead of custom code?
You should use an app if you want faster setup, easier maintenance, visual customisation features or the ability to charge extra for monogramming. For most stores, that is the right call.
In my experience building Shopify apps, merchants underestimate how much edge-case behaviour sits around product forms. Dynamic checkout buttons, theme app extensions, cart drawers, mobile layouts and order data formatting all matter. A good app has already solved most of that.
Apps also make it easier to expand later. Today you may only need initials. Next month you may want gift messages, file uploads, rush production or bundle add-ons. Starting with the right infrastructure saves a lot of rework.
If you are already thinking about add-ons and upsells around personalisation, you might also want to read how to display customizable add-ons and upsells on Shopify and how to create product add-ons for your Shopify store.
Which Shopify apps are best for monogram options?
The best Shopify apps for monogram options are usually the ones that support text inputs, dropdowns, pricing add-ons and product assignment rules. For most merchants, Zepto Product Personalizer and Infinite Options are two of the strongest starting points.
There are other tools in the market, including Bold-style product options apps and newer option-set tools, but the two below are reliable choices for merchants who want to get live quickly. I have included them here because they are established, flexible and easy to understand for store owners who are not developers.
| App | Best for | Key monogram features | Pricing signal |
|---|---|---|---|
| Zepto Product Personalizer | Best for visual personalisation | Text inputs, monogram fields, custom fonts, live preview, conditional logic, dynamic pricing | Starts from $9.99 |
| Infinite Options | Best for simple flexible options | Text boxes, dropdowns, swatches, add-on charges, product option sets | Free plan available / paid tiers |
A good rule of thumb is this: if your customer needs to see the monogram before buying, choose a visual customiser. If you just need to collect initials and maybe charge extra, a simpler options app is often enough.
Is Zepto Product Personalizer good for monograms?
Yes, Zepto Product Personalizer is one of the better options for monograms if you want a more premium buying experience. It is especially useful when font choice, style selection and previewing matter to the sale.
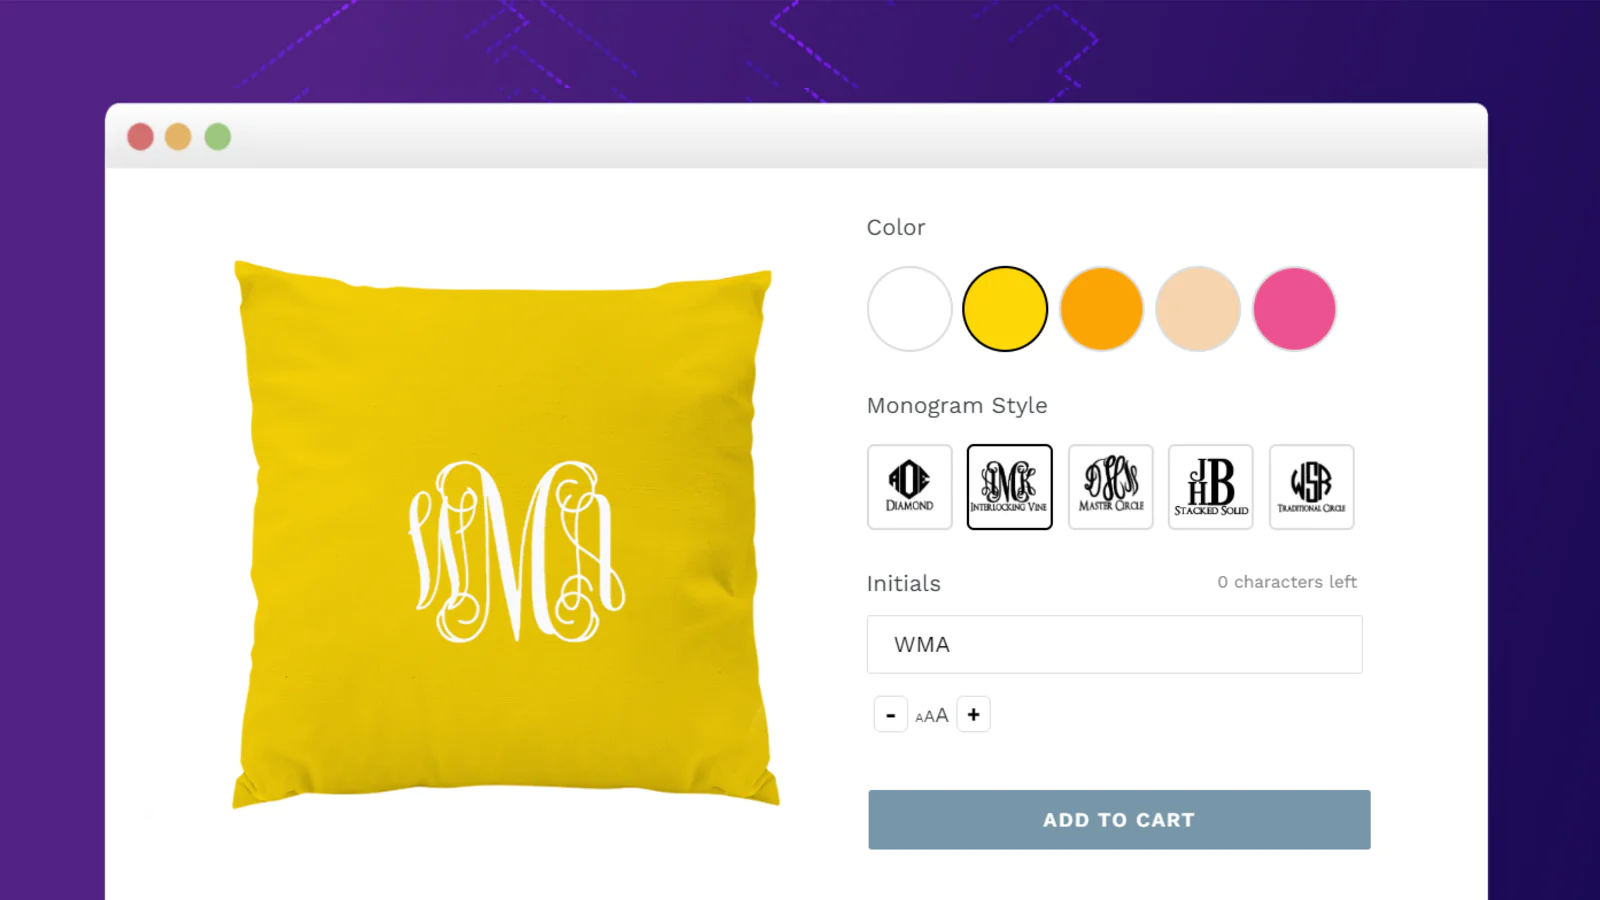

Zepto Product Personalizer gives merchants a wide range of personalisation controls, including text and monogram inputs, custom fonts, colour selections, upload fields, buttons and dropdowns. For stores selling premium personalised products, that flexibility matters because customers often want more than a plain initials field.
One of its strongest features is live customisation. Customers can see their chosen text or style update in real time, which helps reduce mistakes and gives them more confidence before checkout. That is particularly valuable for monogrammed gifts, where a typo can turn into a refund or remake.
The app also supports conditional logic and dynamic pricing. So if a customer selects a premium font, extra placement, or a longer engraving option, you can handle that cleanly. In my experience, this kind of structure is much easier to scale than trying to recreate the same logic with theme code.
Zepto is a strong fit if you sell products where the personalisation itself is part of the value proposition. Think jewellery, robes, bridal gifts, stationery, leather goods and embroidered accessories. If presentation matters, this is often the better choice.
Is Infinite Options good for monograms?
Yes, Infinite Options is a very good choice for merchants who want to add monogram fields quickly without overcomplicating the setup. It is simpler than a full visual customiser, but still flexible enough for many stores.
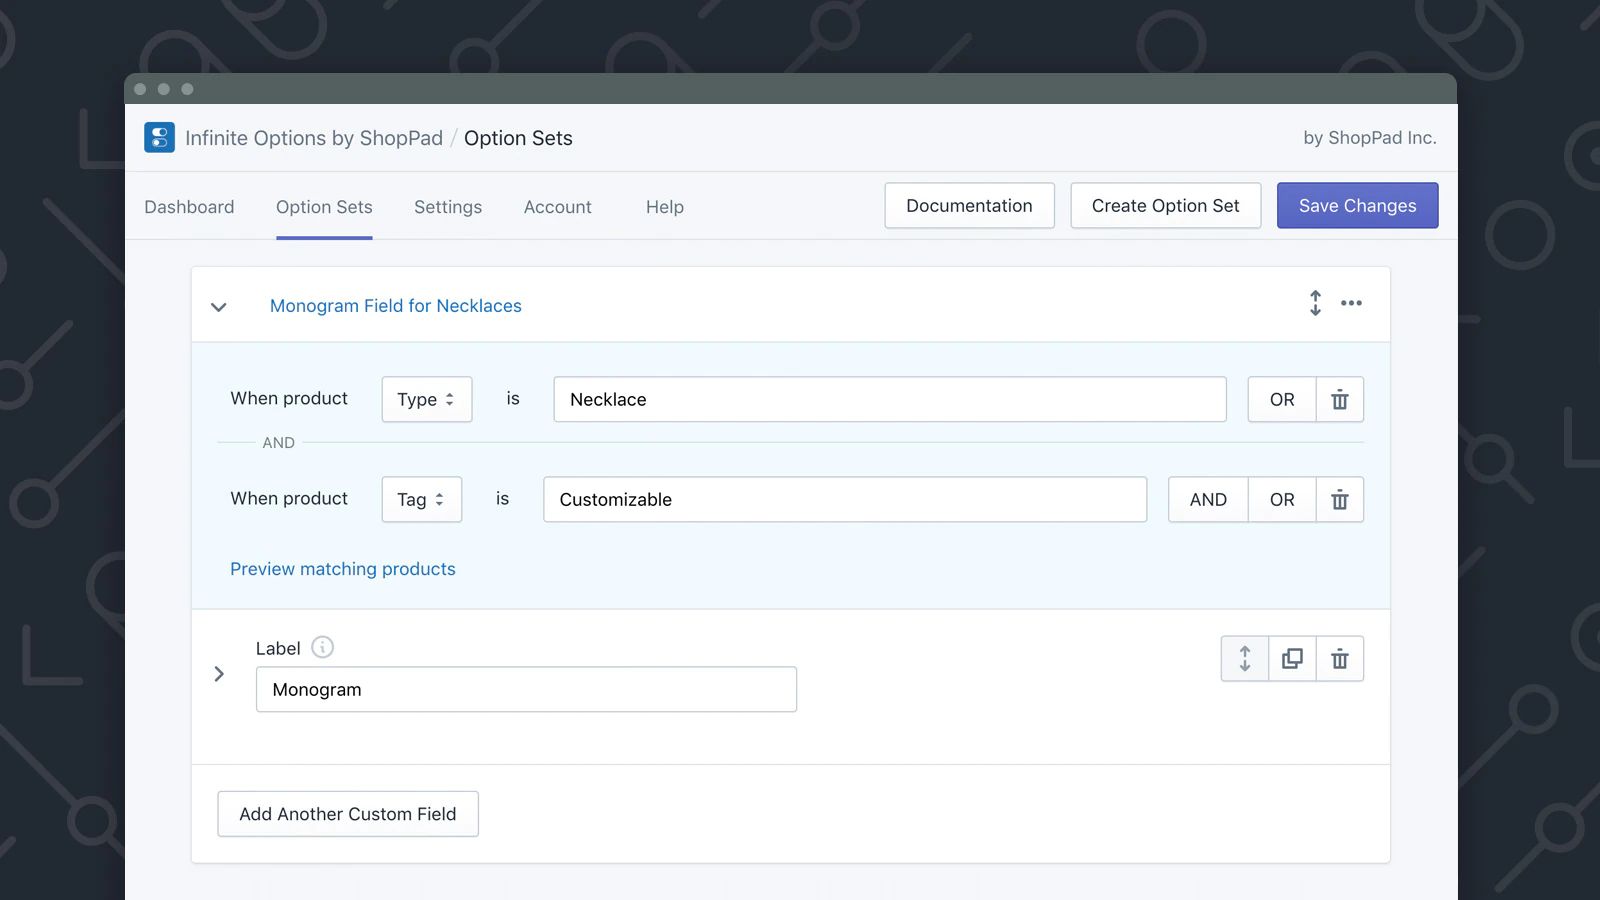
Infinite Options lets you add text fields, dropdowns, radio buttons, swatches and product add-ons to products without needing to create endless variants. For monogramming, that usually means you can collect initials, font choice, thread colour and placement in a clean, manageable way.
It is also useful if you want to attach surcharges for personalisation. For example, you might charge an extra £10 or £25 for embroidered initials, gift wrapping or rush handling. That can increase average order value while keeping the product page straightforward.
For merchants who do not need a heavy visual preview, Infinite Options often hits the sweet spot between ease of use and practical flexibility. I would call it best for beginners and lean teams who want a dependable setup that works across multiple products.
How do I set up monogram options step by step?
The basic setup is straightforward: install an app, create the monogram fields, assign them to products, test the order flow, and make the instructions clear on the product page. The key is to keep the form simple enough that customers do not get confused.
- Choose your monogram format. Decide whether customers enter one initial, three initials, a full name, or a short phrase.
- Create the fields. Add text boxes or dropdowns for each required input, such as first initial, centre initial, last initial, font and thread colour.
- Add pricing rules. If monogramming costs extra, set a fixed fee or conditional surcharge.
- Assign the option set. Apply it to specific products, tags or collections.
- Add clear instructions. Explain the order format, such as traditional monogram order where the surname initial is larger in the centre.
- Test on mobile and desktop. Place a test order and confirm the monogram data appears correctly in the cart, checkout and order admin.
- Train fulfilment. Make sure your production or packing workflow can read the monogram data consistently.
That last step gets missed more often than you would think. A monogram setup is only successful if the production team can read the order and fulfil it accurately. In my experience, clear field labels matter as much as the app itself.
What fields should I include for a monogram product?
The best monogram forms include only the fields needed to complete the order accurately. Too many choices can lower conversion rates, while too few can create fulfilment mistakes.
- Initials or name - one field or separate first, middle and last initial fields
- Monogram style - block, script, diamond, circle or custom style names
- Font choice - if style and font are separate
- Thread or print colour - especially for embroidery
- Placement - cuff, chest, corner, inside cover, etc.
- Special instructions - optional notes for edge cases
- Personalisation fee - shown clearly before add to cart
If you also sell extras like gift boxes or rush production, those can be included in the same option set. For that, see how to add a rush order or production option to your Shopify store.
Should I use text fields or dropdowns for initials?
Dropdowns are better for strict control, while text fields are better for flexibility. The right choice depends on whether you want to prevent errors or allow broader personalisation.
For classic three-letter monograms, dropdowns for A-Z are often the safest choice. They reduce typos, keep formatting clean and make fulfilment easier. This is also the approach shown in older tutorials for product options apps, where each initial is selected from a list rather than typed manually.
Text fields are better when you want names, dates, phrases or less structured engraving. The trade-off is that you need stronger validation, character limits and clearer instructions. If you go with text fields, I strongly recommend setting a maximum length and showing examples.
For many stores, the best setup is a hybrid: dropdowns for initials, swatches for colour, and a short optional note field.
Can I charge extra for monogramming in Shopify?
Yes, you can charge extra for monogramming in Shopify, and most product options apps support this directly. This is one of the biggest reasons merchants choose apps over native theme code.
Common pricing models include a flat fee per product, a premium fee for certain fonts or placements, or a rush fee if the customer wants faster production. Dynamic pricing is particularly useful when the base product stays the same but the customisation changes the labour involved.
From a conversion point of view, I have found that monogram charges work best when they are transparent and justified. If the fee appears only at the last moment, customers feel misled. If it is shown clearly next to the option, they are much more likely to accept it.
Personalisation is also one of the cleaner ways to increase average order value. Industry-wide ecommerce data often shows that tailored products command a premium, and Shopify’s own content on product customisation highlights the willingness of shoppers to pay more for personalised items.
What are the biggest mistakes to avoid?
The biggest mistakes are unclear instructions, poor mobile UX, and failing to test how monogram data reaches the order. Even a good app setup can underperform if the product page is confusing.
- Not explaining monogram order - customers may not know whether initials should be first-last-middle or first-middle-last
- No preview or example image - shoppers hesitate when they cannot visualise the result
- Too many required fields - this can hurt conversions
- Forgetting mobile testing - a lot of personalised gift shopping happens on mobile
- Not validating text length - this creates fulfilment issues
- Not testing cart and order admin - the data must appear clearly after purchase
- Using variants for everything - this makes product management messy very quickly
If you are improving product page UX more broadly, you may also find these useful: how to add an image slider to products in Shopify and adding a notes field to storefront products on Shopify.
How can I improve conversion rates on personalised products?
The best way to improve conversion rates on personalised products is to make the customisation process feel easy and low-risk. Customers need confidence that they are ordering the right thing.
In practice, that means showing examples, limiting confusion, and reducing form friction. A simple example like “Traditional monogram: First, Last, Middle” can prevent a surprising number of support tickets. A visual preview can do even more.
I also recommend placing the personalisation section close to the add-to-cart area and making the pricing obvious. If the monogram option feels bolted on or hidden, it usually performs worse. If it feels like a natural part of the product, it tends to convert better.
For stores focused on lifting order value, personalised products pair well with add-ons, bundles and post-purchase offers. You can explore that in how to increase Shopify sales without additional products and how to add multiple products to the cart with one button on Shopify.
What is my verdict on the easiest way to add monogram options in Shopify?
The easiest and most reliable way is still to use a dedicated product options app. For most merchants, that is the fastest path to a clean customer experience and accurate order data.
If you want a more visual, premium setup, I would start with Zepto Product Personalizer. If you want a simpler and more lightweight way to collect initials and related choices, Infinite Options is a strong option.
Custom code still has a place, especially for stores with very specific requirements or in-house development resources. But for most merchants I speak to, the real goal is not just collecting initials. It is selling personalised products with fewer mistakes, less admin, and a better conversion rate. That is exactly where a good app earns its keep.
If you are selling monogrammed products in 2026, the stores that win are usually the ones that make personalisation feel simple. Customers do not want to think about the backend. They just want to see their initials, trust the result, and buy with confidence.