
If you want to update the text on the Shopify order confirmation page, the quickest method is to use Online Store > Themes > Edit languages and search for phrases like "Your order is confirmed" or "Thank you". That is the no-code route most merchants need, and it is still the easiest way to change the default wording customers see immediately after checkout.
I have worked with Shopify stores for years and I build apps for the platform, so I have seen this confusion come up again and again. Merchants often mix up the order confirmation page, the thank you page, the order status page, and the order confirmation email. Shopify treats these as related, but they are not the same thing, and the place you edit the text depends on which one you actually mean.
In this guide, I will show you the fastest no-code method, explain when it works, cover what changed with Checkout Extensibility, and show you what to do if you want more than just a text tweak.
How do I update the text on the Shopify order confirmation page?
You can update the default text on the Shopify order confirmation page by going to Online Store > Themes > three dots (...) > Edit languages, then searching for the phrase you want to change. In most stores, this is where phrases like "Your order is confirmed" and other checkout-related wording live.
This is the method I recommend first because it is fast, safe, and does not require code. It is also the method most often referenced in Shopify Community answers because it solves the exact problem behind this search query.
- Log in to your Shopify admin.
- Go to Online Store > Themes.
- Next to your live theme, click the three dots (...).
- Click Edit languages or Edit default theme content.
- Use the search bar and type phrases such as order confirmed, thank you, your order, or come back.
- Edit the wording directly.
- Click Save.
- Place a test order to confirm the change appears where you expect.
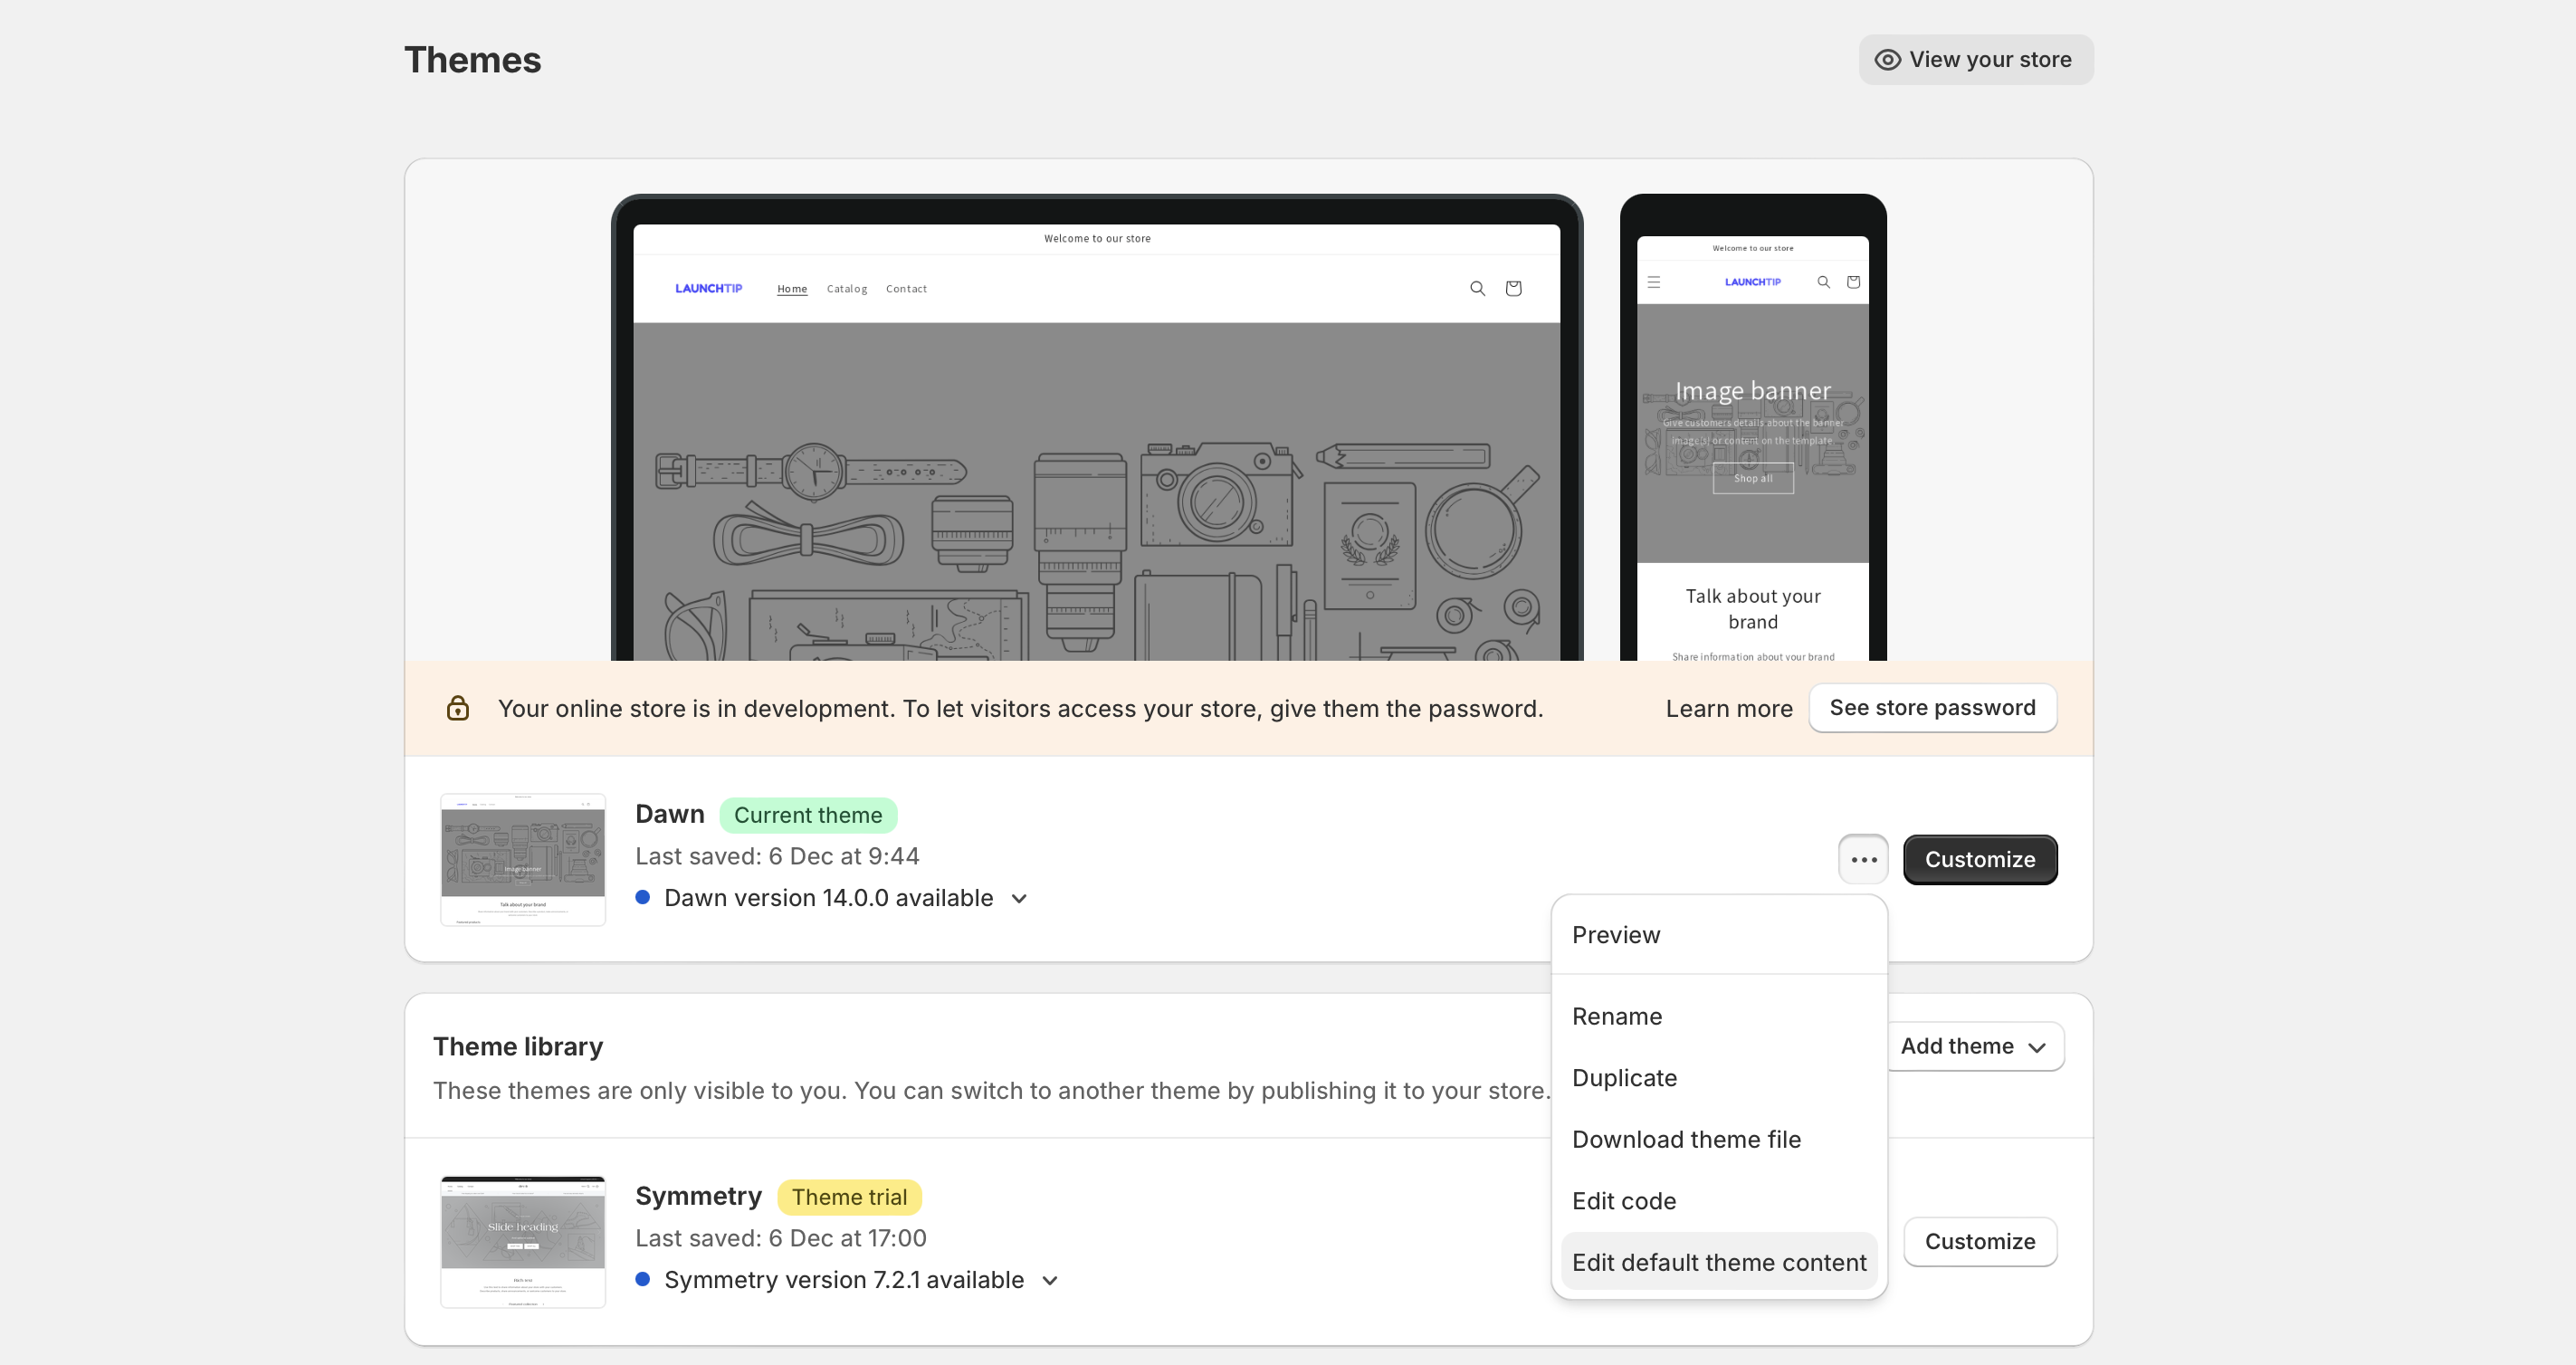
In practice, I usually tell merchants to search by the exact visible phrase on the page rather than guessing the section name. Shopify's language editor can be a bit inconsistent depending on theme version, so searching for the live wording is often the quickest way to find the right field.
What text can I actually change from the language editor?
The language editor lets you change many of the default checkout and confirmation phrases shown to customers. It works best for standard text labels and headings rather than fully custom layouts or app-driven content.
Typical phrases you may be able to change include:
- Your order is confirmed
- Thank you for your purchase
- We have accepted your order
- Continue shopping
- Need help?
- Order updates or related status wording
What catches merchants out is that not every sentence on the page is always editable in the same place. Some text is pulled from Shopify's checkout language system, some from notification templates, and some from apps or checkout blocks. If you cannot find a phrase in Edit languages, that usually means it is coming from somewhere else.
Is the order confirmation page the same as the order confirmation email?
No, the order confirmation page and the order confirmation email are separate. Editing the email will not change the on-screen confirmation page customers see after checkout.
This is one of the biggest sources of confusion in search results and Shopify forum threads. I have seen merchants spend half an hour editing the email template under notifications, only to realise the checkout page text stayed exactly the same.
| Element | What it is | Where to edit it |
|---|---|---|
| Order confirmation page | The screen shown immediately after checkout | Online Store > Themes > Edit languages for default text, or checkout editor/app blocks for advanced changes |
| Order status page | The page customers revisit later from their email link | Settings > Checkout and the checkout and accounts editor, plus supported apps |
| Order confirmation email | The email sent after purchase | Settings > Notifications > Order confirmation |
If your real goal is to edit the email copy, use Settings > Notifications. If you need help with broader notification changes, I have covered related topics like changing the language of email templates in Shopify and customising confirmation emails based on products ordered.
Why can't I find the phrase I want to change?
If you cannot find the text in Shopify's language editor, the phrase is usually coming from a different source such as the email template, an app block, a checkout extension, or older legacy custom code. In newer stores, Checkout Extensibility has changed where many customisations live.
From my experience troubleshooting Shopify stores, these are the most common reasons:
- You are editing the email instead of the page
- The text is generated by an app
- The store uses Checkout Extensibility and the content is in the checkout editor
- The phrase belongs to a different language locale
- An old script or legacy customisation was controlling the content previously
A simple test is to search the exact phrase in Edit languages. If nothing appears, check Settings > Checkout next. If you still cannot find it, review installed checkout apps or ask whoever last customised the store whether they used additional scripts or a third-party app.
What changed with Shopify Checkout Extensibility?
Checkout Extensibility is Shopify's modern framework for customising checkout, thank you, and order status experiences. It replaces older methods like checkout.liquid and most uses of additional scripts.
This matters because a lot of older tutorials are now partially outdated. If you are following a guide from 2020, 2021, or even early 2023, there is a good chance it references methods that are no longer recommended or no longer editable in the same way.
Shopify has pushed merchants towards a more secure, upgrade-safe, and app-based setup. In practical terms, that means:
- Less direct code injection on checkout-related pages
- More use of app blocks and UI extensions
- Better compatibility with Shop Pay and future updates
- Fewer breakages after platform changes
For merchants, the trade-off is simple. The new system is more stable, but some quick hacks that used to work are now gone. As an app developer, I actually think this is the right direction, because checkout customisations used to be far too fragile.
What are the key deadlines I need to know?
The key deadlines depend on whether you are on Shopify Plus or a standard plan. The important point is that legacy checkout customisations are being phased out, so relying on old scripts is risky.
- Shopify Plus stores: 28 August 2025 was the major deadline for legacy checkout customisations
- Non-Plus stores: 26 August 2026 is the main deadline to be aware of
If your store has not yet been updated, review your checkout settings now rather than waiting. I have seen merchants leave this until the last minute and then scramble to rebuild messaging, tracking, and post-purchase content they assumed would just keep working.
How do I customise the order confirmation page with the checkout editor?
If your store uses Shopify's newer checkout setup, you may need to use the checkout and accounts editor rather than relying only on the theme language editor. This is the right approach for layout changes, app blocks, and richer content on the thank you or order status pages.
- In Shopify admin, go to Settings > Checkout.
- Open the checkout and accounts editor if available on your plan and setup.
- Navigate to the Thank you or Order status page area.
- Add or edit app blocks if you want custom content.
- Preview the experience and place a test order.
This route is especially useful if you want to add more than a sentence or two. For example, if you want to show a branded message, delivery guidance, support details, or post-purchase offers, the editor and supported apps are usually the better fit.
If you are specifically working on the page customers revisit after purchase, you may also want to read our guide on how to customise the order status page on Shopify.
Can I still use additional scripts or checkout.liquid?
In most cases, no, or at least not as a future-proof solution. Shopify has deprecated checkout.liquid and restricted the old additional scripts workflow for thank you and order status page customisation.
Older tutorials often mention snippets like adding custom HTML below the confirmation box using JavaScript. Historically, that worked for some stores, especially Plus stores or stores using older checkout setups. In 2026, I would treat that as legacy reference only, not the method to build around.
If you previously used additional scripts, Shopify now expects you to replace them with:
- Customer events and custom pixels for tracking
- App blocks for visual or content changes
- Checkout UI extensions for supported advanced functionality
If you are unsure what your store used before, check your upgrade notes in Settings > Checkout. Shopify often shows a personalised upgrade guide listing which customisations need replacing.
What is the best way to test changes safely?
The best way to test changes is to edit carefully and then place a test order to verify the wording on the live checkout flow. For anything more complex than a text tweak, I recommend testing on a duplicate theme or in a controlled environment first.
Here is the process I use:
- Make the wording change in Edit languages or the checkout editor.
- Save the change.
- Use Shopify's bogus gateway, a 100% discount code, or another test payment method if available.
- Complete a full test checkout.
- Check both the on-screen confirmation page and the email notification.
- Review on mobile as well as desktop.
This sounds obvious, but it is where a lot of stores slip up. A phrase may look fine in the editor and then wrap awkwardly on mobile, or it may be perfect on the page but inconsistent with the email copy.
What should I write on the order confirmation page?
The best order confirmation page text is clear, reassuring, and brand-appropriate. It should confirm the order, explain what happens next, and reduce any post-purchase anxiety.
After a customer has paid, they usually want answers to three things:
- Did my order go through?
- What happens next?
- How do I get help if something is wrong?
That means your message should usually include:
- A clear confirmation that the order was received
- An expectation for dispatch or delivery timing
- Where to look for the confirmation email
- How to contact support
- Optional reassurance about tracking, returns, or next steps
In my experience, the best copy is usually shorter than merchants expect. This page is not the place for a huge wall of text. A few well-written lines do more than a long paragraph nobody reads.
Example order confirmation messages
These examples work well because they are simple, specific, and customer-focused.
| Use case | Example text |
|---|---|
| General store | Thanks for your order. We are preparing your items now and will email you as soon as they are dispatched. |
| Handmade or made-to-order | Thanks for your purchase. Your order is now in our production queue. Please allow 3-5 working days before dispatch. |
| Fast shipping brand | Your order is confirmed. Orders placed before 2pm usually ship the same working day. |
| Support-focused brand | We have received your order. If you need to make a change, contact us within 1 hour and we will do our best to help. |
| Email deliverability reminder | Check your inbox for your confirmation email. If you do not see it, please check spam or add us to your contacts. |
If you need customers to take an extra step before fulfilment, such as reviewing personalisation details, it is worth stating that clearly here and in the confirmation email.
Should I use an app to add custom text or content?
If you only need to change existing wording, no app is required. If you want to add new sections, richer branding, upsells, surveys, or dynamic content, then a checkout-compatible app can make sense.
As a Shopify app developer, my rule of thumb is simple: use the built-in editor first, then add an app only if the native tools cannot do what you need. Too many stores install apps for jobs that Shopify already handles well enough.
Apps are most useful when you want to:
- Add custom blocks to the thank you or order status page
- Show post-purchase upsells or cross-sells
- Collect survey responses
- Display delivery information, FAQs, or support prompts
- Track custom events in a compliant way
If you are exploring this route, Shopify's checkout app collection is a sensible place to start, and Shopify's own documentation on Checkout Extensibility explains the current framework.
What are the most common mistakes merchants make?
The most common mistakes are editing the wrong area, not testing with a real checkout, and assuming old tutorials still apply. These mistakes are easy to avoid once you know how Shopify splits page text, email templates, and checkout extensions.
- Editing Notifications instead of Edit languages
- Changing text without placing a test order
- Using outdated checkout.liquid advice
- Forgetting multilingual stores may need locale-specific edits
- Writing vague copy that does not answer what happens next
I would also add one more: merchants often try to turn the order confirmation page into a mini landing page. That can hurt clarity. This page should reassure the customer first, then support secondary goals like referrals, upsells, or support prompts.
How do I update related order and checkout messaging elsewhere in Shopify?
If you are improving the order confirmation page, it is worth reviewing the rest of your post-purchase messaging too. Customers notice when the cart, checkout, confirmation page, and follow-up emails all sound like they were written by different people.
Related areas you may want to update include:
- Order confirmation emails
- Order status page messaging
- Tracking notification wording
- Cart disclaimers and checkout guidance
For that, these guides may help:
- How to customise the order status page on Shopify
- How to change the tracking number on automatic notifications
- How to add a disclaimer to the cart on a Shopify store
- How to disable order confirmation in Shopify settings
When I audit stores, consistency across these touchpoints often makes the brand feel more polished than any single design tweak.
What if I want to add text below the order confirmed heading specifically?
If you want to add or edit the text directly below the Order confirmed heading, first check Edit languages because the wording may be a default phrase. If the text is not editable there, you may need to use the checkout editor or a compatible app block depending on your store setup.
This exact issue appears frequently in Shopify Community threads. In older stores, merchants sometimes used scripts to inject content below the confirmation box. In newer stores, that approach is far less reliable and often not available, so the practical answer is usually one of these:
- Edit the default phrase in the language editor if it already exists.
- Add a block through the checkout and accounts editor.
- Use a checkout-compatible app if you need more control.
If your requirement is simply to show a short note like dispatch timing, returns guidance, or support contact details, keep it concise. The closer the message is to the confirmation heading, the more likely customers are to read it.
Is changing order confirmation page text worth doing?
Yes, updating the order confirmation page text is usually worth doing because it improves clarity, reinforces your brand voice, and reduces support questions after purchase. It is a small tweak, but it can make the buying experience feel more polished.
In my experience, this matters most for stores with:
- Longer fulfilment times
- Made-to-order or personalised products
- International shipping
- High-support categories where customers often ask what happens next
A generic confirmation page is fine. A clear, branded one is better. If you can reduce even a small percentage of "Where is my order?" or "Did this go through?" messages, the change pays for itself quickly.
Final thoughts on updating Shopify order confirmation page text
The simplest answer is still the right one for most stores: go to Online Store > Themes > Edit languages, search for the phrase you want, change it, and test it with a real order. For many merchants, that solves the problem in under 5 minutes.
If it does not, the next place to check is Settings > Checkout and your store's Checkout Extensibility setup. Once you understand whether the text belongs to the page, the email, or a checkout extension, Shopify becomes much easier to work with.
That is really the key point. Edit languages for default wording, Notifications for emails, and checkout editor or apps for advanced custom content. If you follow that framework, you will avoid most of the confusion that keeps showing up in the search results.
For further reading, Shopify's own help docs on customising checkout configurations, changing theme wording, and upgrading thank you and order status page customisations are worth bookmarking.