
Bulk updating product prices in Shopify using a CSV is the fastest native method for large catalogues. The core process is simple: export your products, edit the Variant Price and Variant Compare At Price columns, then re-import the file with “Overwrite products with matching handles” enabled.
If you only need to change a handful of products, Shopify’s bulk editor is fine. But in my experience building Shopify apps and working with merchants handling hundreds or thousands of SKUs, CSV imports are usually quicker, more repeatable, and less error-prone when pricing changes affect a big chunk of the catalogue.
This guide covers the exact CSV workflow, the columns that matter, common mistakes, and when it makes sense to use an app instead of Shopify’s native import tool.
How do I bulk update product pricing using a CSV in Shopify?
To bulk update product pricing in Shopify, go to Products > Export, edit the Variant Price and optional Variant Compare At Price columns in the CSV, then go to Products > Import and tick Overwrite products with matching handles. That setting is what tells Shopify to update existing products rather than create duplicates.
This is the method I recommend when you need to run a seasonal sale, apply a supplier price increase, or correct pricing across a large catalogue. It is especially useful when you want a clear spreadsheet-based workflow that can be reviewed before anything goes live.
When should I use a CSV instead of Shopify's bulk editor?
A CSV is best for large-scale price changes, especially when you want to use formulas, check values in bulk, or keep a backup of what changed. Shopify’s bulk editor is better for smaller manual edits where you want to work directly inside the admin.
In practice, I usually tell merchants to use the bulk editor for dozens of changes and a CSV for hundreds or thousands. Once you need percentage-based updates, compare-at pricing, or supplier-driven spreadsheets, CSV almost always wins.
| Method | Best for | Pros | Limitations |
|---|---|---|---|
| Shopify bulk editor | Small to medium one-off edits | Fast inside admin, no file handling, easy for simple changes | Less practical for very large catalogues, formula-based edits are awkward |
| Shopify CSV import | Large catalogue pricing updates | Spreadsheet formulas, easy review process, strong for repeatable workflows | 15 MB file limit, no native rollback, not ideal for market-specific pricing |
| Bulk editing app | Advanced edits, scheduling, rollback, automation | Safer for recurring jobs, filtering, undo options, handles bigger complexity | Usually requires a paid app |
What are the exact steps to update Shopify prices by CSV?
The exact steps are: export products, edit the pricing columns, save the file correctly, and import with overwrite enabled. If you follow those four steps carefully, Shopify will update your existing product prices without creating duplicates.
Here is the workflow I use and recommend.
1. How do I export my current product CSV from Shopify?
Go to Shopify admin > Products > Export and export the products you want to update. For most stores, exporting the current product file first is the safest approach because it gives you Shopify’s exact format and the correct product handles.
You can export all products or a filtered subset. If you are only changing one supplier, one collection, or one product type, export that smaller segment first to reduce risk and make validation easier.
- In Shopify admin, open Products.
- Apply filters if needed.
- Click Export.
- Choose the relevant product range.
- Select the CSV for Excel, Numbers, or other spreadsheet programs option if prompted.
- Download the file once Shopify generates it.
Important: use Shopify’s exported file as your base whenever possible. In my experience, a lot of import errors come from merchants building a CSV from scratch and missing required structure.
2. Which CSV columns do I need to edit for pricing?
The main columns are Variant Price and Variant Compare At Price. You should also keep Handle intact, because Shopify uses it to match the imported rows to your existing products.
If your products have variants, each variant can have its own price row. That means you need to be careful not to update only one row when a product has multiple variants with different pricing.
| Column | What it does | Why it matters |
|---|---|---|
| Handle | Unique product identifier | Shopify uses this to match existing products during overwrite |
| Variant SKU | Identifies the variant | Useful for checking you are editing the correct row |
| Variant Price | The live selling price | This is the main field you will change |
| Variant Compare At Price | The original higher price shown during a sale | Use this when running promotions or showing savings |
If you are running a promotion, the normal setup is to put the discounted amount in Variant Price and the original amount in Variant Compare At Price. If you are simply raising or lowering everyday prices, you may only need to update Variant Price.
3. How should I edit the CSV safely?
The safest way to edit the CSV is to change only the columns you need and leave Shopify’s structure untouched. Avoid deleting columns, renaming headers, or sorting rows carelessly unless you are confident you understand the file.
Shopify’s product CSV format can be unforgiving. A small formatting mistake can cause import failures or unexpected product changes, so I always keep a backup copy before editing.
- Keep the file under 15 MB if using Shopify’s native import.
- Save in UTF-8 format where possible.
- Do not change header names.
- Do not remove the Handle column.
- Be careful with spreadsheet auto-formatting.
- Check decimal formatting such as 29.99 rather than currency symbols in the field.
If you need help with wider product file work, I have also written guides on importing products with variants correctly and bulk editing product descriptions in Shopify. The same principle applies here: start from Shopify’s structure and make the smallest necessary changes.
4. Can I use formulas to increase or decrease all prices?
Yes, and this is one of the biggest advantages of using a CSV. In Excel or Google Sheets, you can apply formulas to increase or decrease prices by a fixed amount or percentage.
For example, if your current price is in cell D2 and you want to increase all prices by 10%, use a formula like =D2*1.1. Then paste the calculated values back into the Variant Price column as plain values before importing.
- 10% increase: =D2*1.1
- 10% decrease: =D2*0.9
- Add £5: =D2+5
- Round to .99 pricing: depends on your spreadsheet logic, but many merchants use helper columns for this
When I have tested this with merchants, formula-driven edits are usually where CSV saves the most time. Updating 5,000 variant prices manually is painful. Updating them with one spreadsheet formula is not.
5. How do I import the updated CSV back into Shopify?
Go to Products > Import, upload the edited CSV, and make sure you tick Overwrite products with matching handles. That checkbox is the critical step for updating existing products.
If you miss that option, Shopify may treat rows as new product data rather than updates. This is one of the most common mistakes I see.
- In Shopify admin, go to Products.
- Click Import.
- Click Add file and select your edited CSV.
- Tick Overwrite products with matching handles.
- If you are not adding new products, review any publishing options carefully.
- Click Upload and continue.
- Review the import summary.
- Click Import products.
Shopify usually emails you once the import has finished. If there are errors, review the import feedback and compare it against your original export.
What are the most common mistakes when updating Shopify prices by CSV?
The most common mistakes are not using the correct handle, editing the wrong variant rows, breaking the CSV format, and forgetting to tick overwrite. Most problems are avoidable if you test on a small sample first.
In my experience, merchants rarely have issues with the pricing logic itself. The trouble usually comes from file formatting and import settings.
- Forgetting overwrite: this can stop updates from applying as expected.
- Changing handles accidentally: Shopify may fail to match products.
- Using currency symbols in price cells: plain numbers are safer.
- Editing only the first variant row: multi-variant products need row-level attention.
- Saving in the wrong format: encoding issues can create strange import problems.
- Testing on the full catalogue first: always start with a subset.
How do I test a Shopify pricing CSV before updating my whole catalogue?
The best way to test is to export and update a small subset of products first, such as 5 to 20 items. That lets you confirm your prices, compare-at prices, and variant mappings before touching the full catalogue.
This is the same advice Shopify gives in its product import documentation, and it is the advice I follow myself. A ten-minute test import can save hours of cleanup.
- Filter a small group of products.
- Export only those products.
- Edit the pricing columns.
- Import with overwrite enabled.
- Check product pages, collection pages, and any sale badge logic in your theme.
- Only then run the full import.
If you use price-per-unit displays, bundles, or custom pricing logic in your theme, verify those too. If that is relevant to your store, my guide on how best to show price per unit on Shopify is worth checking before a large pricing update.
Can I bulk update compare-at prices for a sale using CSV?
Yes. Shopify’s CSV import supports Variant Compare At Price, which makes it ideal for sale pricing. Set the sale price in Variant Price and the original price in Variant Compare At Price.
This is one of the most common use cases before Black Friday, seasonal promotions, and clearance events. It also gives you more control than trying to set sale prices one by one in the admin.
For example:
| SKU | Variant Price | Variant Compare At Price | What customers see |
|---|---|---|---|
| TSHIRT-BLK-S | 19.99 | 29.99 | Sale price of 19.99 with original price of 29.99 |
| MUG-WHT | 12.00 | 15.00 | Sale price of 12.00 with original price of 15.00 |
If your theme or app stack displays savings badges, test those after import. Some themes calculate discount percentages from compare-at pricing, so incorrect values can create messy storefront messaging.
What are the limitations of Shopify's native CSV pricing updates?
Shopify’s native CSV import is excellent for standard product pricing, but it has limits. It is not the best tool for market-specific pricing, B2B price lists, advanced scheduling, or rollback.
This matters more in 2026 because more merchants now sell across multiple markets and customer groups. A basic CSV workflow is still useful, but it does not cover every pricing model.
- 15 MB native file size cap
- No native rollback if you import the wrong prices
- No built-in scheduling for future price changes
- Limited support for complex international pricing workflows
- Not ideal for recurring automated repricing
If your store has a simple catalogue and one base price per variant, native CSV is usually enough. If you have complex merchandising rules, apps are often the safer option.
What is the best app for bulk updating Shopify prices?
The best app depends on your workflow. Matrixify is excellent for advanced import-export jobs, Hextom: Bulk Product Edit is strong for broad bulk edits and scheduling, and Ablestar Bulk Product Editor is one of the safest tools for controlled edits with undo support.
As a Shopify app developer, I always prefer native Shopify tools when they are enough. But when merchants ask me about recurring price changes, rollback, or more advanced filtering, I usually point them towards an app because the safety net is worth it.
| App | Best for | Standout strength | Link |
|---|---|---|---|
| Matrixify | Advanced imports, exports, large catalogues, market pricing | Powerful spreadsheet-based workflows across many Shopify data types | View app |
| Hextom: Bulk Product Edit | Scheduled edits, filtering, broad bulk changes | Strong automation and bulk editing options | View app |
| Ablestar Bulk Product Editor | Safe edits with preview and undo | Very merchant-friendly rollback and monitoring | View app |
Is Matrixify good for bulk price updates?
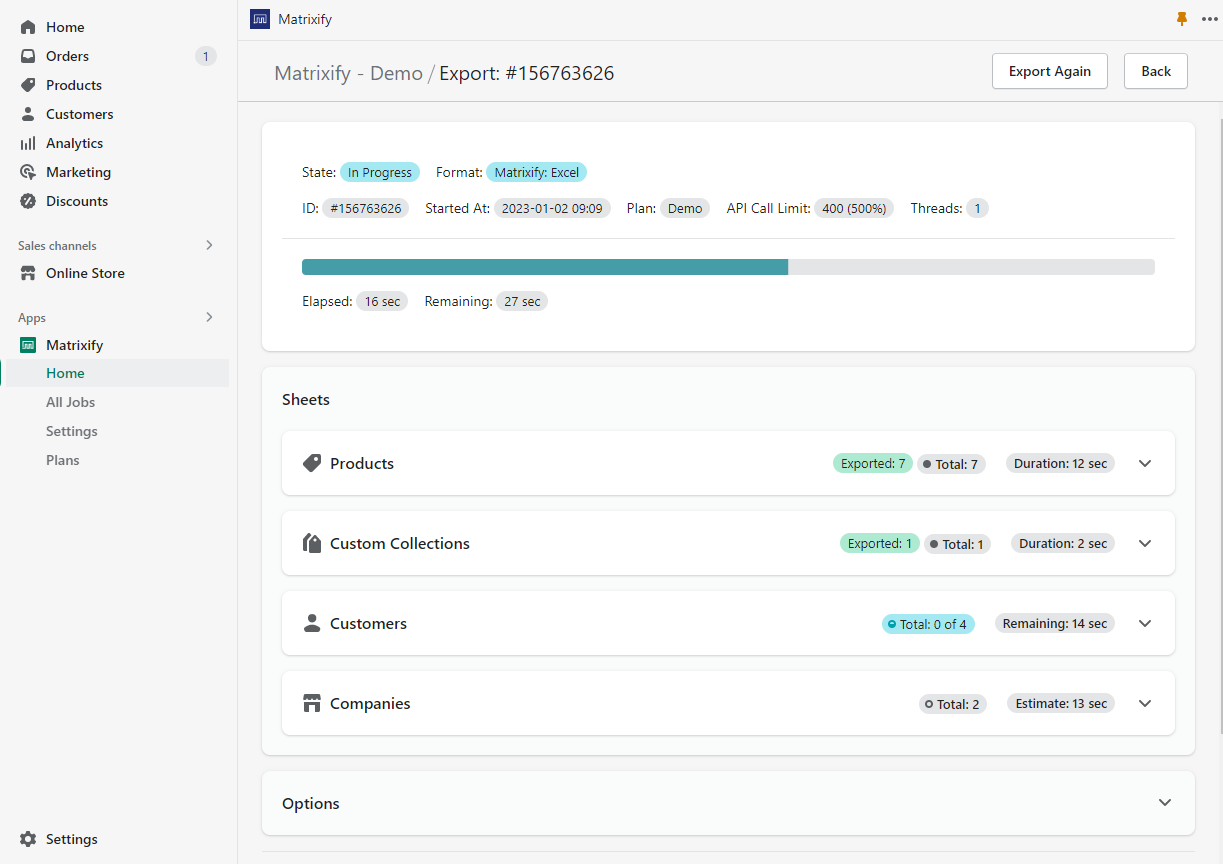
Matrixify is one of the best choices for advanced Shopify imports and exports. It is especially useful if you need more than a simple native CSV import, such as working with larger datasets, copying data between stores, or handling more complex pricing structures.
In my experience, best for advanced merchants is the fairest verdict here. It is powerful, but it is most valuable when your pricing workflow is already a bit complex.
![]()
Matrixify supports bulk import/export for products, collections, customers, orders and more. It is particularly useful if you need to work with Excel, CSV, or Google Sheets and want a more robust workflow than Shopify’s native importer.
- Best for: advanced bulk operations and larger catalogues
- Useful for: backups, store migrations, structured imports, market pricing
- Worth it if: you regularly work with bulk data outside Shopify
Is Hextom: Bulk Product Edit good for price changes?
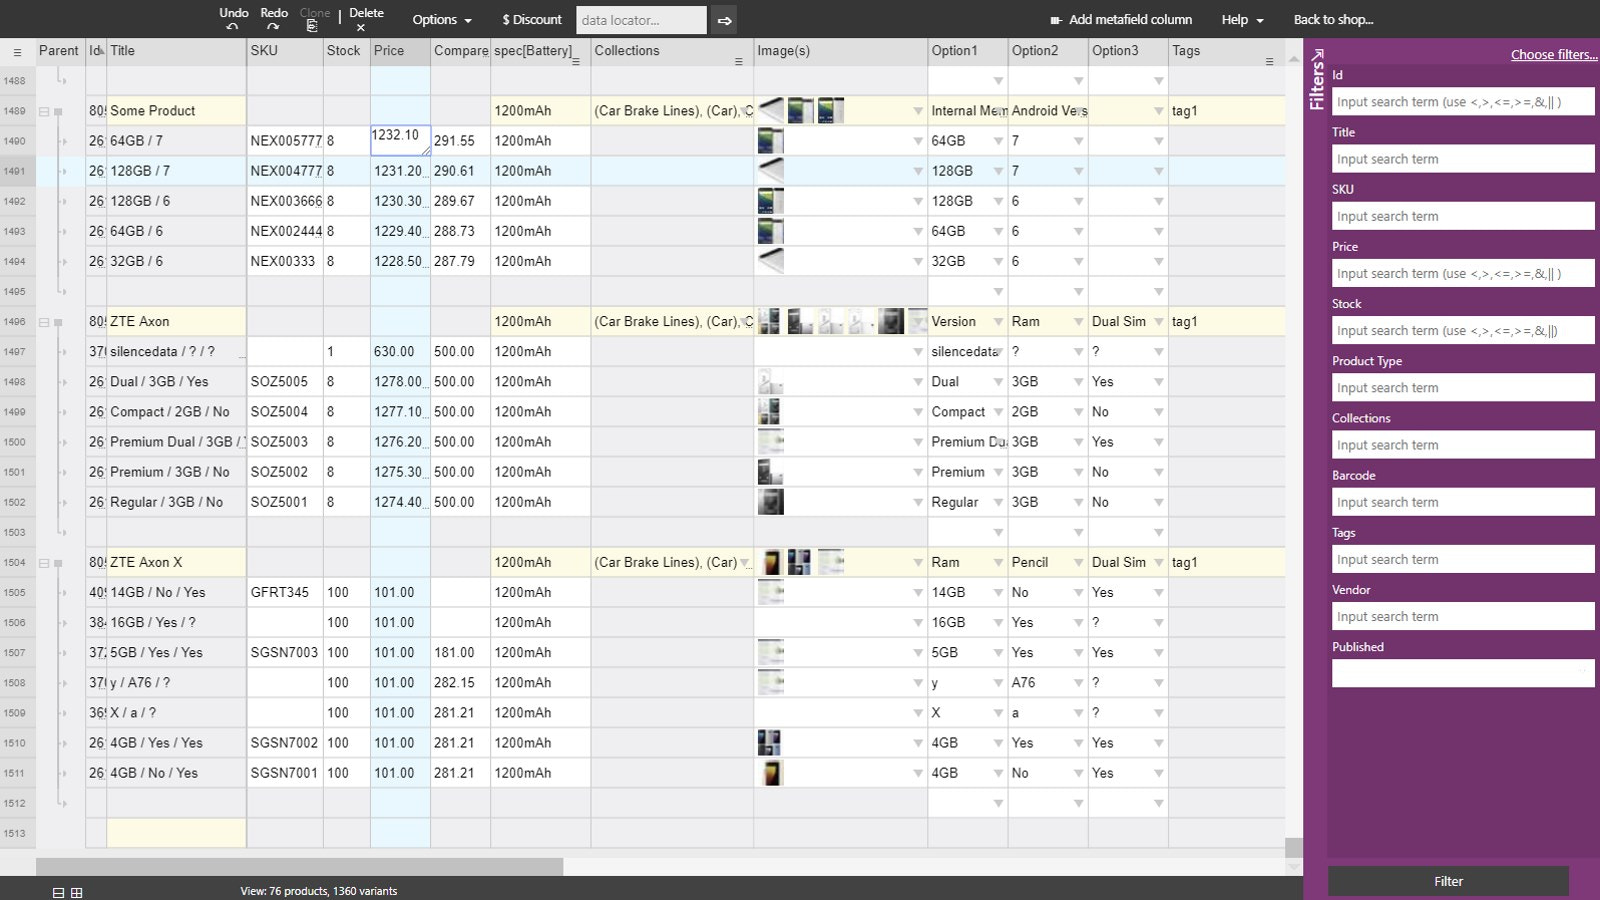
Hextom: Bulk Product Edit is a strong option if you want to edit prices using filters, CSV workflows, or scheduled tasks. It is particularly useful for merchants who run repeated promotions and want less manual work each time.
I like this category of app because it reduces the chance of late-night sale prep mistakes. For many stores, best for recurring promotions is a fair summary.
![]()
Hextom: Bulk Product Edit lets you update product pricing in bulk with advanced filters or CSV-based workflows. It is widely used for editing products, metafields, customers and more.
- Bulk edit thousands of prices using filters or CSV import/export
- Scheduling support for timed promotions and recurring tasks
- Rollback-friendly workflows compared with native CSV imports
Is Ablestar Bulk Product Editor worth it?
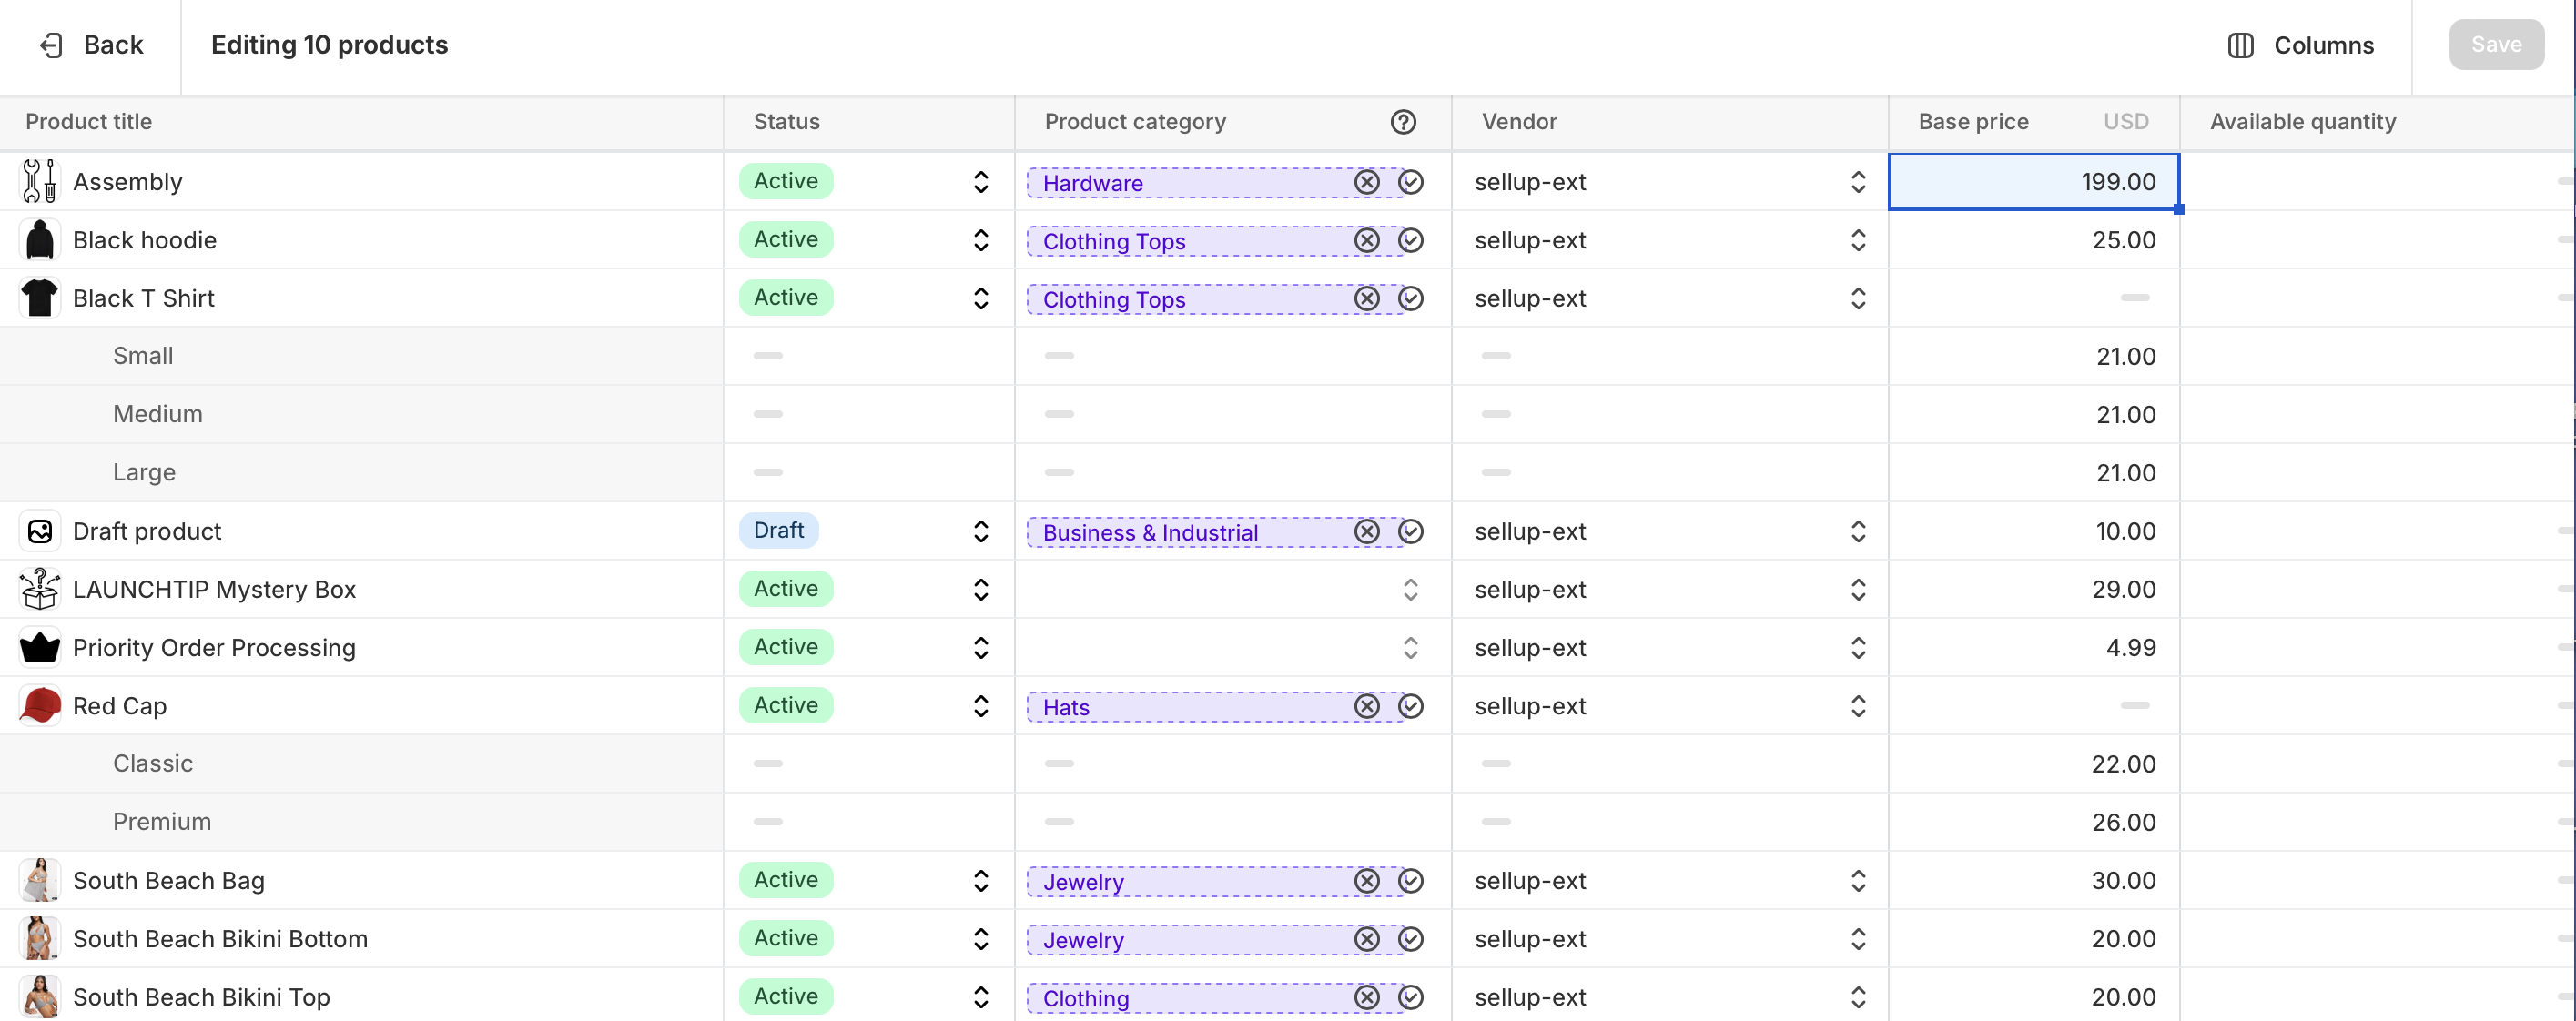
Ablestar Bulk Product Editor is one of the safest tools for merchants who want visibility and undo options. If you are worried about making a mistake on a large catalogue, this is often the app I suggest first.
That is because preview, progress tracking, and quick undo are genuinely useful features, not just marketing copy. When pricing updates go wrong, the ability to reverse changes quickly matters a lot.
![]()
Ablestar Bulk Product Editor helps merchants bulk edit prices, descriptions, metafields, Google Shopping data and more. It also supports spreadsheet uploads and automations.
- Preview and progress monitoring before and during edits
- Quick undo after promotions or accidental changes
- Scheduling and recurring automations for repeated workflows
What are the benefits of using CSV updates for Shopify pricing?
The main benefits are speed, accuracy, flexibility, and repeatability. A CSV gives you a structured way to update lots of prices at once without clicking through product pages one by one.
For stores with large inventories, this is not just a convenience. It is often the only practical way to keep pricing current when supplier costs or promotional plans change quickly.
- Efficiency: update large catalogues much faster than manual editing.
- Accuracy: use spreadsheet validation and formulas to reduce human error.
- Flexibility: change prices, compare-at prices, and related fields in one workflow.
- Time-saving: ideal for repeated supplier or seasonal updates.
- Auditability: you keep a file showing what changed and when.
What should I do if my Shopify CSV import fails?
If your import fails, check the error report, the handle values, the pricing format, and the file structure. Most failed imports come down to formatting issues rather than Shopify itself.
I normally troubleshoot in this order: compare against the original export, test a tiny subset, and then re-import. That approach finds the issue faster than guessing.
- Compare your edited file with the original export.
- Check that Handle values still match existing products.
- Make sure price fields are numeric.
- Confirm that headers are unchanged.
- Try importing 1 to 5 products only.
- Review Shopify Help docs on importing products with a CSV file and using CSV files to import and export products.
Is bulk updating Shopify prices by CSV worth it?
Yes, bulk updating Shopify prices by CSV is worth it for any store with more than a modest catalogue. It is the best native method for large-scale price changes, and it becomes even more useful when you need formulas, sale pricing, or supplier-driven updates.
In my experience building Shopify apps, the merchants who get the most value from CSV workflows are the ones who treat them as an operational process rather than a one-off task. Export clean data, test on a sample, import carefully, and keep a backup. That simple discipline prevents most pricing disasters.
If your catalogue is small, Shopify’s built-in bulk editor may be enough. But if you are managing hundreds or thousands of products, CSV is the practical option, and for more advanced needs, one of the specialist apps above can make the workflow safer and faster.
For related catalogue management workflows, you might also find these useful: how to quickly bulk upload product images to Shopify and how to download all product images from your Shopify store.