If you want to know how to increase DPI for print-on-demand, the short answer is this: you usually need more pixels, not just a higher DPI number. In practice, that means creating artwork at the correct dimensions from the start, or upscaling a low-resolution image carefully before you upload it to your POD platform.
I work in the Shopify ecosystem every day, and this is one of the most common issues I see from merchants selling wall art, apparel, mugs, and other personalised products. A file can say 300 DPI and still print badly if the underlying image is too small. Equally, a large enough file at the right pixel dimensions can print beautifully, even if the metadata was wrong before export.
If you sell through Printful or Printify, getting this right matters. Both platforms care about actual print quality, not just the label attached to the file.
What does DPI mean for print-on-demand?
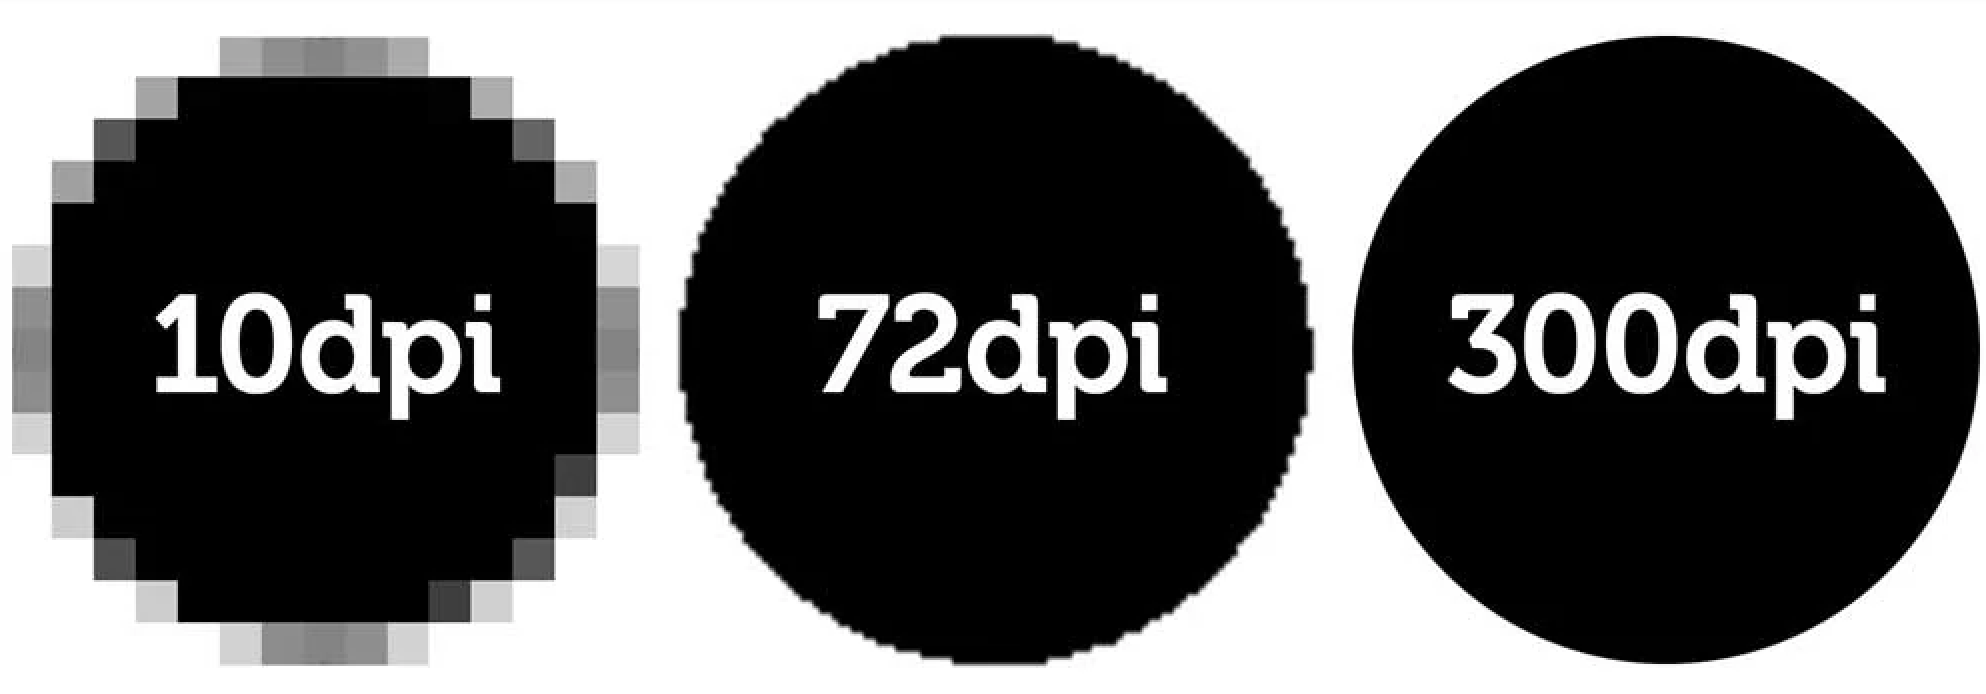
DPI means dots per inch, but for digital files you will often also see PPI, or pixels per inch. For most Shopify and POD workflows, people use the terms interchangeably, even though printers and image files are technically measuring different things.
The important bit is simple: higher DPI at a given print size usually means a sharper print. If you print a 3000 x 3000 pixel image at 10 x 10 inches, that gives you 300 PPI, which is generally ideal for products viewed up close.
In my experience building Shopify apps and helping merchants troubleshoot product assets, the confusion usually comes from mixing up file metadata with actual image resolution. Changing the DPI field alone does not magically create detail that was never there.
Why does DPI matter for POD products?
DPI matters because POD products are physical items, and physical print size changes how sharp your design appears. A design that looks crisp on a laptop screen can look soft, jagged, or blurry once stretched across a t-shirt or poster.
For most print-on-demand items, 300 DPI is the safest target. That is the benchmark I recommend for t-shirts, art prints, mugs, notebooks, and other products customers inspect at close range. For large-format pieces viewed from farther away, 150 DPI can be acceptable.
This matches current guidance from major POD providers and print education resources. 300 DPI is the standard recommendation, but it only works if your file has enough pixel dimensions to support the intended print size.
Can you increase DPI from 72 to 300?
Yes, but only changing 72 to 300 in the file settings does not improve quality on its own. If the image does not have enough pixels, the print will still be poor.
This is the biggest misconception behind this keyword. A lot of people search for a quick way to turn a 72 DPI web image into a 300 DPI print file. What they actually need is either a larger original file, careful resampling, or AI upscaling.
Here is the practical difference:
- Changing DPI without resampling changes print size metadata only
- Resampling or upscaling adds pixels so the file can print larger
- Vectorising can make logos and simple graphics scalable without DPI limits
If you downloaded an image from a website, social media, or an old marketplace listing, there is a good chance it is too small for POD. In those cases, editing the DPI field alone is not enough.
What is the best DPI for print-on-demand?
The best DPI for print-on-demand is usually 300 DPI. That is the standard for products viewed up close and the target I suggest for nearly every Shopify POD seller.
There are exceptions. Large banners, oversized wall art, and some decorative prints can still look good at 150 DPI because people view them from farther away. But if you want one rule that works most of the time, use 300 DPI at final print size.
| Product type | Recommended DPI | Notes |
|---|---|---|
| T-shirts, hoodies, sweatshirts | 300 DPI | Best for detailed graphics and text |
| Mugs, phone cases, notebooks | 300 DPI | Close-view products need crisp lines |
| Posters and photo prints | 300 DPI | Ideal for artwork viewed at short distance |
| Large wall art and canvases | 150-300 DPI | Depends on viewing distance and artwork style |
| Banners and signage | 100-150 DPI | Often acceptable for long-distance viewing |
When I test POD workflows, I always think in terms of final physical size. A design for a mug wrap needs very different dimensions from a 24 x 36 inch poster, even if both are exported at 300 DPI.
How do I calculate the pixel dimensions I need?
To calculate the right size for print, multiply the print dimensions in inches by the target DPI. This is the simplest and most useful formula in the whole process.
If your design will print at 10 x 10 inches and you want 300 DPI, you need 3000 x 3000 pixels. If your poster is 16 x 20 inches, you need 4800 x 6000 pixels.
Here is a quick reference table I often use when advising merchants.
| Print size | Pixels needed at 300 DPI | Pixels needed at 150 DPI |
|---|---|---|
| 8 x 10 inches | 2400 x 3000 px | 1200 x 1500 px |
| 10 x 10 inches | 3000 x 3000 px | 1500 x 1500 px |
| 12 x 16 inches | 3600 x 4800 px | 1800 x 2400 px |
| 16 x 20 inches | 4800 x 6000 px | 2400 x 3000 px |
| 24 x 36 inches | 7200 x 10800 px | 3600 x 5400 px |
This is also why many Canva exports disappoint sellers. The design may look fine inside Canva, but if the export dimensions are too small, it will not become print-ready just because you type in 300 DPI somewhere afterwards.
How do I check the current DPI of an image?
You can check an image's DPI in Photoshop, Preview on Mac, or file properties on Windows. But remember, the more important number is often the pixel dimensions.
Here are the quickest ways to check:
- Photoshop: Go to Image > Image Size and look at width, height, and resolution.
- Windows: Right-click the file, choose Properties, then Details.
- Mac: Open in Preview, then go to Tools > Show Inspector.
- Photopea: Open the image in Photopea and inspect image size and resolution.
When I am checking assets for a merchant, I usually look at pixel dimensions first. A 1200 x 1200 image is still a 1200 x 1200 image whether it says 72 DPI or 300 DPI in the metadata.
How do I increase DPI in Photoshop?
Photoshop is the most precise way to adjust DPI because it lets you either change metadata only or actually resample the image. If you already have enough pixels, you can set the file to 300 DPI without degrading quality.
If you do not have enough pixels, Photoshop can upscale the file, although results vary depending on the original image quality.
Method 1: Change DPI without changing pixels
This method is best when your image already has enough pixels for the intended print size. It changes the resolution setting, not the actual detail in the file.
- Open the image in Photoshop
- Go to Image > Image Size
- Untick Resample
- Enter 300 in the Resolution field
- Check the resulting print dimensions
- Save the file as PNG, TIFF, or high-quality JPEG as needed
This is useful if a POD platform is reading the file metadata incorrectly, but the pixel dimensions are already right.
Method 2: Increase actual pixel dimensions
This method is for images that are too small and need more pixels. It can help, but it cannot fully recreate lost detail from a poor source file.
- Open the image in Photoshop
- Go to Image > Image Size
- Tick Resample
- Set the resolution to 300
- Enter the target width and height in inches or pixels
- Use a high-quality resampling option such as Preserve Details 2.0
- Review edges, text, and fine detail at 100% zoom
In my experience, Photoshop is reliable for moderate upscaling. If you are trying to enlarge a tiny web image dramatically, AI tools usually do a better job.
What are the best free ways to increase DPI for print?
The best free options are Photopea, GIMP, Adobe Express, and careful exporting from Canva. They can help you adjust resolution settings or upscale lightly without paying for Photoshop.
Not every seller wants another monthly tool bill, especially in early-stage POD. If you are just validating products, these free or low-cost options are often enough.
| Tool | Best for | Free? | Notes |
|---|---|---|---|
| Photopea | Photoshop-like editing in browser | Yes | Great for changing resolution and exporting |
| GIMP | Desktop image editing | Yes | Good free option for resampling and print prep |
| Adobe Express | Quick design resizing | Free plan available | Useful for creating larger canvases |
| Canva | Simple design creation | Free plan available | Best when you design at large dimensions from the start |
If you use Canva for POD, my honest advice is this: build at the final pixel dimensions from the beginning. That is far more reliable than trying to fix a too-small export afterwards.
When should I use AI upscaling?
AI upscaling is best when you have a decent image that is slightly too small, not when the original is badly compressed or tiny. It can improve print readiness, but it is not magic.
For old photos, scanned artwork, and medium-resolution graphics, AI upscalers can do an impressive job of adding believable detail. For pixelated screenshots or poor-quality marketplace images, results are often disappointing.
Current popular options include Let's Enhance, Topaz Gigapixel, and Adobe's own enhancement tools. I have found AI upscaling especially useful for merchants repurposing older artwork into larger print formats.
The key is to inspect edges, text, faces, and textures after upscaling. AI can introduce strange artefacts, especially around lettering and fine line art.
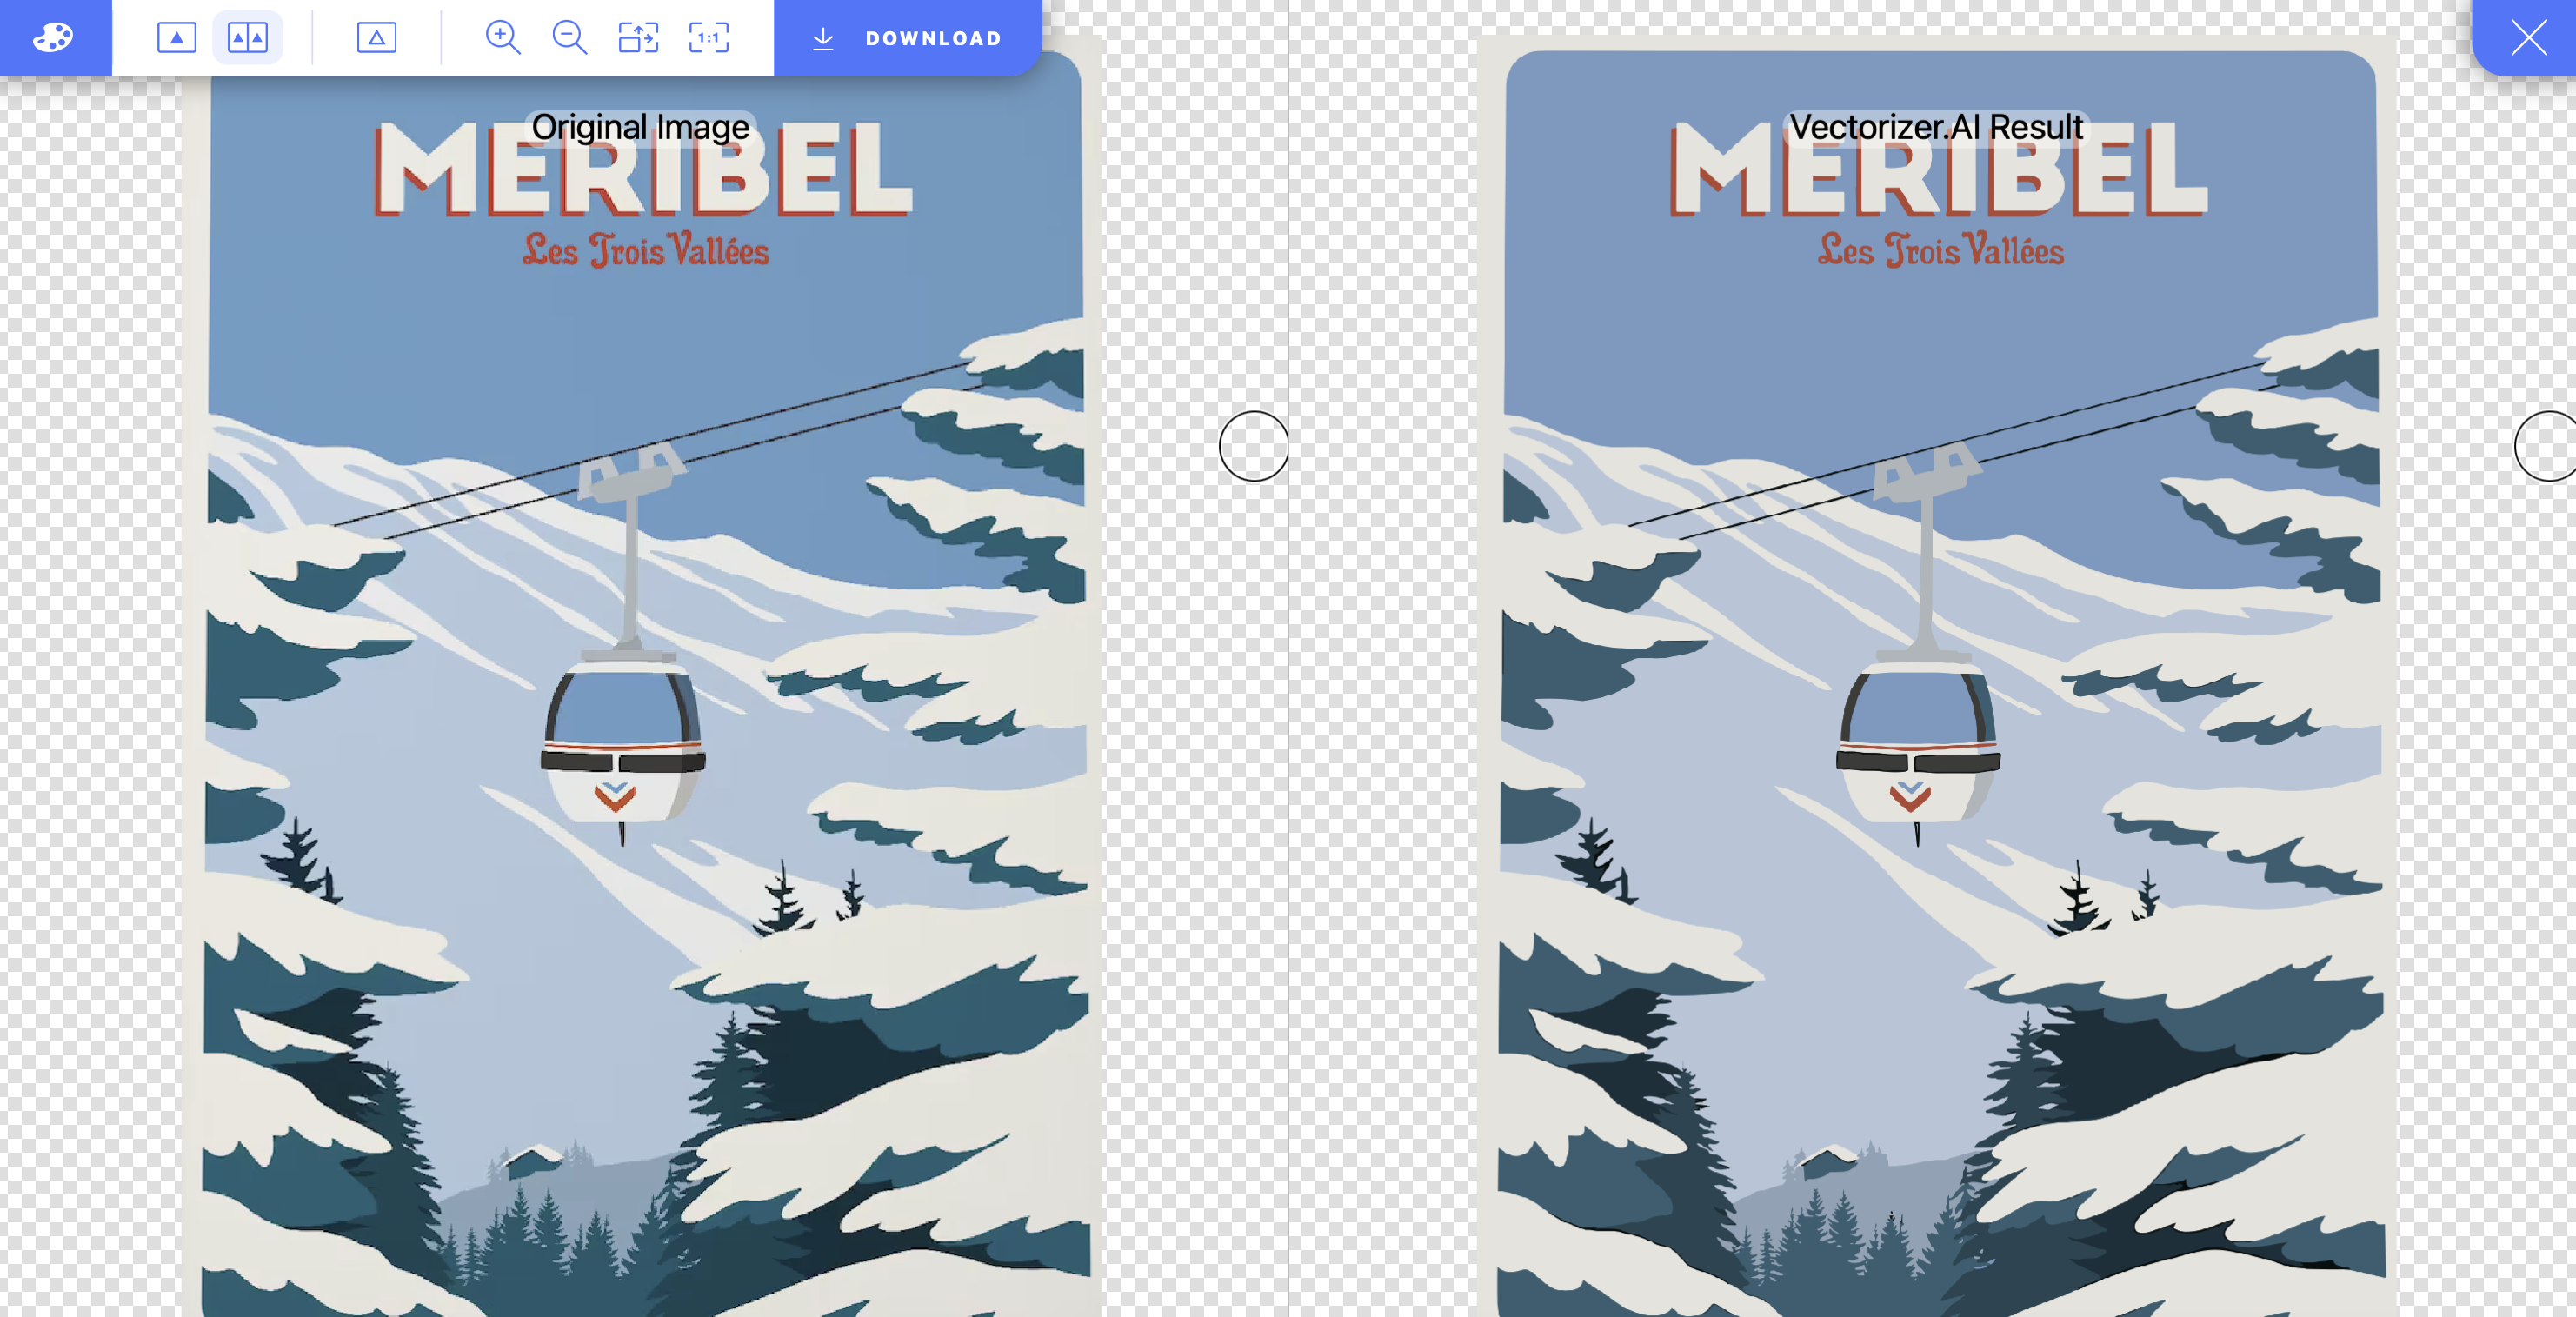
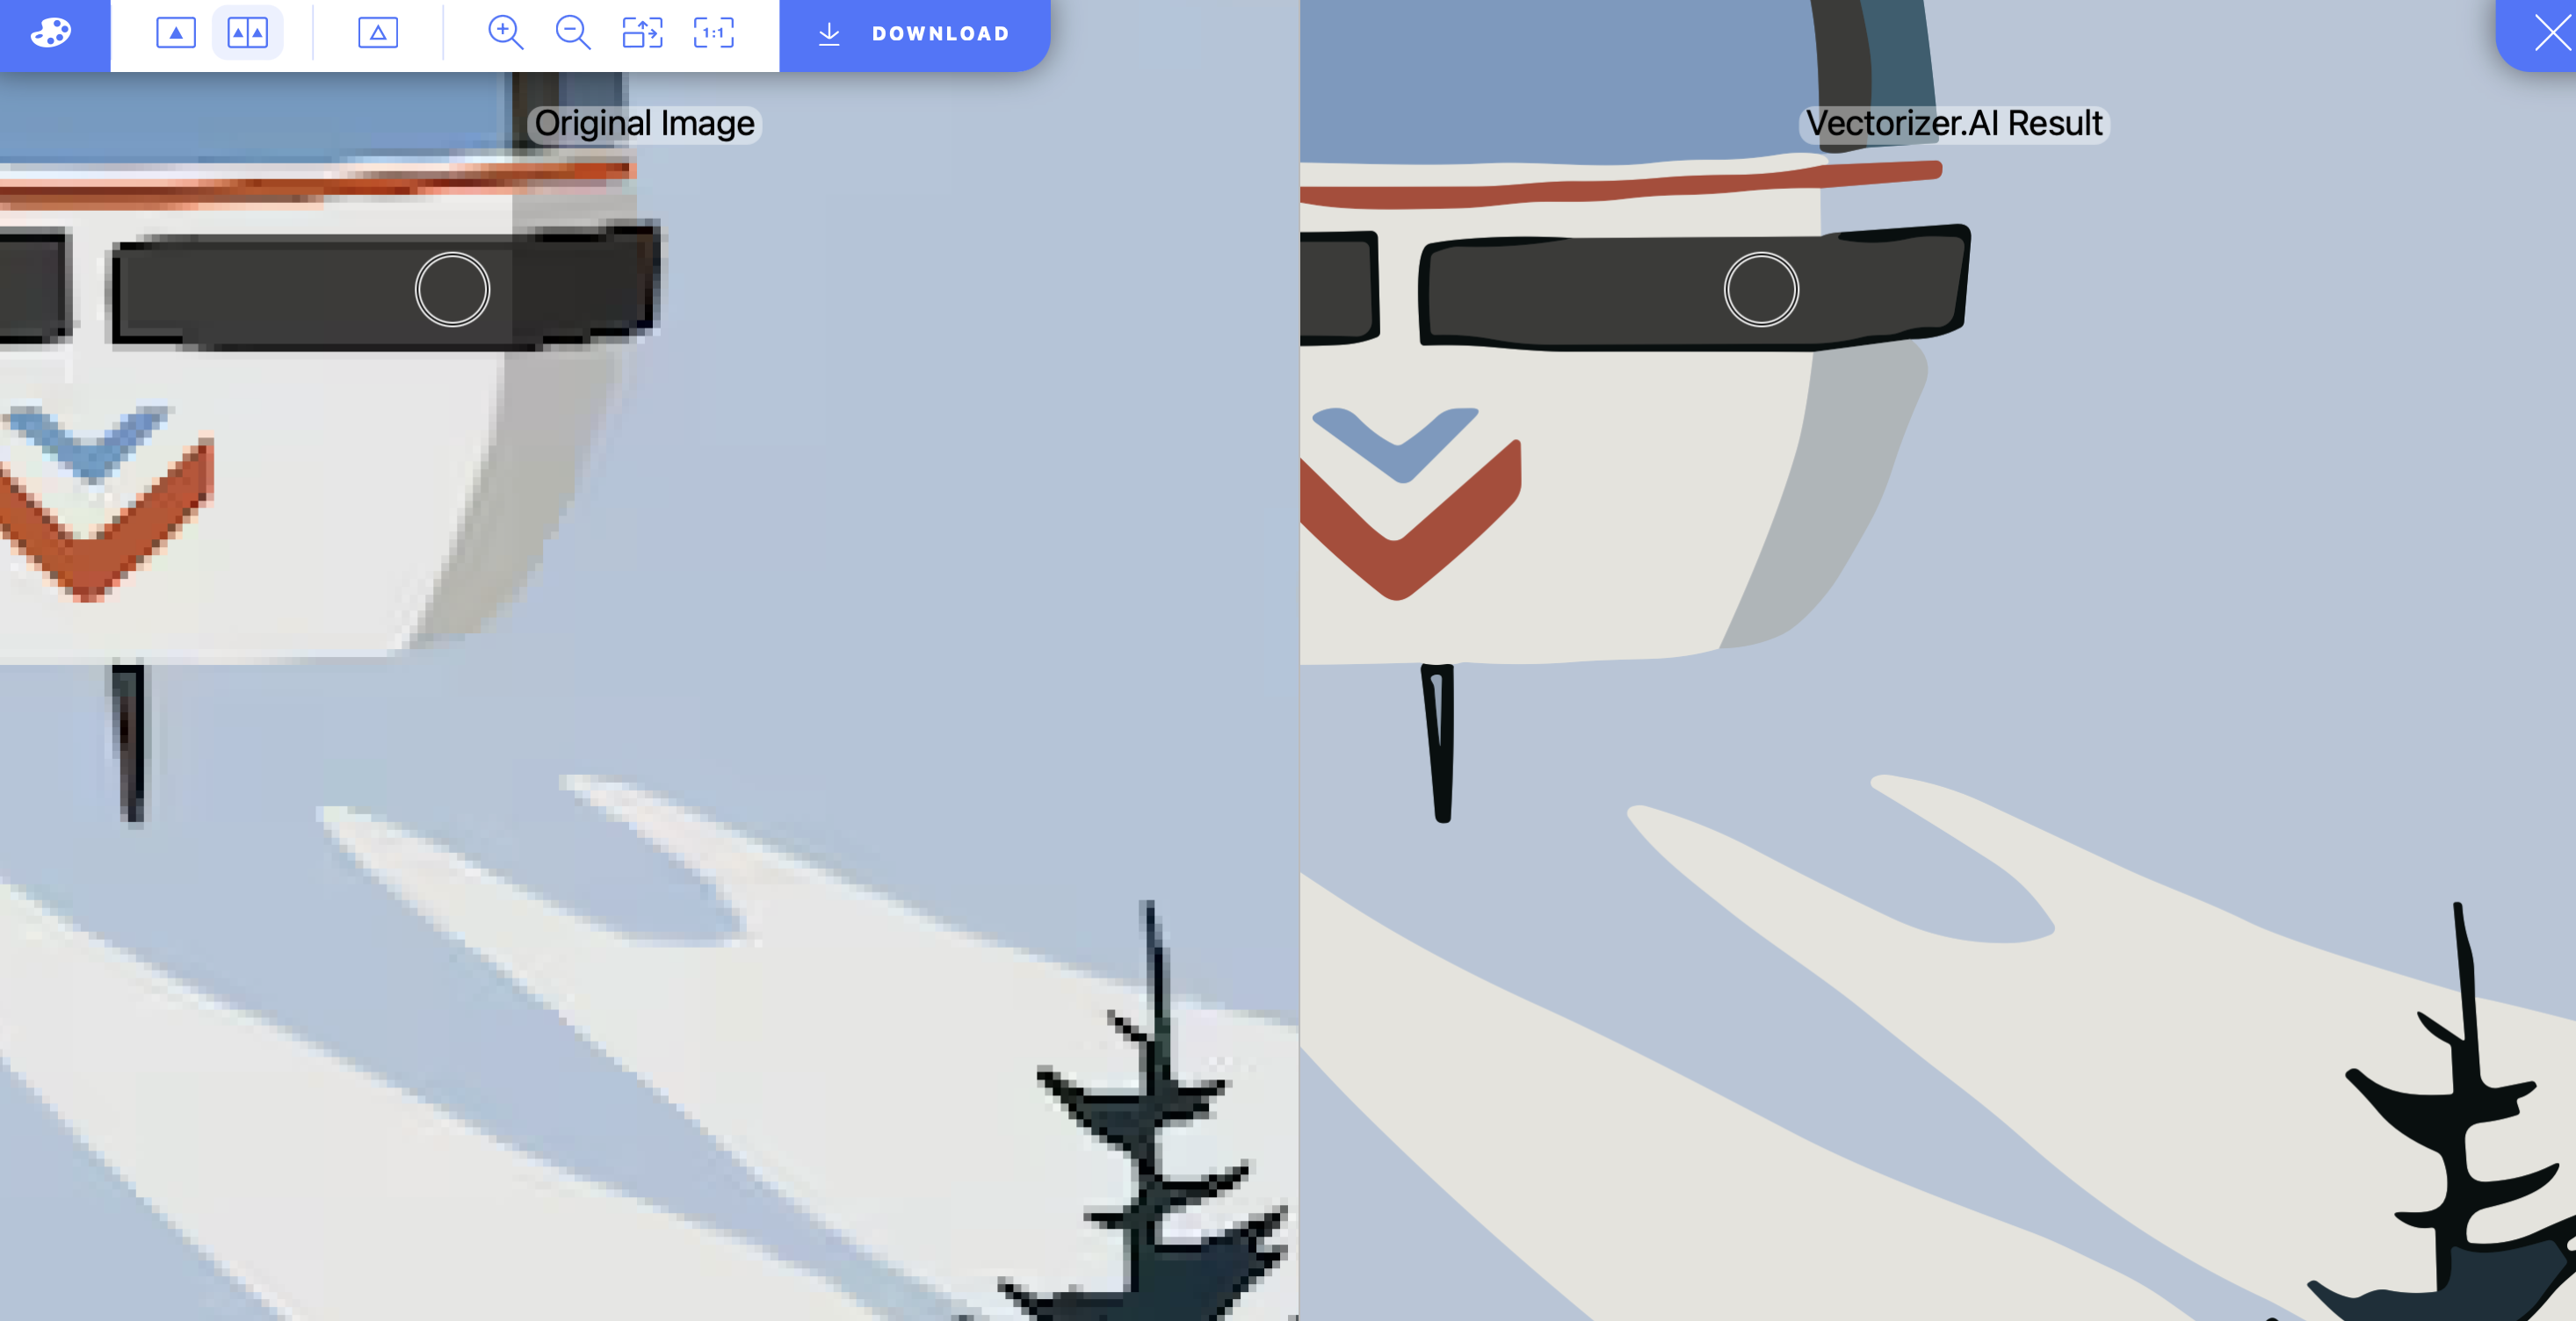
Is vector better than increasing DPI?
Yes, for logos, typography, icons, and simple illustrations, vector is usually better than increasing DPI. Vector files scale cleanly because they are based on paths rather than fixed pixels.
This is one of the most overlooked improvements for POD sellers. If your design is mostly text or flat shapes, you do not need to keep fighting with raster resolution. Rebuild it as a vector in Adobe Illustrator or use a vectorising tool where appropriate.
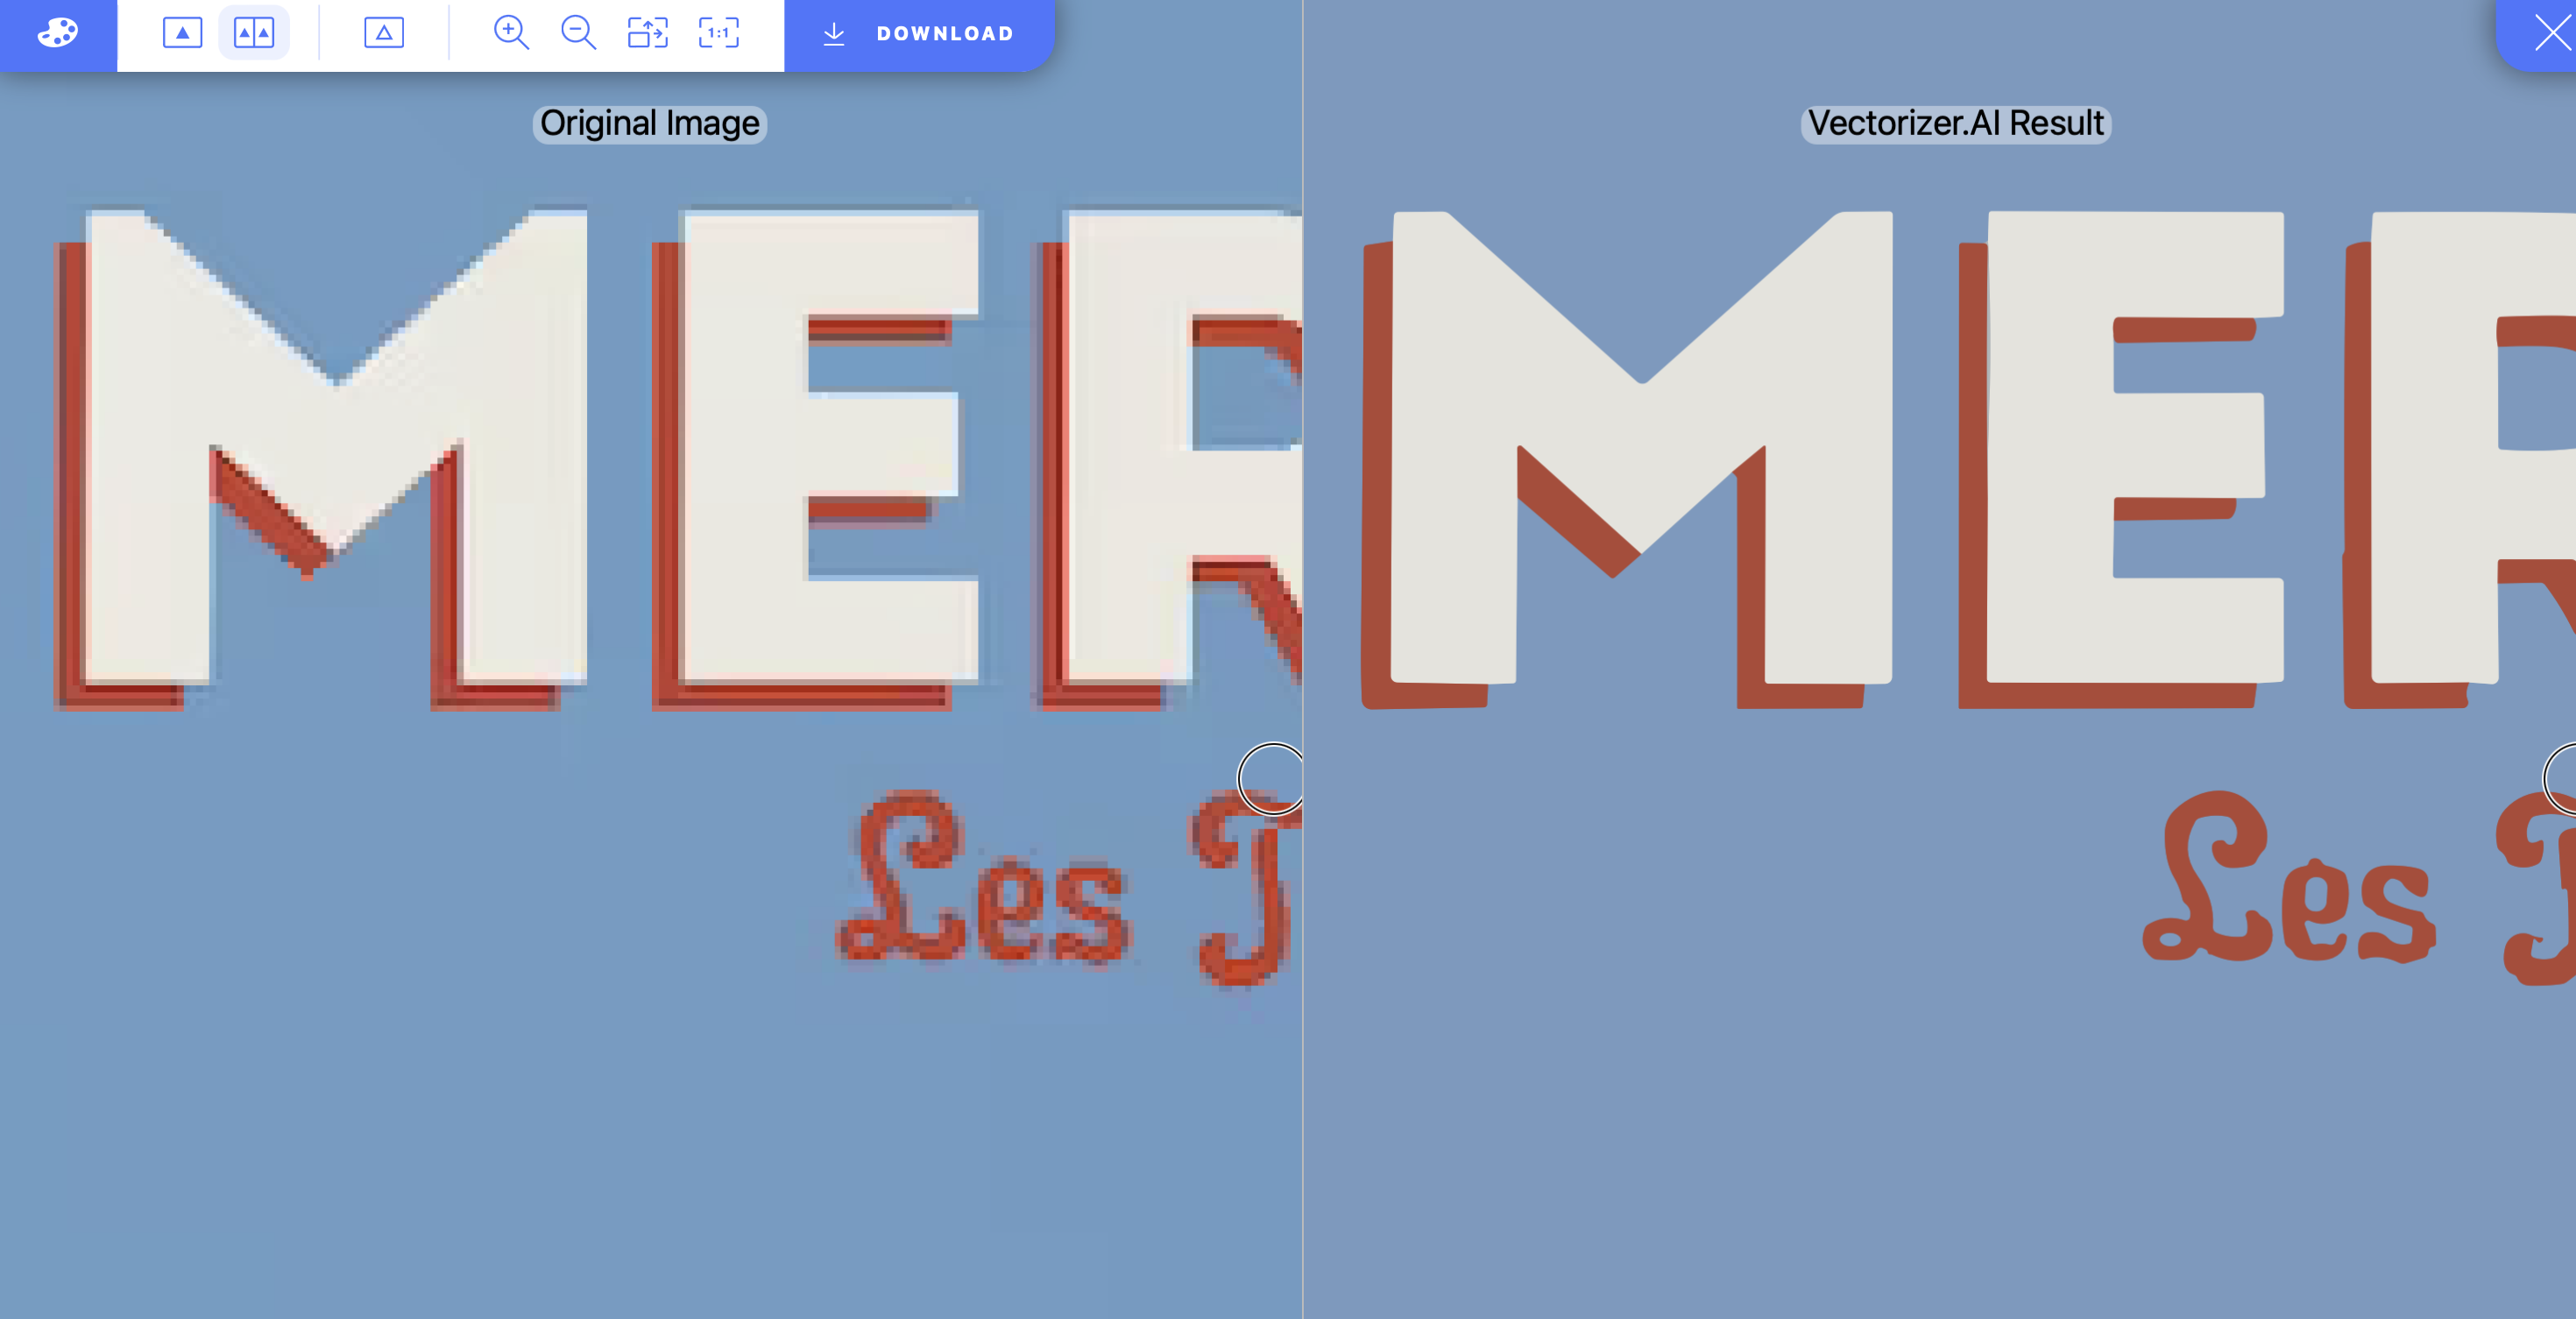
Vectorizer AI and similar tools can help, but I would still review the result carefully. Automatic vector conversion works best on simple, high-contrast graphics, not photographs.
Printify's own guidance is sensible here: DPI alone does not guarantee quality. A badly enlarged raster file can still look poor, while a clean vector graphic will stay sharp across sizes.
How do Printful and Printify handle low-resolution files?
Both Printful and Printify encourage high-resolution uploads, and both can flag low-quality files during product creation. You should still prepare your files properly before upload rather than relying on platform fixes.
Printful and Printify are the two POD apps I see most often on Shopify stores. They make fulfilment easier, but neither can turn a poor source file into premium print quality.
Printify has publicly noted that 300 DPI is a common recommendation and that artificially increased resolution does not always equal better image quality. That matches what I have seen in real stores. Merchants who start with strong source files get far fewer complaints and refunds.
| App | Best known for | What to watch for |
|---|---|---|
|
Printful |
Strong branding, fulfilment network, built-in checks | Use product template specs and preview files carefully |
|
Printify |
Large supplier network and broad product catalogue | DPI warnings help, but source file quality still matters most |
If you are still choosing a provider, our guide to the best print-on-demand providers compares the main options from a Shopify seller's perspective.
How do I increase DPI in Canva for print-on-demand?
The best way to get high-DPI Canva designs is to create them at large dimensions from the start. Canva is fine for POD, but it is less forgiving than Photoshop when you realise too late that your canvas was too small.
My usual workflow recommendation is:
- Set up the design at the final pixel dimensions needed for your product
- Use high-resolution source elements only
- Export as PNG for graphics or PDF Print where appropriate
- Check the resulting pixel dimensions before upload
- If needed, use a dedicated upscaler after export
For example, if you are creating a square art print, build it at 3000 x 3000 pixels or larger instead of relying on a later DPI conversion. Canva designs often fail for POD because the starting canvas was too small, not because Canva itself is unusable.
What mistakes should I avoid when increasing DPI?
The biggest mistake is confusing a higher DPI label with better image quality. If the source file is weak, the print will still be weak.
These are the problems I see most often:
- Using web images pulled from Google, Etsy, or social media
- Changing 72 DPI to 300 DPI without adding pixels
- Stretching small files across large print areas
- Ignoring product template dimensions in Printful or Printify
- Uploading JPEGs with heavy compression for artwork with text or sharp lines
- Skipping test orders before selling at scale
In my experience, the safest approach is to treat every product as its own print spec. A file that works for a mug may not work for a framed poster, and a hoodie front print may need a different layout from a t-shirt chest print.
What is my recommended workflow for Shopify POD sellers?
The best workflow is to design for the final product size first, then export, check, and test before publishing. This avoids most DPI problems before they happen.
- Choose the exact product and note the print area dimensions
- Calculate pixel requirements using print size x 300 DPI
- Create in a large canvas in Photoshop, Photopea, Canva, or Illustrator
- Use vector where possible for logos and text-based designs
- Upscale only when necessary and inspect the result closely
- Upload to Printful or Printify and review all warnings
- Order a sample before pushing traffic to the product
This is also why I always tell merchants not to treat file prep as an afterthought. Better product images and better print files usually lead to fewer returns, better reviews, and a more trustworthy brand.
If you are building a new POD store, you might also find these guides useful: how to start a print-on-demand business with Shopify, our full Shopify POD guide, and how to start a wall art business with print on demand.
How do I know if my file is actually print-ready?
A print-ready file has the right pixel dimensions for the final size, looks sharp at 100% zoom, and passes your POD platform's quality checks. That is the practical test.
Before uploading, I would check these five things:
- Correct dimensions for the specific product template
- 300 DPI target for close-view items
- No blurry edges or fuzzy text at full size
- Transparent background if needed for apparel graphics
- Colour and contrast that will survive real-world printing
And if the product is important to your catalogue, place a sample order. No software preview beats holding the finished print in your hands.
So what is the real answer to how to increase DPI for print-on-demand?
The real answer is that you increase print quality by matching pixel dimensions to the final product size, not by editing one number in isolation. Sometimes that means changing DPI metadata, but more often it means creating larger files, upscaling carefully, or rebuilding the design as a vector.
If you remember one rule, make it this: 300 DPI at final print size is the goal for most POD products. Work backwards from the product dimensions, not forwards from a low-resolution image you are trying to rescue.
That one change in thinking will save you a lot of blurred prints, rejected uploads, and unhappy customers.