
Last Updated on by Dan S
Originally Published September 27, 2019.
How to setup Google Ads Dynamic Remarketing Tag for your Shopify Store
What is a remarketing tag? Dynamic remarketing is a powerful tool in your retargeting toolbox. This tag not only serves ads to users who have previously visited your site, but goes a step further to show ads for the specific products they’ve viewed.
Why do I need this? You can use this to tailor specific messages to your audience to entice them to come back and finish buying that product they were interested in. Up to 70% CTR on remarketing can be achieved and conversions are typically 10x higher. This is because you have had a first touch/introduction already with the potential customer.
Before you get started you will have to create a Google Merchant Center account and upload a product feed. If you have a large catalog and don’t want to manually input all of your listings into Google Sheets, you can download the free “Google Shopping” sales channel in Shopify.
This channel will automatically update your feed when you add a new product to your Shopify. When downloaded you have to link your Google account and Google Merchant Center ID and your feed will populate. Once this is complete you can add your dynamic remarketing code to your site.
Next, set up your remarketing tag using the new global site tag and optional event snippet. For more information about this new tagging system, you can read this Google Support article: https://support.google.com/adwords/answer/7559130 . Log into your Google Ads account and click the wrench that says “tools” then go to “audience manager” under Shared Library.
On the left-hand side, navigate to “audience sources.” Lastly, you’ll see the “Google Ads tag” card with a button that says “set up tag.” If you already have a tag set up, click “details” on the card and scroll down to the “tag set up” box at the bottom of the page.
Follow the instructions on where to place the global site tag and the event snippet. The event snippet needs to be implemented if you are a “retail” business type.
Note: When you set up your tag, make sure you select “Collect specific attributes or parameters to personalize ads” then select “retail” as your business type and select to track ecomm_prodid, ecomm_pagetype, and ecomm_totalvalue.
 Once you have your remarketing code, you can paste it into your Shopify template page. To get there, go to the Shopify Admin left-hand side and find “Online Store” under Sales Channels.
Then go to “Themes.”
Find the “actions” dropdown and click “edit code.” for your current theme.
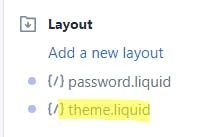
Lastly, make sure you are on “theme.liquid” and you will enter your code just above the /body closing tag.
Remember: Always backup your code incase you need to revert. Shopify allows you to roll back to previous edited version but don’t rely on this feature solely!
Next, you need to figure out what your business type is to add custom parameters. If you are using Shopify, you will most likely need the “retail” custom parameters which are listed below. You can find the parameters for multiple business types in the Google Help Center.
ecomm_prodid*
ecomm_pagetype**
ecomm_totalvalue**
*Required
**Recommended
These parameters pull in the specific information for the product when a user visits that page. Customize your event snippet with the three parameters. This code may have to be tweaked slightly based on your shops’ information.
Note: This is an example of an event snippet for the product pages and will not work on your site specifically. Follow the first step to receive your snippet.
<!– Event snippet for Example dynamic remarketing page –>
<script>
gtag(‘event’, ‘page_view’, {
‘send_to’: ‘AW-XXXXXX’,
google_business_vertical : ‘retail’,
id : ‘[Google Merchant Center ID]’,
ecomm_prodid: ‘shopify_US_{{ product.id }}_{{ product.variants.first.id }}’,
ecomm_pagetype: ‘product’,
ecomm_totalvalue: ‘{{ product.price_min | money_without_currency | remove: “,”}}
});
</script>
You can place the event snippet anywhere underneath the Global Remarketing tag.