
Last Updated on by Dan S
Originally Published August 16, 2020.
In this exclusive guide, you will learn EVERYTHING you need to start, build and launch a profitable Shopify store from scratch.
How to build a Shopify store from scratch and launch in 1 day Step-by-Step (with no prior experience required). [Updated for 2024]
You can walk through this guide at your own pace or blitz through it in under an hour. So without further ado, shall we build a business?
Introduction
Welcome.
In this deep guide, you will be walked through every step required to build and run a successful Shopify store.
Whether you have previous experience of Shopify or any ecommerce platform or are completely new, you will gain the skills and knowledge to do ecommerce the right way.
The platform we use here on Commercefy allows you to go at your pace, completing the lessons when you want to. Whether you burn through it in a couple of days or progress over a few months, you can track progress and revisit at any time.
So without any more hold up, let’s dive straight in.
What is Shopify?
Shopify is a complete commerce platform that lets you start, grow, and manage a business.
- Create and customize an online store
- Sell in multiple places, including web, mobile, social media, online marketplaces, brick-and-mortar locations, and pop-up shops
- Manage products, inventory, payments, and shipping
Shopify is completely cloud-based and hosted, which means you don’t have to worry about upgrading or maintaining software or web servers. This gives you the flexibility to access and run your business from anywhere with an internet connection.
Whilst there are other platforms available, none come close to Shopify in terms of ease-of-use, healthy ecosystem, integrations and manageability.
What will I need?
Asides from this course, you will just need a computer with an internet connection and time to build an online store!
It is possible to use a tablet and even a smartphone to achieve this but with a computer, you will give yourself the best chance.
The good news is that because Shopify is cloud based, you don’t need anything fancy. Windows or Mac, as long as you can browse the web, you’ll be good to go.
So, that’s all the “preface” out the way.
Let’s build a business!
Building your Store
In this section we will start the foundations of building your store. As big of a task that may sound, luckily we have tools to make it very manageable and more importantly, without having to use a single line of code…
Create Account
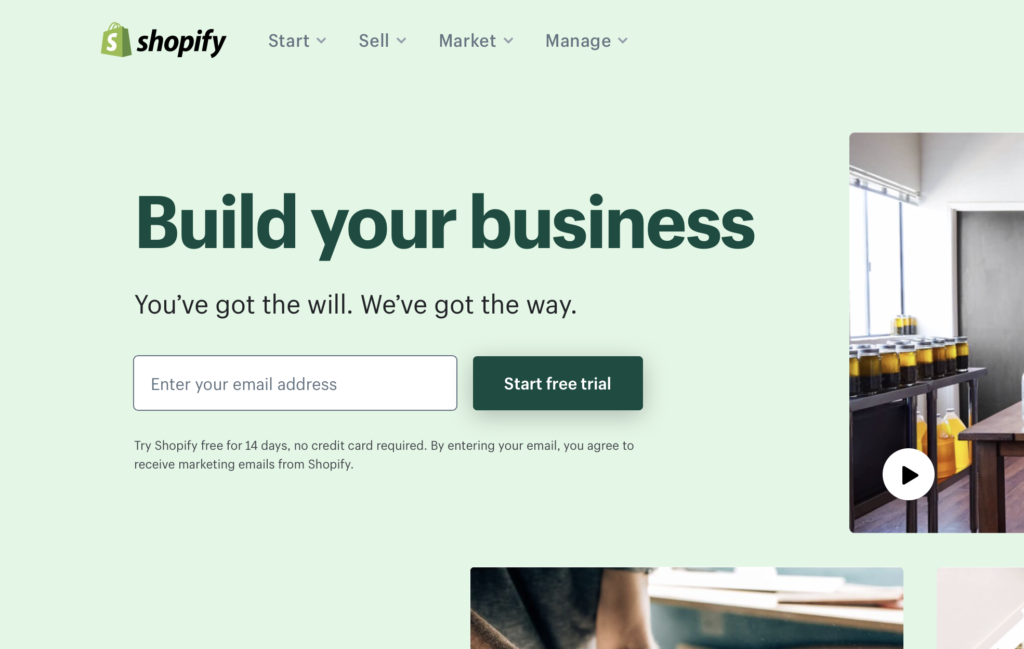
Ok, first thing, Open up the Shopify website. In the field at the top of the home page, fill in your email address and click the button Get Started.
If you already have a Shopify account, we urge you to sign up again using the link above so you have a fresh account. This course will completely guide you through EVERYTHING and there will also be an added bonus later on if you have successfully signed up using the link above.
Once you’ve clicked on the Get Started button, you will need to provide a little more detail to get started.
Then fill in the password that you would like to use with Shopify and the name of your store. Make sure to use the store name you want – the address of your store will be based on it. It is literally the store name so you don’t need to put in “www”, “.com” or anything like that.
Note down the password as you will need it again. And click the Create your store button and Shopify will start putting in place your store.
Before we get into the admin, Shopify needs a few more details to complete the setup of your account. Fill in your name, address and telephone number.
Then click the Next button. And on the next page, you can provide Shopify with a bit more information about your business. Click Enter my store to finish.
The Shopify Dashboard

The left panel is where you will manage everything. The search at the top is useful when you have content (great for finding orders or products) but not needed until you go live.
Choose a theme
The default theme is usually Dawn. This is a strong theme to build an online store with and the moment you start to customise your store with logo, images, products and color, it will come to life and no store will look a like.
There are premium themes and 3rd party themes but for now, we suggest focusing on the important aspects of starting and building a Shopify business.
Customising your Theme
In your Shopify Admin, on the left panel, scroll down to Online Store and click it. Next, you will see your Current theme along with a purple button named “Edit Store”. Click that and you will be taken to the editor.
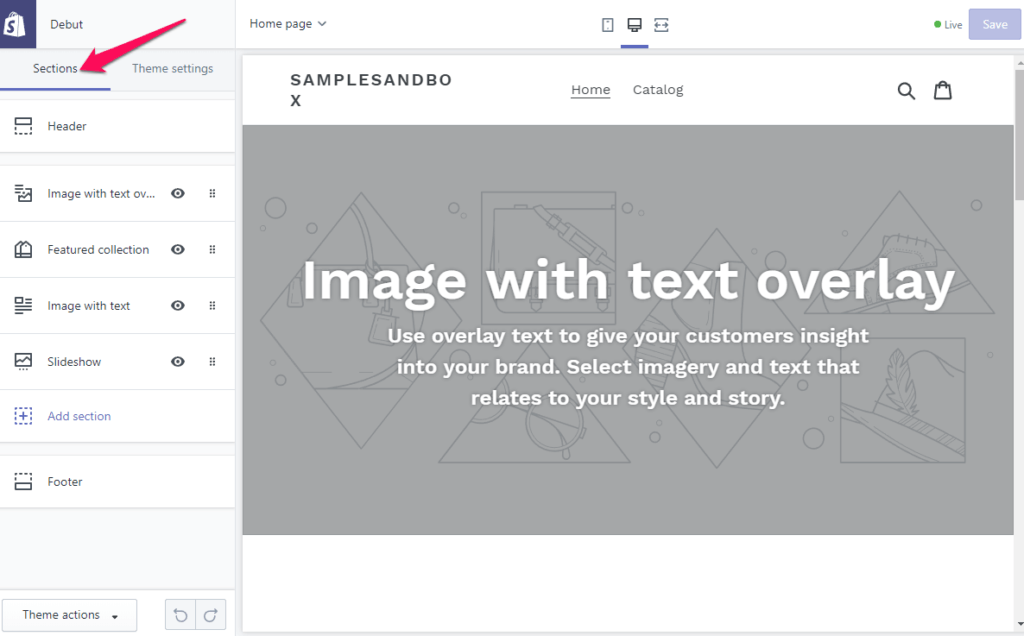
On the left is “Sections” and “Theme Settings”. Sections are the building blocks of particular pages. These change depending on the page type you are looking at and the themes customisation options.
The Theme settings control the fonts, colours, theme functions and checkout options.
On the right (pictured above) is the preview. This is so you can work on your store and preview it in real time!
We suggest going through all the sections, pages and options to get to know your way around.
Create the “important” pages
Next, you need to head over to “Pages” under your Online Store.
For now, we just need to create “About” and “Contact“.
In the about page, just write a paragraph or so describing when you founded your business, how you will provide great customer service and so on. You can revisit this later when you have identified the business direction.
For the Contact us page, simply create a new page called “Contact” and make sure the template it’s using is page.contact.
Finally, head over to “Legal”. This is found in Shopify Admin > Settings. Here you will find Refund, Privacy, Terms and Shipping Policies. Simply click “Create from Template” to auto-generate all these. How simple hey!
Add your logo
The logo is a crucial part of your store. It’s your brand and also part of your theme’s design.
A logo can dictate which direction you take a brand (color and font etc) so if you aren’t a savvy designer then outsource it.
Head over to Fiverr.com, type in logo designers and get one made. It will cost anywhere between $5-25 based on the seller. Just look at their portfolio to decide what you like the look of.
Want to spend nothing? There are some basic logo makers such as Shopify own one found here.
You also have the likes of Canva which are a bit more design heavy but still a free option.
Once you have your logo, head over to your theme and customise as per the previous “Select your Theme” topic and upload it. You will need to add it to your theme header. You should now start to see your brand come to life!
Let’s continue.
Identify Market & Product Fit
What are we building exactly? Without a direction, it’s hard to know. In this lesson, we will identify what we will sell so we can, well, sell it!
Select a market
There are 2 routes to go, “general” or “niche”.
For the purpose of this course and your success, we recommend going for niche. This means you find a market either of interest or something you have experience of and focus on that.
An example could be “Jewellery” or “Pets“. Remember, these are still massive markets so you are by no means limiting your store’s potential for success, in fact you are improving it by not creating a “general” store.
To help you come up with markets, head over to AliExpress and start browsing. AliExpress is going to be your supplier so it helps to find a market on the platform that you fancy conquering. Remember, this is a massive marketplace and will cater to almost any niche you select.
Whether that be Gym wear, Pet Toys, Car Accessories, Phone Cases, Jewellery, toys, home decor and so on.
Once you have settled on a good niche, it’s time to identify what your store will actually sell. Getting exciting hey?
Product Research
Now we have a market, we can focus on what products we should be selling.
In terms of product selection to make sure what you’re looking at will actually convert into profit for you, we need to create some criteria.
The first is price. We are talking here about buying something on our for $4 or less and selling it at $15 to $20. This is a price point where people will buy online without perhaps shopping around or spending ages researching it.
Next you want something without sizing ideally. If something is for someone to wear and it comes in 5 sizes, you increase the chances of return when someone orders in the incorrect size.
Another aspect is size and weight. The smaller the better. If it can fit in the mailbox, bonus. You also want it light so its cheap to ship and more margin for you.
Try to avoid branded products as these add unnecessary cost at this price point.
Finally, when look at the products, ask yourself if you would actually buy it. Look at the images and description. If a product on AliExpress is appealing, when you add your sprinkle of better description later on, it will have an even better chance to sell.
Once you have identified the sorts of products you want to sell, make a note of them like “Dog Bowl, Dog Toys, Dog Collars”. The list can be as short or as long as you like. However, at this point we would say to aim for 5-10 product types.
The next part is where the real magic happens regarding products…
Adding Products
Arguably, one of the most important aspects of an ecommerce store, the products. In this lesson we will show you how to create products, where to get products from and tools we can use to make this a breeze.
Creating a Product
Now you’ve chosen your product, it’s time to add them to your store.
Whilst we will be adding products “AUTOMAGICALLY” using a super cool app, its important to know how to do this manually so you understand product creation and more importantly, editing.
There are two types of products; simple products and variable products. We’re going to focus on simple products in this section.
A simple product is exactly how it sounds. There are no variants to a simple product, just one size and one colour, for example.
Adding a product
- Navigate to your Shopify Admin and select Productsfrom the left-hand side menu
- Next select Add product
There are three main aspects that make up the product; the title, the description and the images.
The title
When creating your product title, ensure you keep it succinct and to the point. It needs to state exactly what the product is. For example, if you choose to sell a red dog collar, you’ll want to name your product title ‘Red Dog Collar’.
The description
This is what describes your product. It’s a good idea to start the product description with a question. This makes the buyer think and draws them into wanting to purchase your product. The description needs to be short; include bullet points, as this is easier for the buyer to read.
The images
The images are the most important part of the product. The images need to be high quality, as this will make the buyer purchase. Ensure that your lead image is the best one of your selection. This is what will grab the buyers attention when they are product searching.
The price
Select a price that you know the product will sell for. You should know this from the product and market research that you’ve done previously.
Other product page fields
You don’t need to worry about filling out the inventory information, as you’re creating a drop shipping business. You don’t need to stock your products. Your supplier will ship your products directly to your customers. Leave the other fields as they are for now. You don’t need to add variants for a simple product, as there will be no variants for this kind of product.
At the bottom of the product page, you’ll find the search engine listing preview. This will show you what you product listing will look like on search engines. You can edit this if you wish by selecting Edit website SEO.
Once you’ve saved your product, you’ll be able to view this as it would appear on your website. Click Viewat the top of your product page.
Now that you’ve added one product, try adding more. It’s always good to familiarise yourself with the process.
Creating a Variable Product
After creating several products, it’s now time to look at variable products.
Choose product that has different variants. This could be a necklace that is available in gold, silver and black. Again, save the images that you want to use on your own product listing. You’ll need one of each variant at least.
Next, navigate to your products in your Shopify store and add a new product. Once you’ve entered the title, description and added the images, scroll down to Variants.
Adding variants
Select Add variant. Under Option name, you’ll to change Size to Colour (it always defaults to size). We want to change it to Colour in our example, as we’re working with a gold, silver or black necklace.
In Option values, you’ll need to insert Gold & Silver. These are the different variants of your product. Select Save.
Next, scroll down to Variants. You’ll see it’s laid out the three variants that you’ve just inserted. You now to add the correct image against the right variant. You do this by selecting the image icon. Then you can enter the price of each variant. When this has been completed, select Save.
You now have everything in place for a variable product. Select View on your product page and you’ll be able to see your variable product on your website. There should now be a drop-down menu where you can select the colour. The image and price should also change when each colour is selected.
Add in several variable products to your store so you understand the process. Now you’re ready for the next step.
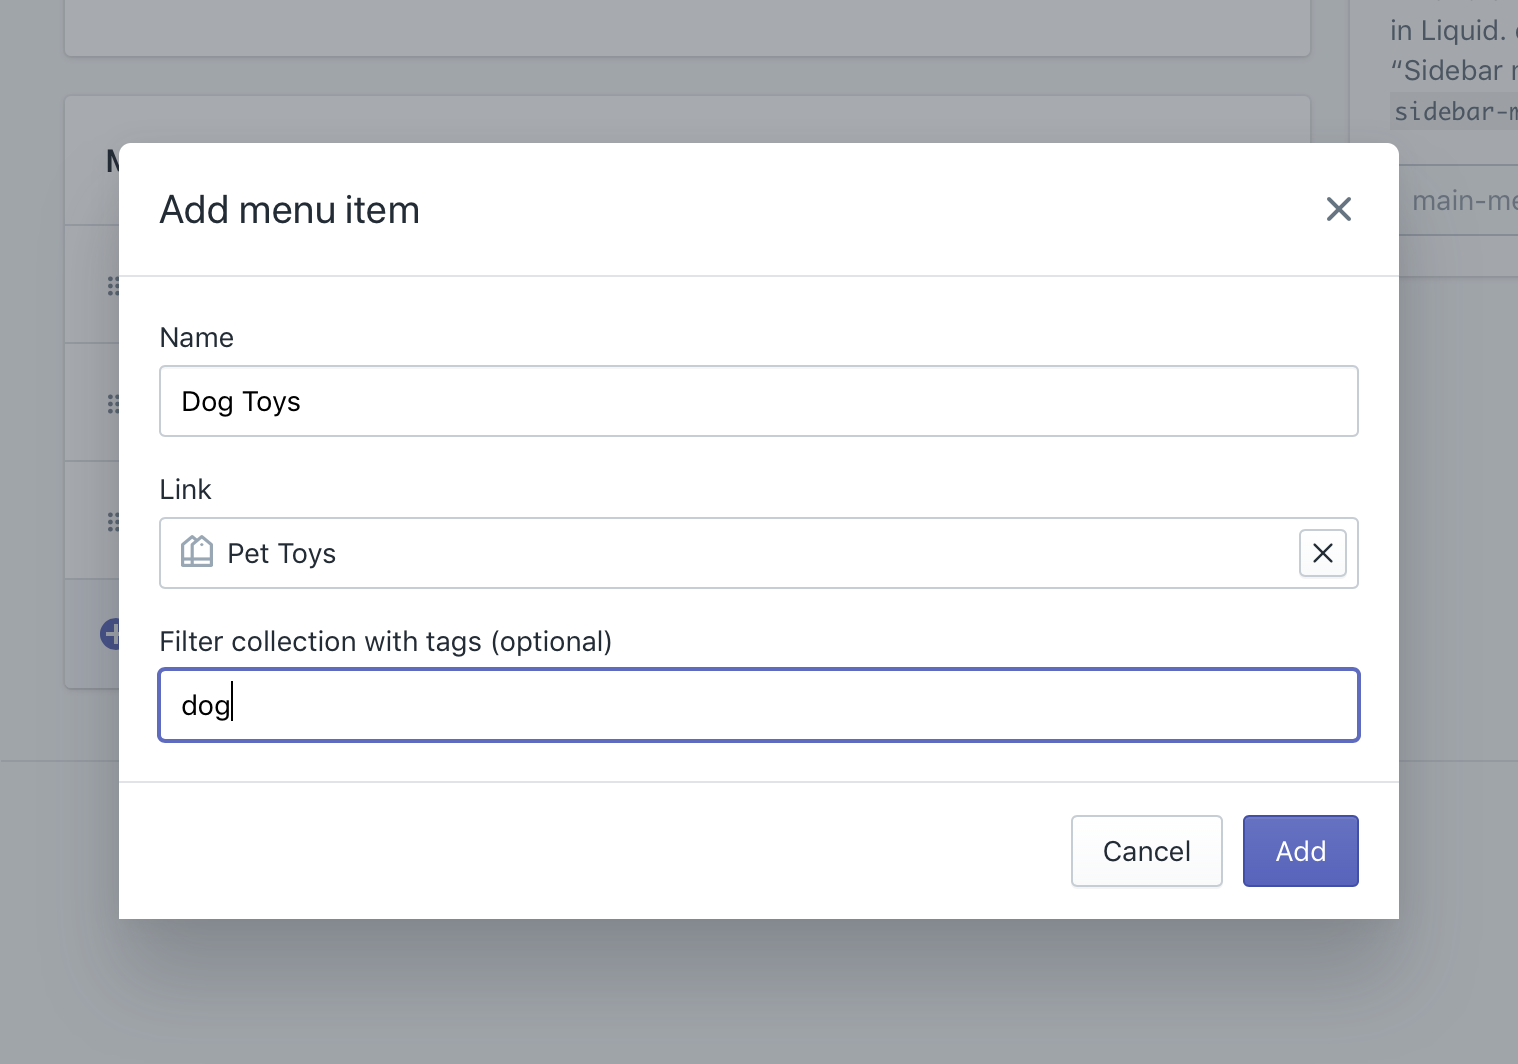
Creating Collections
Collections are basically categories. They “group” your products together in a structure that makes sense. You can get to collections in your Shopify Admin by going to Products > Collections

As example if you had a store selling “Pet Products” then you may have a collection called “Toys”. Under this you would put all your pet toys.
You can have as many collections as you like and you can also filter using “tags”.
Taking the previous example, I may choose to add a tag called “dog” to all my products that are for dogs. This comes in handy when you want to create your stores menu.
This allows you to go another tier deeper. So my “top level” main menu item would be “Toys”, I would then have menu link title “Dogs” sat under this and that would simply be the “Toys” collection filtered by products tagged with “dog”. As you can guess, I would probably repeat the same with “Cats” using a “cat” tag.
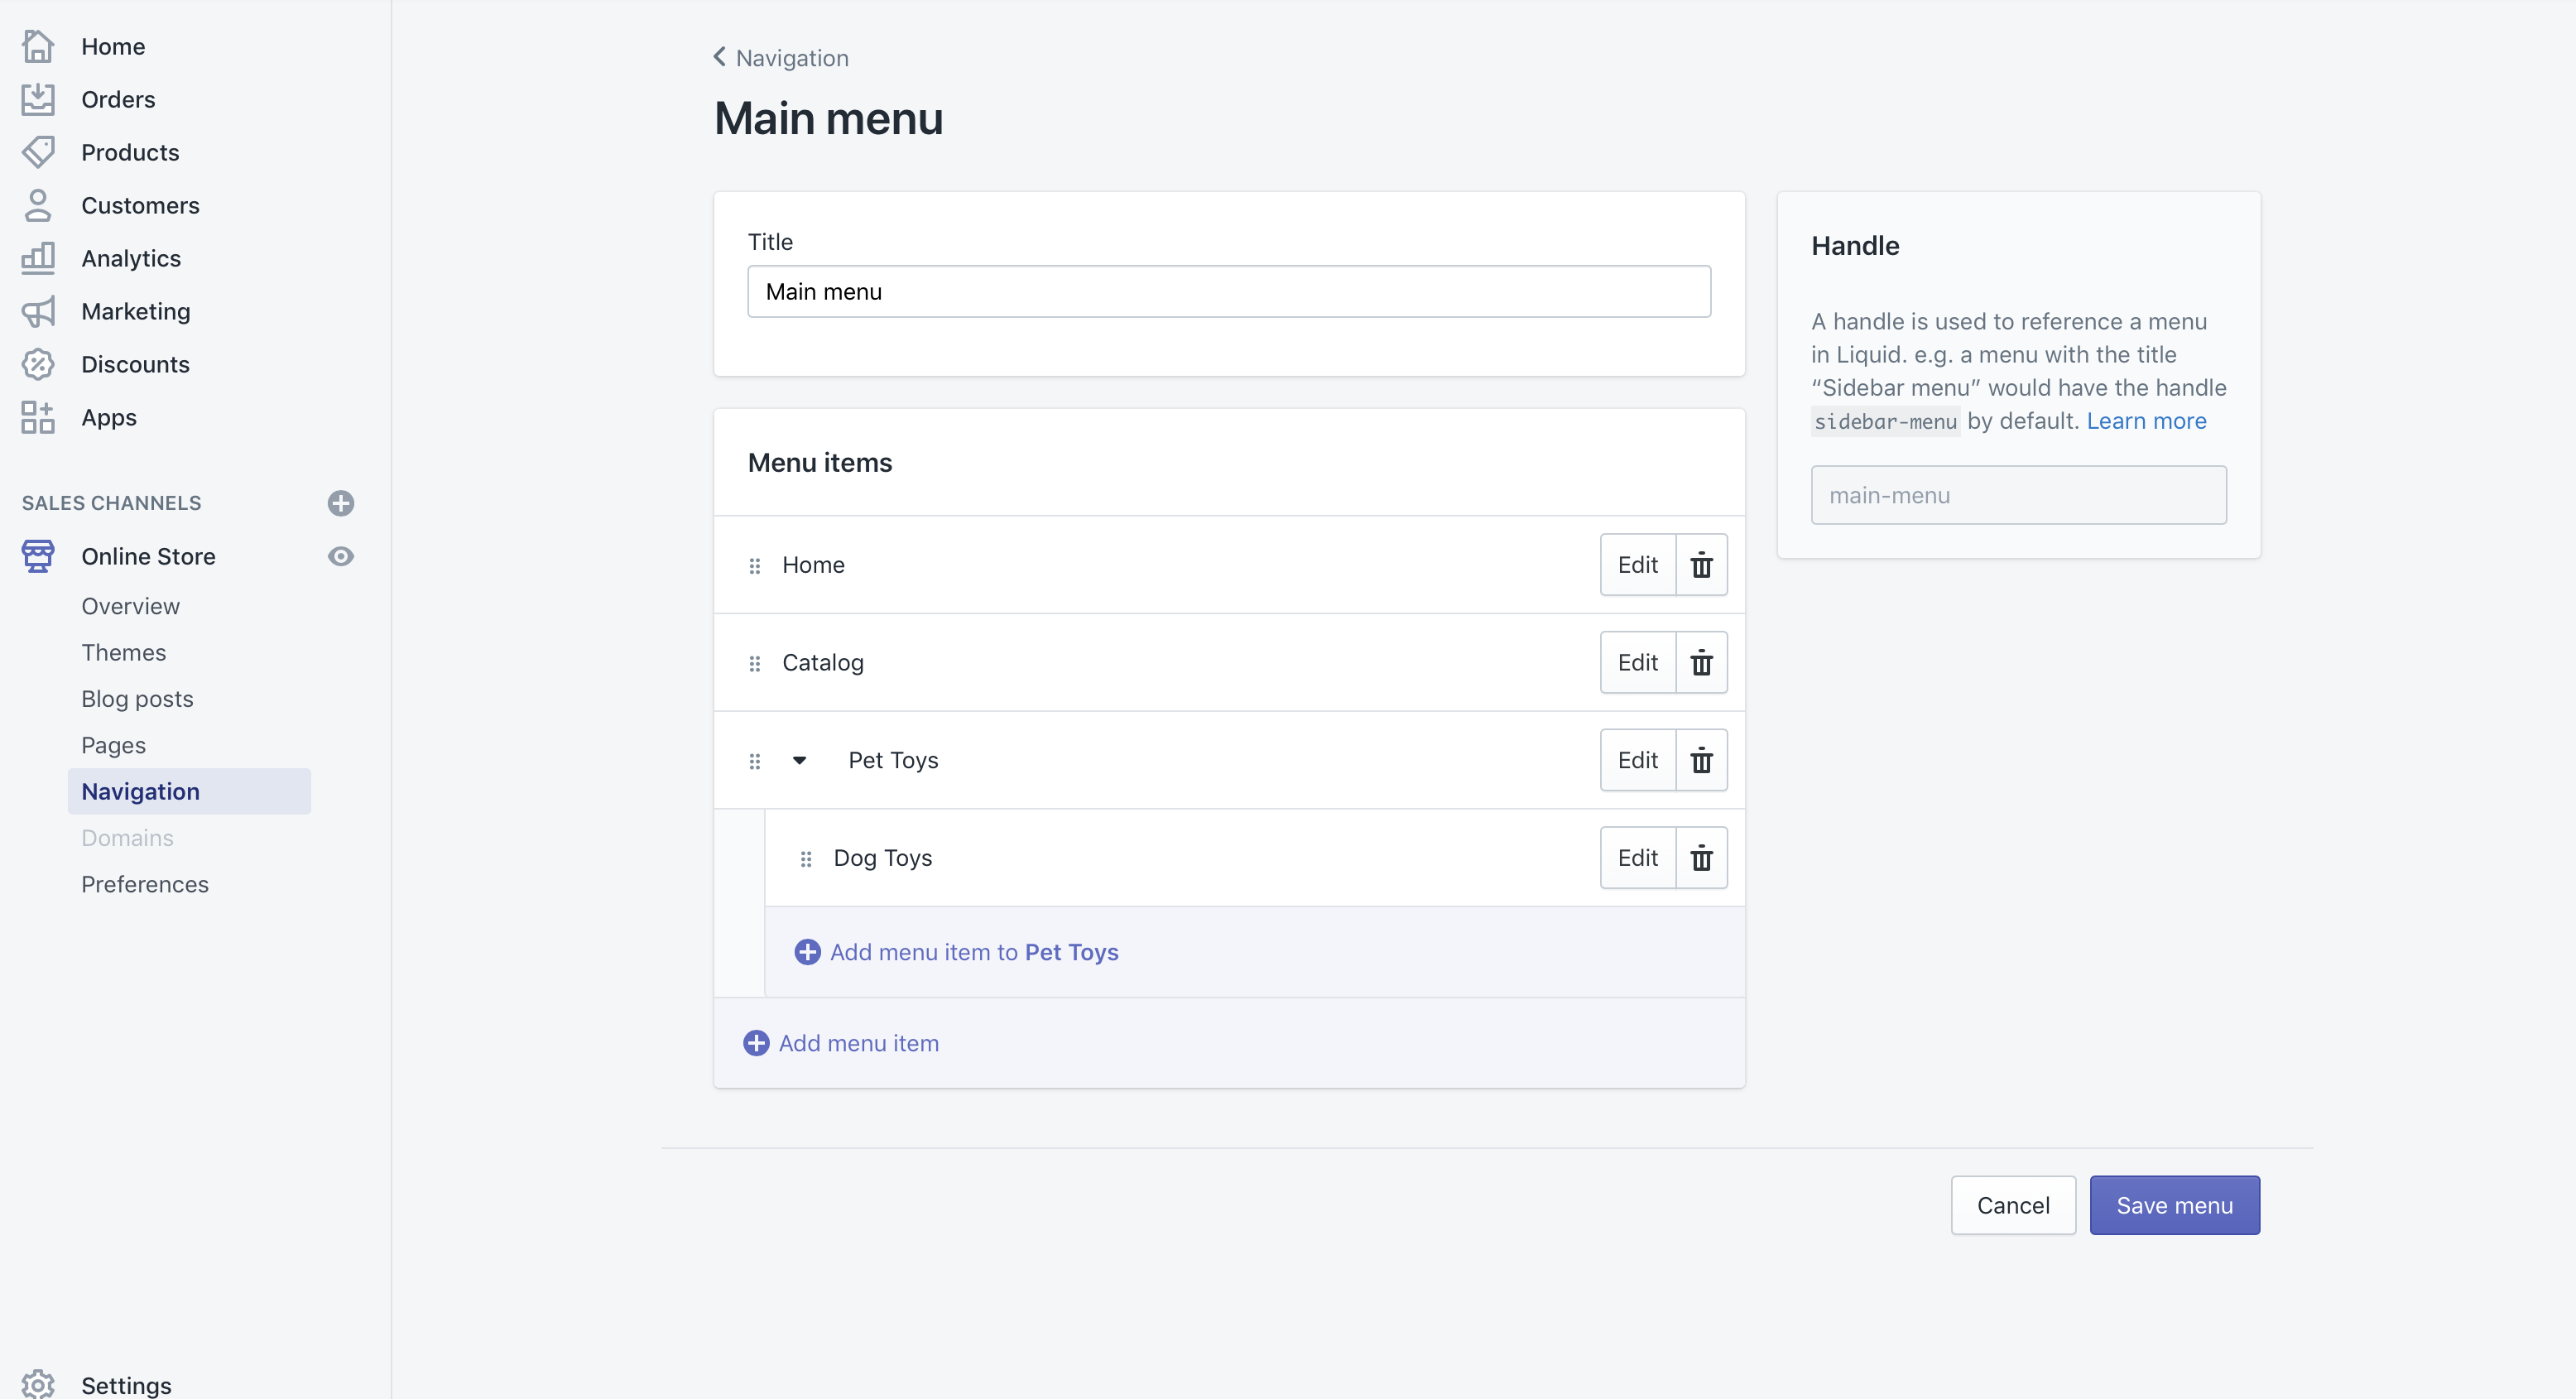
Menus are best built once you have imported all your products and added them to collections.
Dropshipping
It’s important to see how you can add products manually so you know your way around products and collections. However, we’re now going to show you how to use DSers.
DSers is a free plan available App which allows you to find products to sell, import them with one click and even fulfil your orders.
DSers is the #1 Drop Ship app available. With this installed on your Shopify store, you can pretty much cut out product creation, product sourcing, having to worry about warehousing, delivery and so on. You are just the middleman of the deal and you simply take the profit on every order.
You will just have to focus on finding the products you want to sell, click to import them and sell them! How simple is that…
Simply head over to the Shopify App Store and add DSers to your Shopify store.
Once installed, you will be able to connect your store (usually automatically) and become familiar with the Oberlo Dashboard.
Next, let’s browse some products. Click on “Find and add your first product”.
Search for any product at first and click into it. Familiarize yourself with the tabs, product information and actions you can take.
Don’t push anything to the shop yet though. We have some more housekeeping todo first. Let’s proceed.
Print on Demand
This is an optional section for those interested in the world of Print on Demand. Even if you aren’t, we still suggest skimming over the lesson. You may end up adding it the future or for another project.
What is Print on Demand?
Print on Demand is similar to Drop Shipping in that you never touch the product, you simply take a cut of the sale. (The difference between the sale price and cost price).
As you can guess from the name, it’s to do with Printing!
With Print on Demand, you can list products on your store with designs on them. Think T-Shirts with prints, phone cases with patterns, shoes, watches, mousepads, keyrings, posters, canvases, mugs, totes and so on.
When you list them on your store, you are showing a “mockup” of the product. So it may be a picture of a dog on a mug. In reality, this hasn’t been printed yet, its just a mockup (Don’t worry, there is an app for this) and its being advertised for sale.
Only when we actually make a sale is the product printed and shipped to the customer. Print…. on…. Demand.
Imagine a warehouse full of “blank” items ready to be printed on. As blanks, they are boring and well, not very desirable. However, the moment we add designs to them, they come to life.
Whilst this course is primarily focused on Drop Shipping, you could choose just to offer Print on Demand products. You could even offer both in a store. It’s entirely up to you.
How to source imagery
In order to create Print on Demand products, we need source imagery. This is what we will upload to our Print on Demand app to create the mockup (visuals of our products) and to actually print onto the products themselves.
Some key points to address immediately:
- Only use imagery you can legally use. If its a brand, character, celebrity or logo and you don’t have permission then steer clear
- Make sure it’s of decent quality. If its small, it won’t print well. The app will alert you if this is the case
Where to get designs? You have 3 options.
- Free Providers (Pixabay, Pexels, Freepik) – They are all free and most are commercial use. Check the copyright.
- Design your own. Are you handy with illustrations or photoshop? Make them!
- Buy them. Places like Shutterstock have ready made designs. You can also commission them on platforms like fiverr.
Once you have the designs, that’s the hardest part out the way.
Now we can upload them and create the products to sell!
Selecting a provider
When it comes to finding a provider for your Print on Demand items, there are a few things to keep in mind.
Quality, Speed and location.
There are quite a few offerings on the App Store, including but not limited to: Printful, Prinitfy, CustomCat, TeeLaunch, AOP+, Fuel and WC Fulfilment.
For this course, we will go with Printful.
Just like Oberlo, if you want to offer Print on Demand, head over to the App Store and grab the Printful app.
https://apps.shopify.com/printful
Once installed, load up the app and familiarize yourself with the dashboard.
Next, you will want to create a product using your design. You simply upload the design in the product editor, position it and select the variants you want to offer.
Fill in any details and watch your product come to life! When happy, add it to your store.
Head over to your Shopify Admin products to check its ok and view it on the frontend. Cool hey?
Audience Discovery
We need an audience to sell to. This lesson is about starting the accounts that will help us reach them.
Setup facebook
Having a Facebook page for your store is important for 2 reasons. Insight and Reach.
With insight, we can see who is interested in what we are selling and with reach, we can reach them.
To setup a facebook page for your store, head over to pages and fill in the few details it requests.
Don’t worry, this is separate from your personal facebook profile if you have one.
https://en-gb.facebook.com/business/pages
The import aspects to add are name (of course), a profile picture, cover and some about text. Once setup, we can move on to the next step.
Setup Instagram
Just like the previous step, create an Instagram account for your store.
https://www.instagram.com
Whilst we may not put much content on either of these platforms, we need them to advertise and promote our store successfully to get sales.
Don’t spend too much time if you don’t want to on setting up these accounts. However, the more content you put on them, the more established you will look.
This should happen naturally over time if you commit to adding a couple of posts a week for example.
What are insights and how to use them
Insights allow you to gauge what audiences are doing on Facebook and how you can reach them.
As your page is new, you won’t have any metrics (stats on visits, who is visiting, location, get) however you can still use the Audience insight tool to look at potential audiences on Facebook.
https://www.facebook.com/business/insights/tools/audience-insights
At this stage, this is just for research and familiarity. Its not crucial to the success of your store but will help you to know your way around these tools.
Final Configuration
Now it gets real exciting. By now we should have a store with a theme reasonably configured, you will hopefully have some products loaded and you have some sort of direction for the stores brand, market and general direction.
In this lesson, we will go through all the aspects which will knit these elements together and get your store LIVE.
Selecting a Plan
In order to continue and commit, we need to pop our Shopify account on to a plan.
This is important for multiple reasons. The first is we don’t want to lose what we have setup. If the trial expires, our account faces deletion. Secondly, it commits us. To be successful at this, we need to be motivated to keep going and a plan will give us that little push.
On your Shopify Admin Dashboard, you should see “Select a Plan” next to your trial notification. If this isn’t visible, head over to settings > Account.
There are 3 Plans but as we are starting, only 2 really apply to us.
Basic Shopify VS Shopify.
To keep it simple, lets kick off with the cheapest plan at $29 a month. If you want to save, you can opt for annual payment. This of course will tie you in for one year but will also be a real reason to commit and make this a success!
Alternatively, you can pay monthly with no contract. The choice is yours.
Add/Register a domain
Now you are on a plan, we can connect a domain easily.
There are 2 options: Buy Direct from Shopify or Connect an Existing Domain.
Option 1:
This is the easiest way. You can buy a domain (if available) through your Shopify Dashboard and connect it straight away.
This has one major drawback. Email configuration. You won’t be able to reply to customers with your flash new [email protected]
We don’t like this so we suggest you go for option 2 which is slightly tricker but gets us the all important professional email.
Option 2 (Best Way):
Buy a domain from a provider and connect it to Shopify under the “Connect an Existing Domain” setting.
There are many domain providers but for ease, we will show you how to do it with GoDaddy.
Head over to GoDaddy, find a domain and purchase it.
Once you have purchased it, all we need to do is connect it. In the next video, we walk you through purchasing the domain (for those new to it) as well as connecting it.
Connect your domain
Provided you went with option 2 in the previous section, you should now have bought a domain.
This domain needs to now be connected to Shopify.
In your Shopify Admin, Go to Online Store > Domains. Click “Connect Existing Domain”.
Enter your domain in the field and click next. You will now be presented with a screen on what to do next.
Depending on where you bought the domain from, there will be different instructions but most follow the same sort of structure.
All we need to do is add some “DNS” records to the domain. This tells the domain to point to Shopify.
When you have entered your domain in and clicked next, it should auto-detect who the domain is with and provide you with the correct instructions. Simply follow those to complete the process.
Once your domain is connected, its time to create email with your provider.
Setup Email
With your Domain all connected in Shopify, we next need to sort out email.
As mentioned previously, Shopify don’t provide email accounts for your store. You need to get these yourself.
The easiest place to do this is the same place you bought your domain from.
Simply login to your domain provider and add an email account to your plan.
With GoDaddy, just head over to the domain in your account (on GoDaddy, not Shopify) and click manage email.
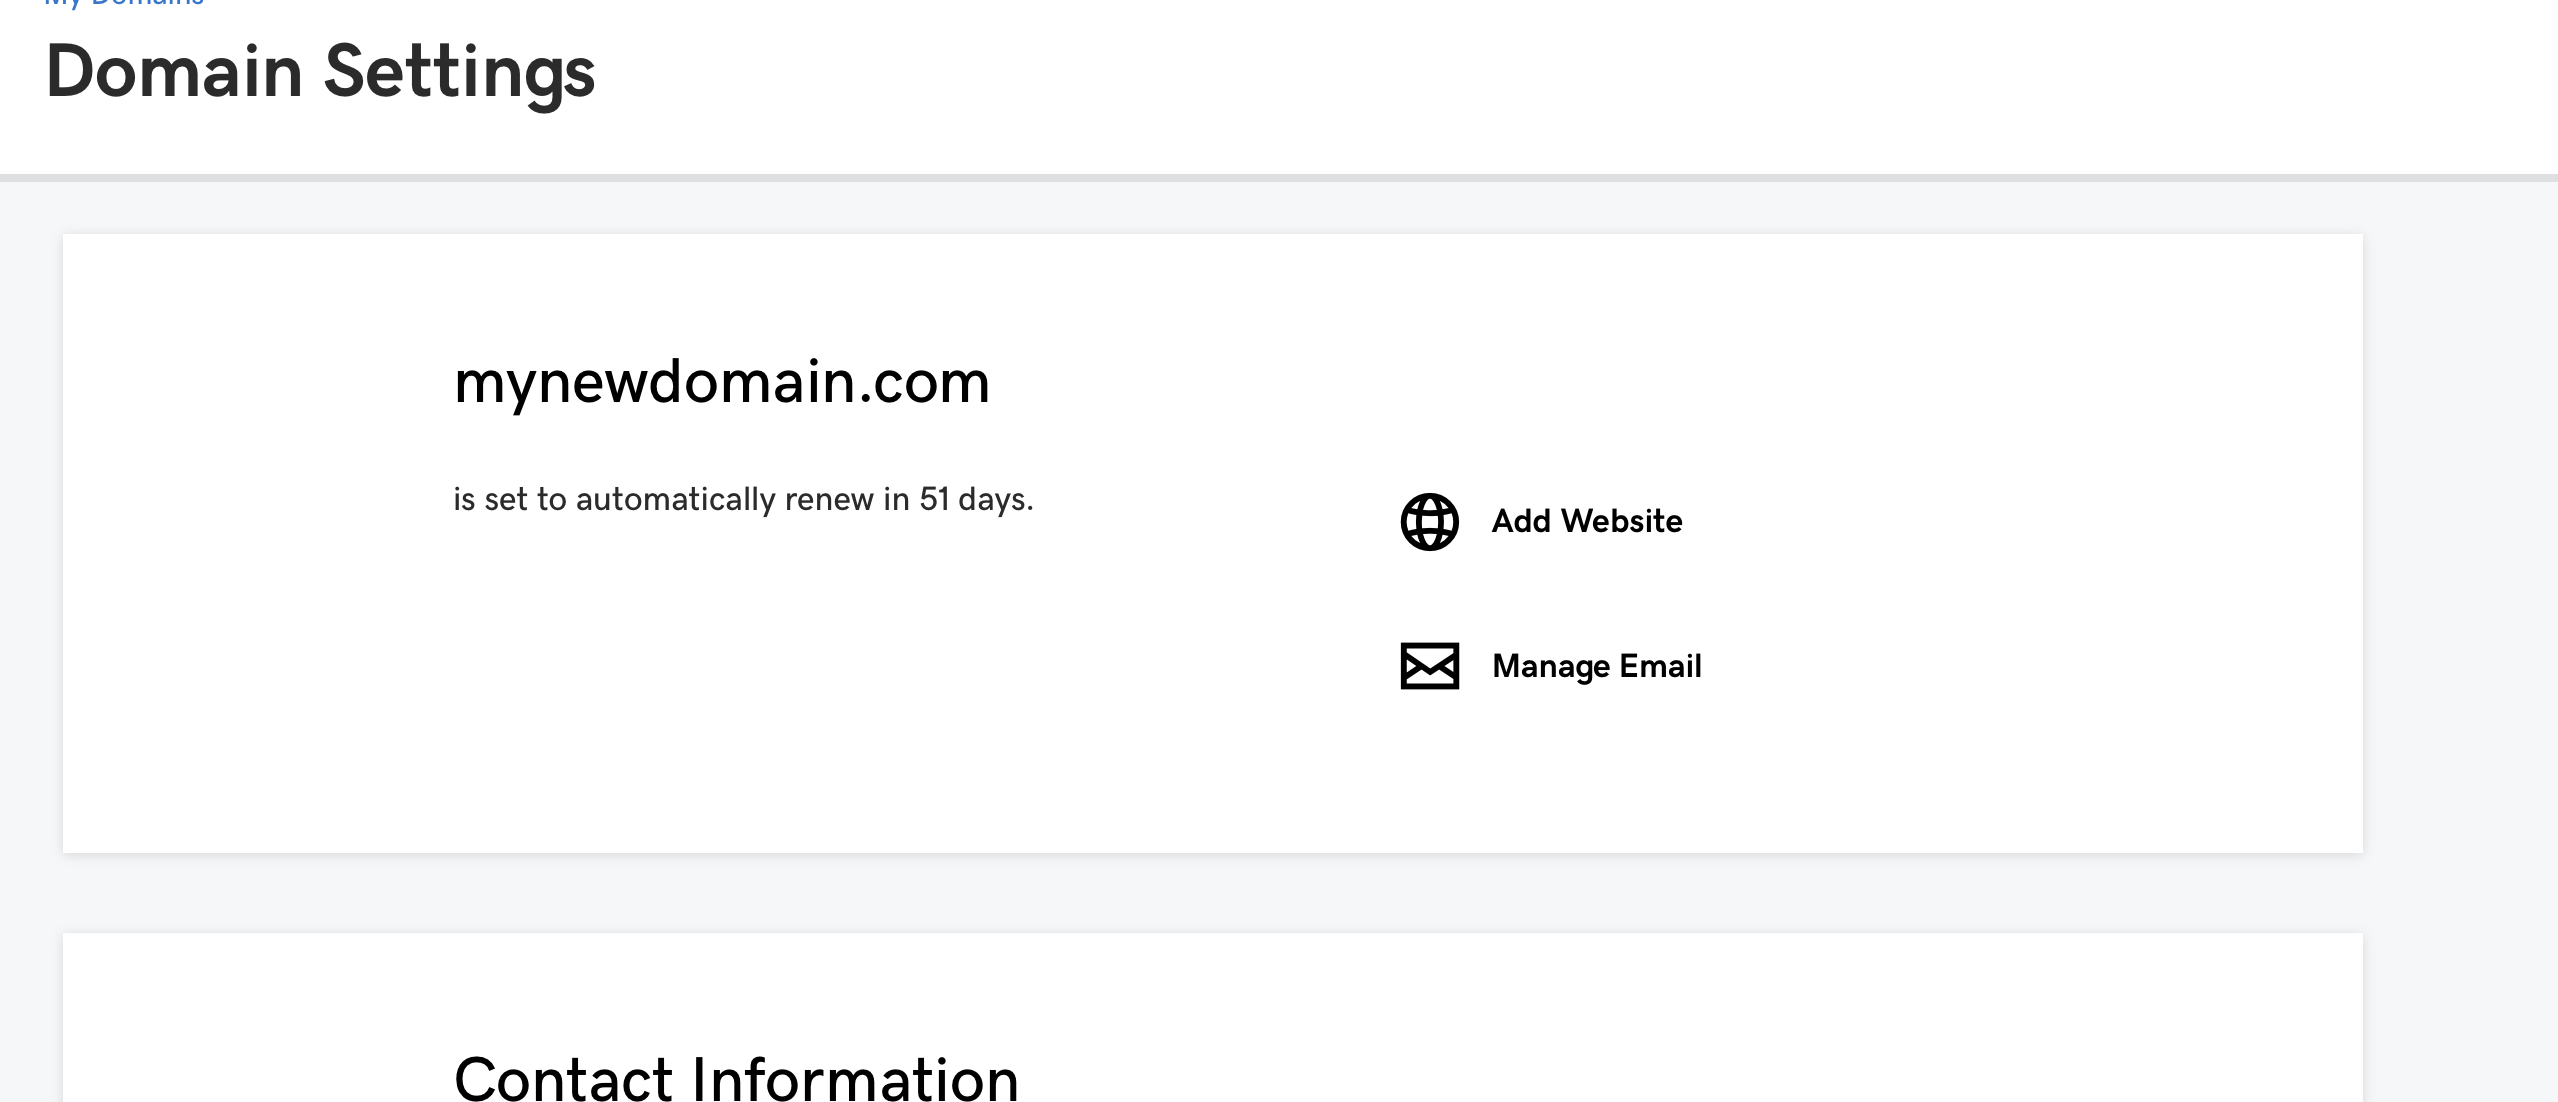
Then, just click add email and set one up. There is a small cost per month but it’s only a few dollars. A few months covered by 1 sale! (You may have purchased it already when setting up the domain)
When you have created your email e.g [email protected], head back over to Shopify.
We need to update the “Customer Email” address.
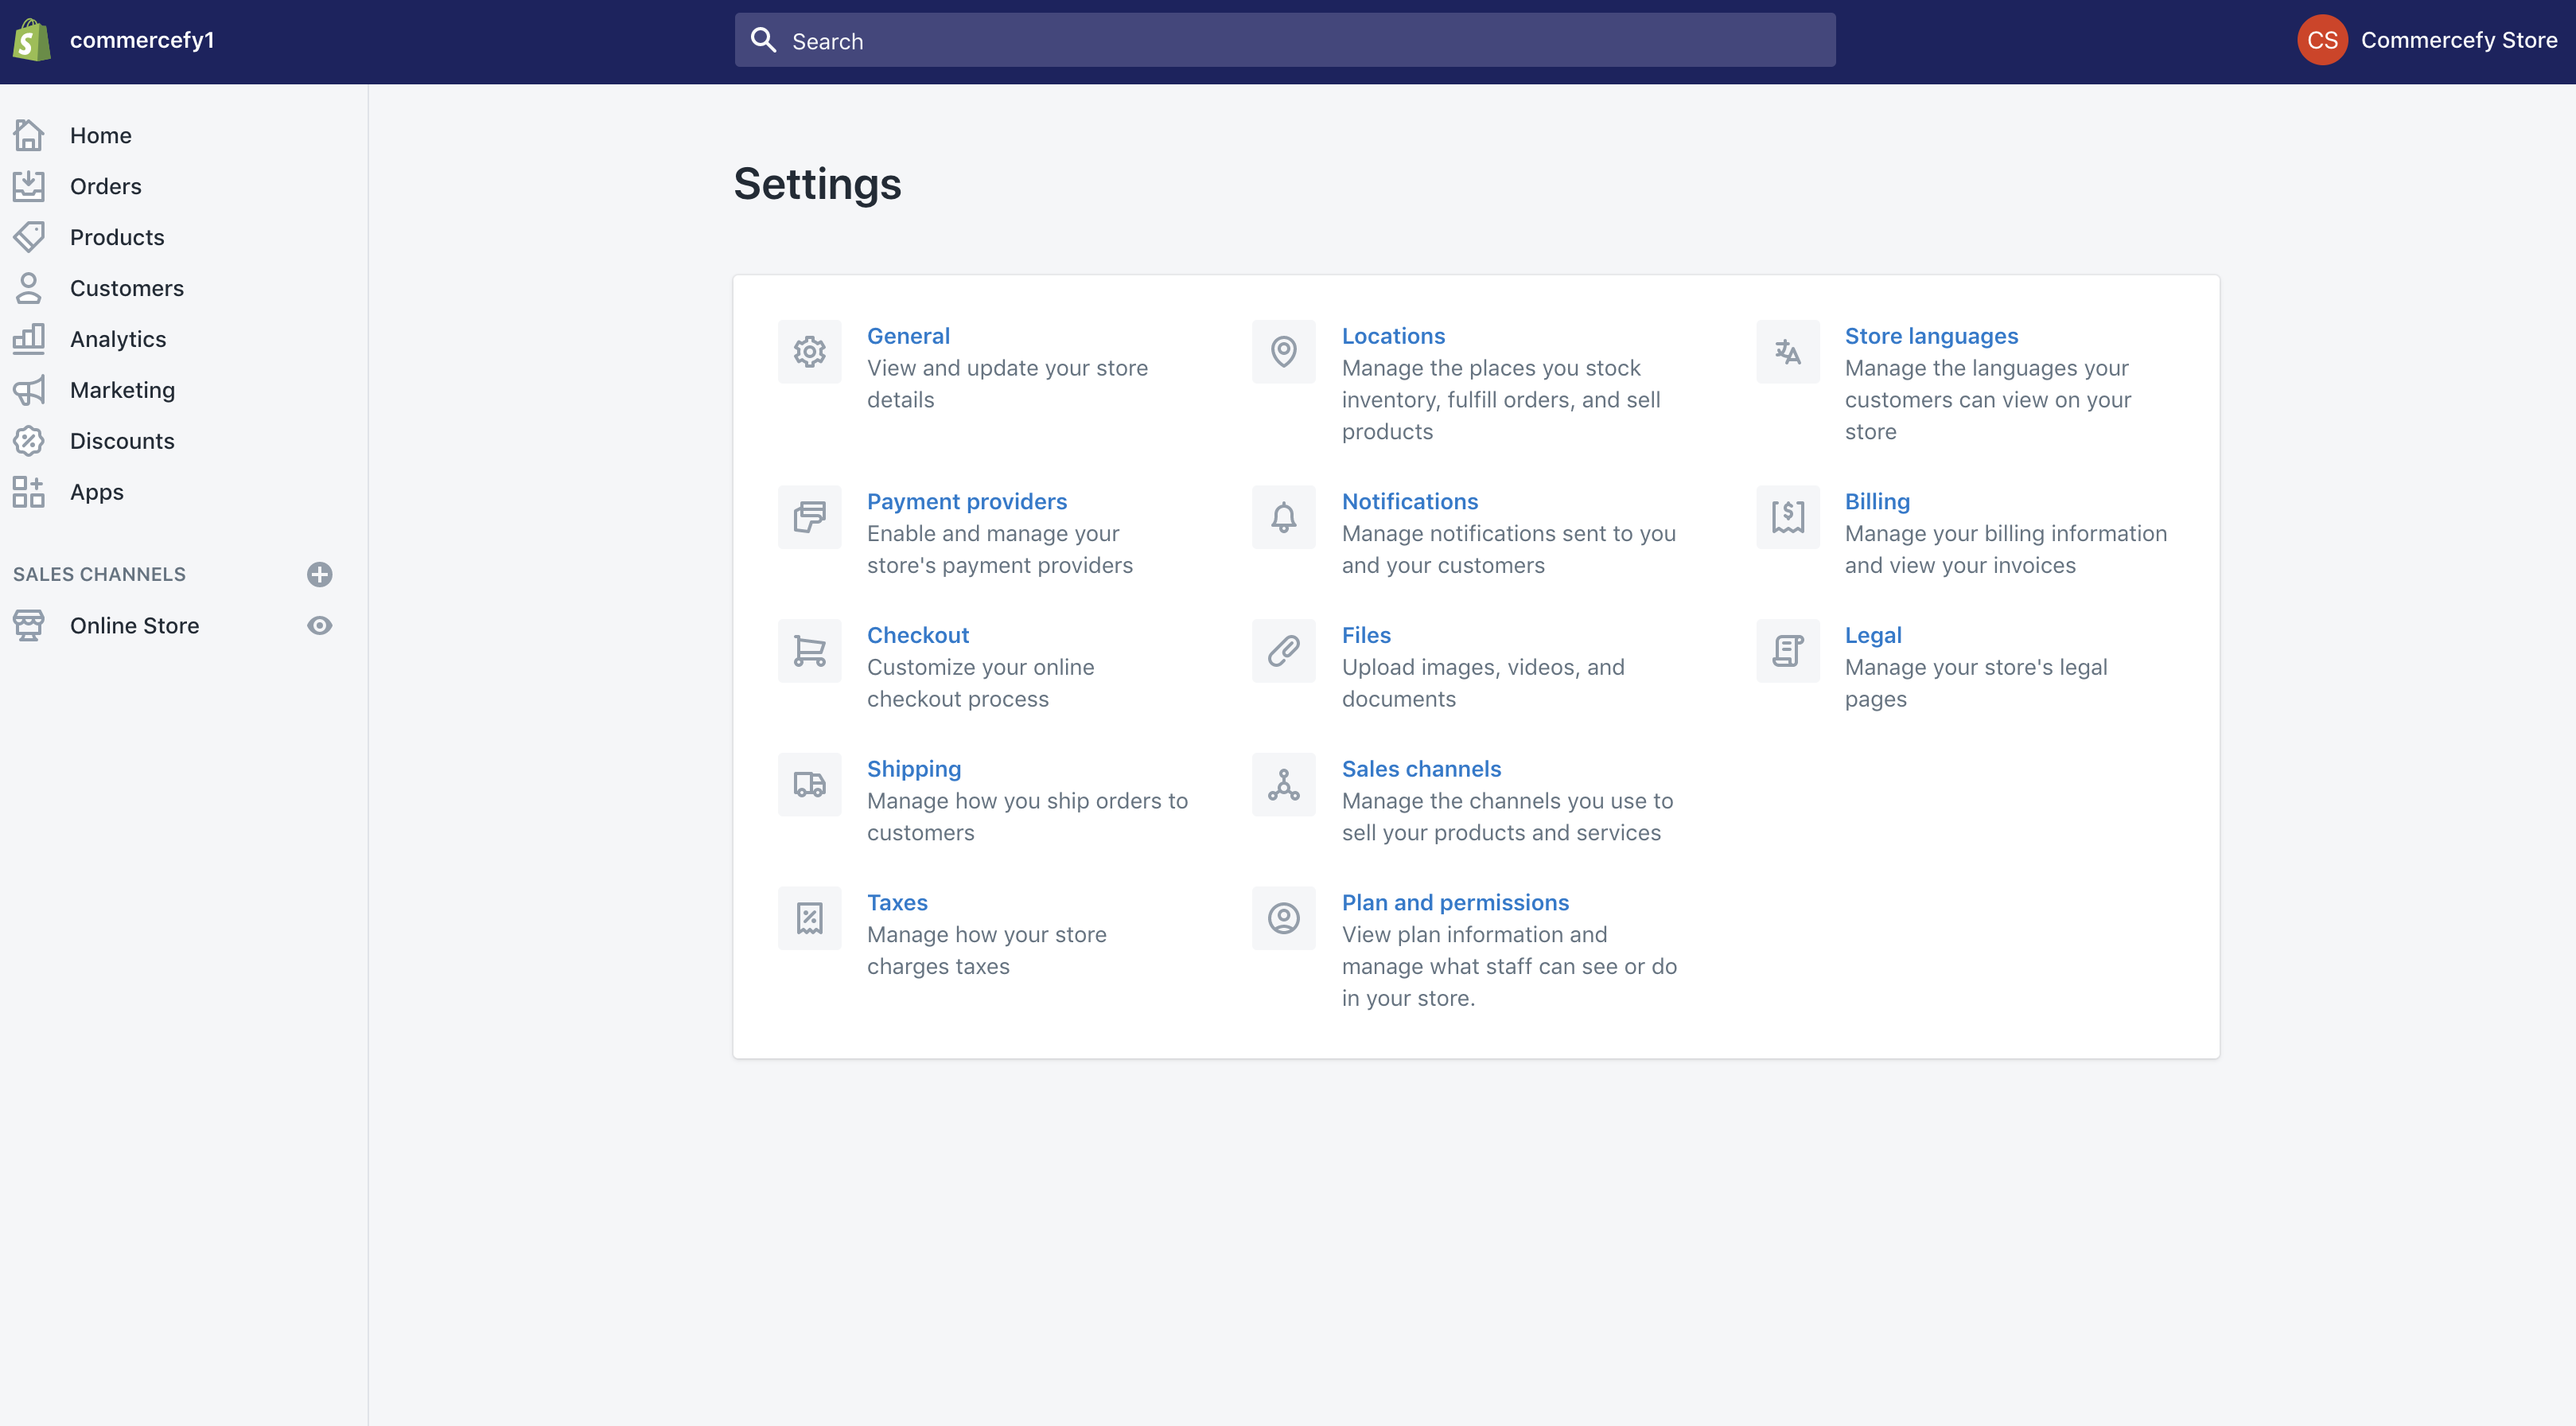
In your Shopify Admin, go to Settings > General and then update “Customer Email” with your newly created email address.
Setup Shipping
Ok. With Domains and Email sorted, it gets easier now.
We need to setup Shipping for our store.
You have 2 options here:
- Free Shipping
- Flat rate
Both will work but have advantages/disadvantages.
With Free Shipping, its less chance of drop-off when a customer is checking out. Having said that, you will have to absorb the cost in your product price. You would ideally have product prices factor this in.
With Flat rate, we create a shipping model that simply applies to all orders. This could be a flat rate of say $1.95 to cover a majority of the cost. Remember, we should have nice margins from our products already. Cost of a few dollars vs the sale price of $15, $20, $30 or however you have priced them at.
Personally, we advise making the Shipping “Free” so A) You can Shout about it within your store and B) Less customers will drop-off at checkout when it comes to Shipping.
Setup Payment Providers
Next we need to setup a Payment Provider. This is how customers will pay us!
Now, depending on your country, you will have access to various different providers.
The key 3 are “Shopify Payments, PayPal & Stripe”. To find your available methods, select your country from the following URL:
https://www.shopify.com/payment-gateways
If available, we advise “Shopify Payments“. You will see this as an immediate option if it is available to you. Its quick and easy to setup.
As there are so many Payment providers, we can’t show you how to set them all up or which ones are available in your country.
However, to setup a Payment Provider, head over to Settings > Payment Providers in your Shopify Dashboard.
You can have more than one option. For example, you Could setup “Shopify Payments” and also offer “PayPal” along side.
Once you have setup a payment provider, its time to make a test order to check everything is working well.
Place a Test Order
Now that we have the basics in place for everything to function, we need to make a test order.
This is not mandatory but advised!
Head over to your Shop as if you were a customer, add a product to the cart and click checkout.
When you have entered the checkout flow, start filling in the checkout as you would at any other site. (Remember, this is your store so don’t worry about sensitive details etc!)
When it comes to Payment, select an option you have setup (Credit/Debit via Shopify Payments, PayPal, Stripe etc) and complete the purchase.
Don’t worry, you will be refunding this in a moment. (Remember, its your store so you would be technically paying yourself some cash without any costs involved).
Once you have completed the checkout, head back to your Shopify Admin to see the new order!
In your Shopify Admin, go to Orders and you will see it there. You will see options to fulfil etc but this time we are going to hit the “Refund” button in grey. Click that and the order will be refunded.
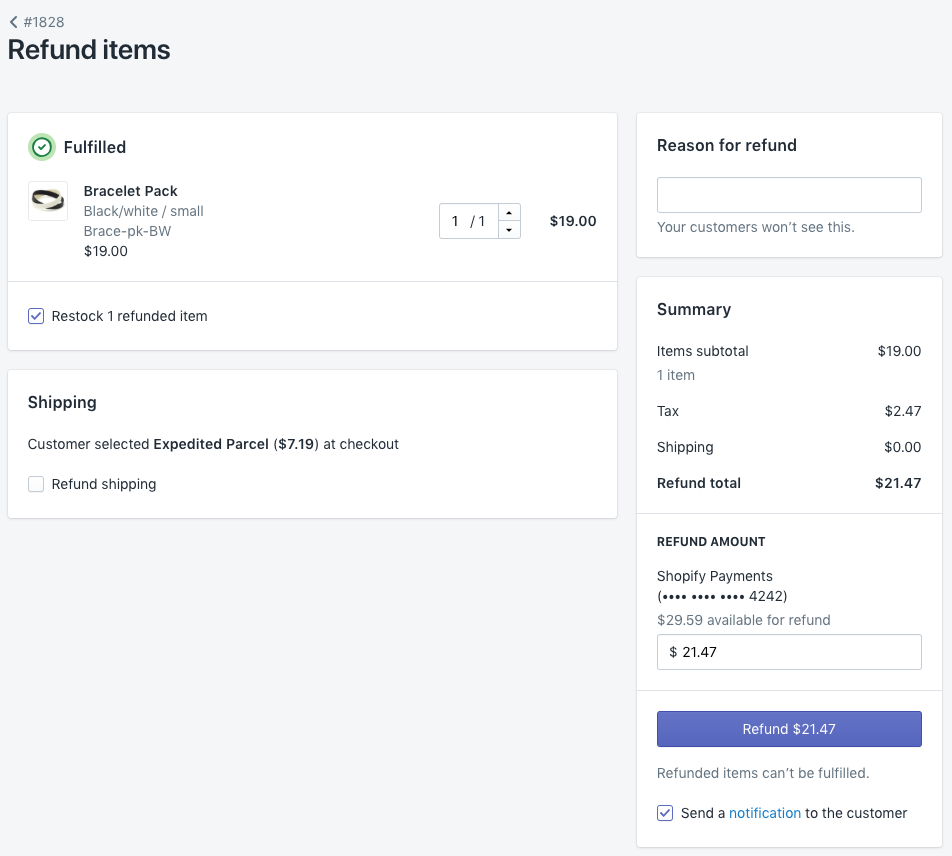
You will see that the order will update. It will say it has been refunded and this closes the order. The same would be true if we had clicked fulfil.
Final Preparations
Believe it or not, we are almost there to having a store ready to get out there.
Before advancing. Go through ALL settings on your store. This is how you can pick up on something you may have missed.
Email Notifications
As you may have noticed, you received a Customer Order email (provided you put in your personal email address) when placing the test order. This is an email notification you receive when you place an order at your store. This is not the same as being notified of a new order at your store. Here, we are talking purely about emails that are received by your customers when they place orders.
Now, these are already setup for you and predefined.
Should you want to customise them, they are found in Settings > Notifications
Fraud Analysis
From time to time, you may get an order that is “Suspected” of fraud. These are rare but do occur. Your Shopify Admin will highlight these for you and to be on the safe side, we always recommend refunding these straight away and not processing the order.
Fraud orders often result in chargebacks that will cost you not only the original order value but also a fee on top of usually $15. Be safe and cancel/refund these orders straight away. Remember to refund the whole amount including any applicable shipping.
Conclusion
At this point, provided you have followed all the steps and not missed any bits, you will have a fully functioning Shopify store that is now ready to sell!
If you see something that hasn’t been covered, it is probably because it isn’t critical at this stage. There are settings you will use further down the line but they aren’t needed for launching.
On to the next step…
Paid Traffic using Facebook Ads
In this section, we will go through getting traffic to your store and how best to do that for new stores.
Business Manager
If you remember, we setup a Facebook Business Page early on.
Now its time to create a Business Manager Account. This is the account we use to serve ads. In order to serve ads you need a facebook page for your business (which you should already have).
To setup the business manager account, follow the link:
Once you have created your facebook business manager account, we will need to connect this to your Shopify store. We do this using a “Pixel”. This is explained in the next lesson.
Setup Facebook
Once you have created your Business account, your page should now be visible.
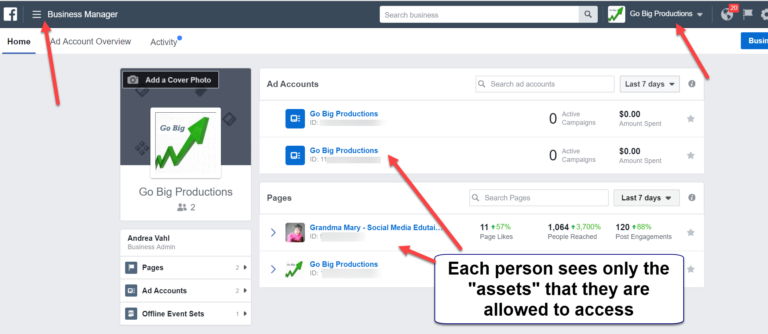
Facebook are always changing the links and titles for everything so if you are having any trouble at this stage, just google search for “Add page to Facebook Manager” and this should get you back on track.
Provided you can see your facebook page in your business account, we can proceed to setting up the Pixel!
The mighty “Pixel”
You may have heard of a “Pixel“. This is simply facebooks tracking code. What this does is allows us to see traffic from Ads that land on our store, measure the effectiveness of them and also retarget those customers. The Pixel is extremely powerful and when setup with a strong Ad strategy can lead to high sales and profitability.
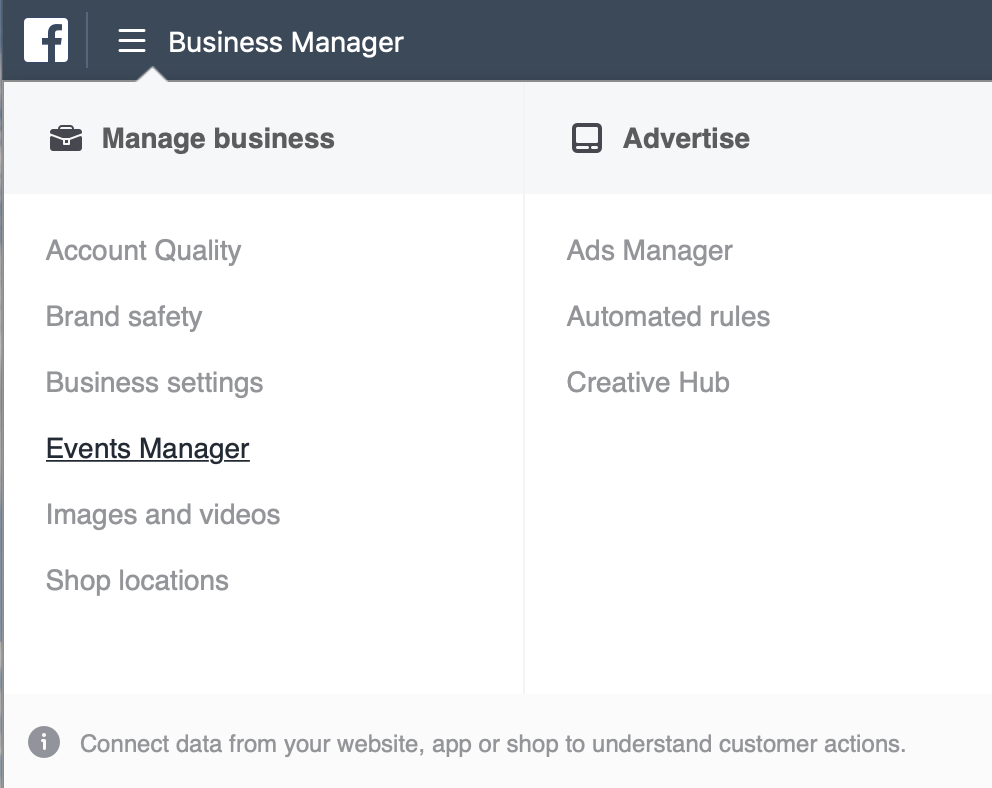
To setup the Pixel, login to your recently setup Facebook Business Manager Account, then click on “Events Manager”
Next, we need to add a new data source. If this is a new account, you will also be created with a welcome box inviting you to setup a Pixel. You can click either.
![]()
Once you have entered the setup, facebook will guide you through the process. Its very simple as they have an option for “Shopify”. Click that when prompted and they will walk you through connecting the two. Once complete and you have checked its working, let’s create some ads!
Creating your first Ads
Creating an Ad is a time consuming practice, the first time round. Not only are you learning the platform you are on, you are learning about the world of advertising.
It can be VERY daunting.
We have attached a video from PlaceIt, one of our partners, who will run through the basics of setting up an ad.
A little bit about PlaceIt. They allow you to create mockups containing your Print On Demand products as if a model was modelling it. You can also create other amazing image placements for your ads so go check it out!
The world of advertising can’t be conquered over night. We suggest running a few ads at first with no more that $5-10 budgets to get the feel of it and test the water.
We will build on these tactics in the next sections.
A/B or “Split testing” your Ads
A/B or Split testing may sound alien to some people but it’s actually a very simple concept.
With advertising, there are some things that “work” and some that “don’t work”. How we find this out is by split testing.
For example, if you create an Ad to sell a mug, you will often use a picture of the mug right? Now, how many pictures of that mug could you have? The answer is infinite. You could take a picture of the mug on a beach, on a table, with other mugs, alone, on a pink rug, next to a dog, in the hand and so on. Loads.
Split testing allows us to duplicate the ads that we create and change aspects of them to create a new ad or a “split test”. In the newly duplicated ad, we may change the image and modify the headline.
These changes alone could be the difference between no sales and an ad going viral and making 1000’s of sales. Cool eh?
Split testing is an ongoing process you will be doing as your store evolves, the traffic increases and your ad budget grows. The more successful ads you show, the more you will want to spend right? This is because a successful ad = sales and that’s what we want. To find the successful ads, we need to run lots of split tests.
So, to duplicate an ad, we just copy it to the same Adset.
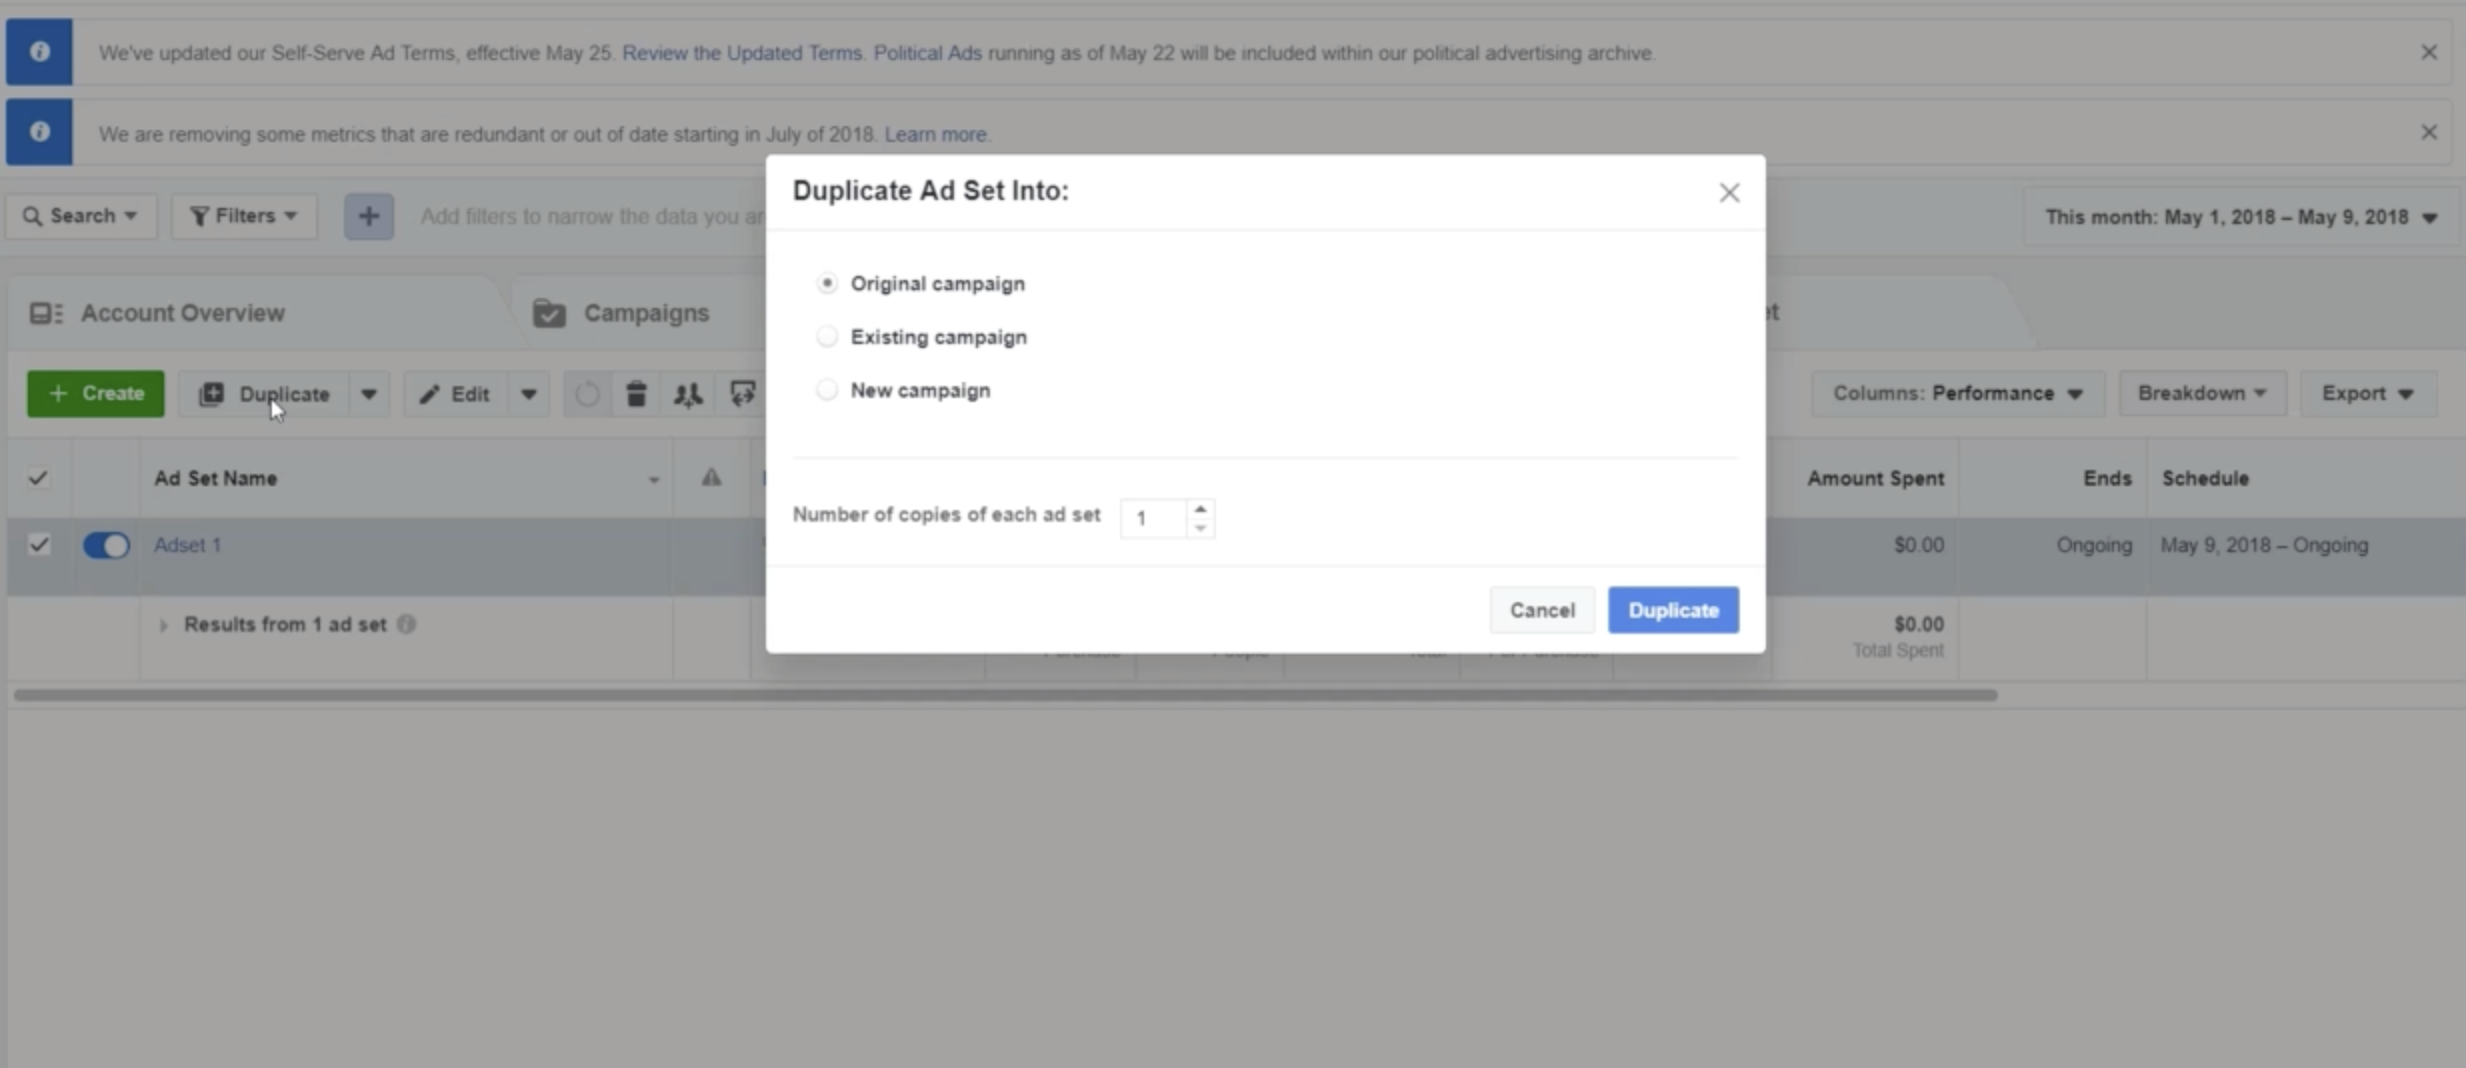
Once duplicated, we can go into the ad, change an image, or the headline and so on to create a slight variation on our existing ad. You can run these side by side, or 1 after the other. However, side by side is better because we can directly see which one is performing better based on the results and delete the non performing ad.
Keep repeating this process and eventually you will have a killer ad that is very well optimized and making sale after sale.
Scaling your Ads
Scaling is the art of increasing an ad that is showing promise to determine the optimum budget and performance.
If you have an Adset that is spending $5 a day and showing a positive ROI or engagement rate, this is a prime candidate to scale.
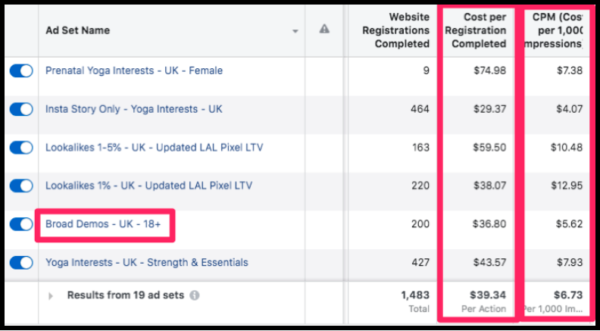
How to scale
Once you have identified an Adset to scale, you simply increase the budget by 50%. So $5 will be come $7.50. $10 will become $15 and so on.
The #1 mistake people make is to increase it from say $5 to $100 straightway thinking it will bring in 100s of sales. This is not the way to scale, will confuse the facebook algorithm and potentially burn your budget. It’s also not sensible.
Think about it like flying a kite. You let a bit of the line out to go higher whilst retaining control. If we let all the line out straightway in high winds, we will have no control and the kite could come crashing down. Not good! Baby steps is the sensible way forward.
After increasing the budget by 50%, we give the ad time to breathe and monitor it over a 2 day period. If the budget was used and the results were good, i.e still performing well, we simply repeat the above process again. Increase by another 50%, monitor and so on.
We do this until the ad hits optimal performance. If you start seeing budget being eaten but no consistent performance, simply dial the budget back 50%.
Ad Summary
With Ads, its not as simple as setting up the store like we have shown in previous steps. For example, connecting a domain has right way of doing it and a wrong way of doing it. That’s it. It’s either connected and working or it isn’t.
With Ads, there are no right or wrong ways to creating and building solid ad campaigns. It take’s time, it is an art form in itself.
Having said that, once you have create your first couple of ads and experimented, you will start to get the feel of it. Focus on good headline grabbing titles and strong imagery. Your goal is to get as many people to your store as possible who will buy your products whilst spending the least amount as possible.
It’s hard to get all 3 of those counterparts right from the get go. It will take time, trial and error, patience and some budget.
If you still feel perplexed by it and have the money to offload it, try Upwork or fiverr. There are people who will build, monitor and scale ads for you but this will of course eat in to your overall profits.
Fulfilling your Orders
This is the important part after a sale happens on your store. Now it’s time to fulfil it. This means purchasing the product from your supplier and having them send it direct to your customer.
There is a manual and an automatic way to do this. FYI, there are 2 spellings of “Fulfil” and “Fulfill”. We went with the more common one. 😀
Manual fulfilment
Manually processing an order is quite a simple process but its tedious and if you have 100’s of orders, it will take ages. Not ideal. However, from time to time, the automatic fulfilling of orders can fail or have issues outside of our control so we need to know the manual way as a backup.
What does the manual order processing consist of? let’s list the steps.
- Confirm the new customer order is legitimate and paid in full
- Place the order on AliExpress
- Update your Order on Shopify
Confirm
Confirm the order is safe to process. This is just checking that you have indeed received payment for it and there is no fraud flag. Provided you have authorised payments active, you should always have been paid otherwise the order wouldn’t be place. The fraud flag is the important part. If it looks like the following, simply refund it and archive the order.

Notice we have already refunded such order.
Place
Once we know the order is good to go, we need to head over to AliExpress and place the order for the item the customer ordered and get it shipped to them. If you haven’t created an AliExpress account, setup one now. You will need this for the automatic step anyway.
To place the order, simply identify the item on AliExpress, add it to your cart and checkout. Just like if you were buying it yourself, everything will be the same.
You will use your billing address, your billing card but you will be shipping it to your customers address. Once you have completed the checkout, the supplier will begin preparing the order and shipment to your customer.
This is Drop Shipping. Remember, you have been paid in the above step and the customer has paid a nice amount (in our cases £38 or about $45). The item will be purchasing on AliExpress will be at cost and thus we will make a nice profit!
Update
Finally, once we have placed the order on AliExpress, we just need to update the order in our Shopify Admin so we can keep track. We just need to mark this as fulfilled and that’s it!
After a 1-2 weeks, the customer will receive their products. The shipping time can vary and there are some reports of it even taking just 5-7 days. Very quick considering it is coming from China direct!
Now we have covered the manual process, let’s show you the easier, automatic way.
Automatic Fulfilment
Ok. If the previous step sounded long winded, that’s because it it. There is an easier way that is automated. We had to go through the manual process so you have it as a backup but for most of the time, you will hopefully have it working the automated way.
The Automated way (via DSers)
Using the app you can place 100’s of orders in a few clicks.
https://apps.shopify.com/dsers
Order Processing
With everything setup above, when an order comes into your Shopify store, you simply head over to the DSers App and click the “Order Product” next to the new order (Within DSers, not the Shopify Admin).
After clicking this, the magic will happen. The DSers Browser Extension will take over, navigating to AliExpress, injecting the product into the cart, heading to checkout, inputting all the details and taking you to the payment page. All you need to then is click the pay button and you’re done.
You just saved about 5 minutes. Imagine that across 100 orders….
Now, its not 100% automatic as you can see but it’s 95% of the way. If you start to do serious volume, you can always hire a Shopify VA (Virtual Assistant) to process the orders for you so you can sit back and relax.
Increasing your store authority
In this lesson, we will talk about “Authority“. This is the process of giving your store credibility so potential customers are more likely to order from you.
Social Proof
Social proof is a very powerful concept online and in the real world.
Have you ever looked for a restaurant to eat at night but skipped past the ones that look empty? This is human nature working. An empty restaurant is a red flag to us.
You turn the corner and see a buzzing restaurant, ask for a table in the hopes of a “yes” and brief a sigh of relief when the waiter has checked and says “follow me”.
This is social proof. If other diners are eating there, it must be good right?
So how do we translate this to online?
Reviews, Engagement and activity.
Reviews are vital to a store that is new. These remove the emptiness of the store. Reviews are a sign of previous customers. How do we get reviews if we are new though? In the past, store owners used to write fake reviews but these aren’t credible and its also tiring if you have a load of products.
There is an easier way. Import real existing reviews.
That’s right. Just like DSers imports the products, we can import reviews from sites for the same products.
Using the following app, you can build instant authority by importing reviews for the products you have listed to bring your store to life.
https://apps.shopify.com/ryviu
Activity is also a great contributing factor to tipping customers over the edge and buying. You may have seen the widgets that popup in the bottom left of a store. “Tom from the US just bought a set of marble coasters”. This is activity and shows your traffic that you are making sales. For new stores, you can also enable other activity factors like “Add to Carts”, “Customer Count” and so on.
Other social proof includes photo reviews which you can setup using Loox. We suggest leaving this for now until you have your store operating well and have ironed out any issues.
Chat
If a potential customer has a quick question and they can reach for an online chat to get the answer, it will result in a sale. If they don’t see a chat, they will likely leave the site and hunt elsewhere.
Chat widgets have greatly advanced since the days of needing someone to man it 24/7.
Thanks to Apps like Whatsapp and Messenger from facebook, you can add chat widgets to your site and get customer requests direct to your mobile. Sat at a bar on holiday? No problem, the chats come straight to the device, you can answer, grab the sale and take a sip of your drink.
Again, as your store expands, you can hire a Shopify VA to take care of customer queries so you don’t have to.
Whatsapp Shopify App (Requires you have the Official Whatsapp mobile app installed on your phone as well)
Shopify have an official Messenger Channel you can grab here.
Retarget & Remarket your store
This lesson is on the power of retargeting and re-marketing to your traffic and past customers. Often overlooked, this is a great way to easily get more sales.
Abandoned Carts
The great news about this tactic is its free.
Did you know that 55-65% of all carts get abandoned. Whilst this may be a hard fact to swallow, there is something we can do about it. Shopify gives us the ability to send abandoned cart reminders straight out the box.
Simply head over to your Shopify Admin. Click Settings > Checkout. Scroll down to the Abandoned cart section and setup the settings as follows:
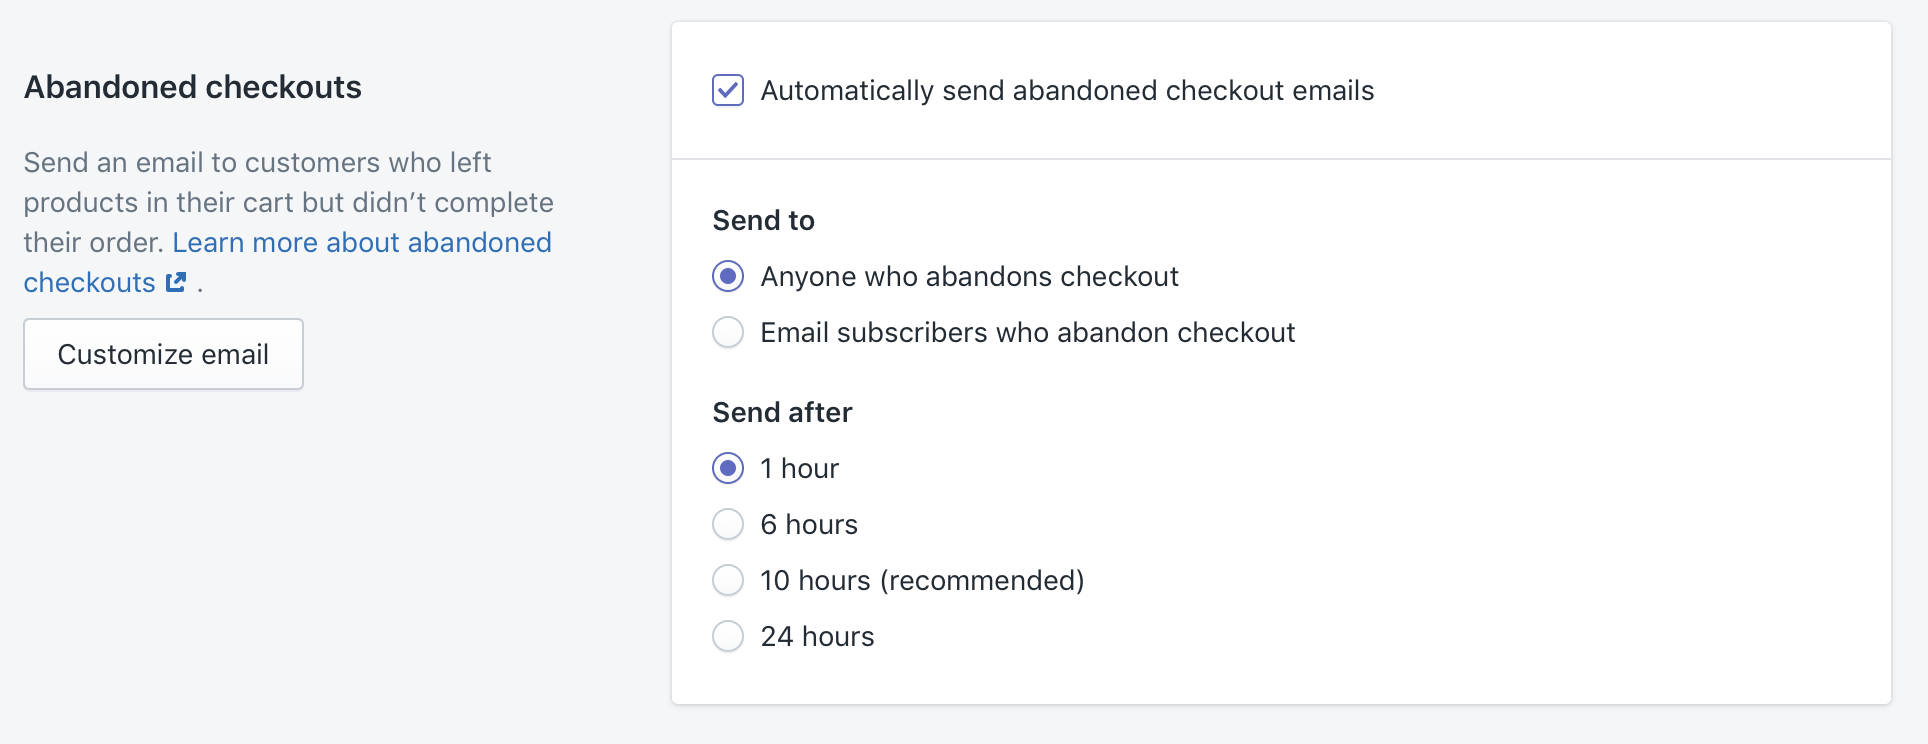
For a more definitive guide to abandoned carts in Shopify, check out this guide.
Web Push
Web Push Notifications are ultra effective and very easy to setup.
There are quite a few apps but 2 of our recommend favourites are OneSignal, Pushowl and Smart Push.
Both offer free plans to start with.
The idea is that you can reach users when they aren’t on your store and bring them back to it. You can do this with discount codes, flash sales, price drops, re-engagement campaigns and so on.
Whilst not critical at first for a new store, its good to get this up and running so it builds. If you have it active for over 6 months, you will have a nice audience you can reach out to and increase orders.
Provided you followed the previous lessons on creating facebook ads and setting up your pixel, you can unlock the ability to reach those previously engaged visitors and customers.
Now, this should be done only when your store is growing and your sales are good. If you are still struggling with sales, you need to address previous points such as product selection, ad targeting, branding and so on to fix this. Once sales are good, your retargeting will not be wasted.
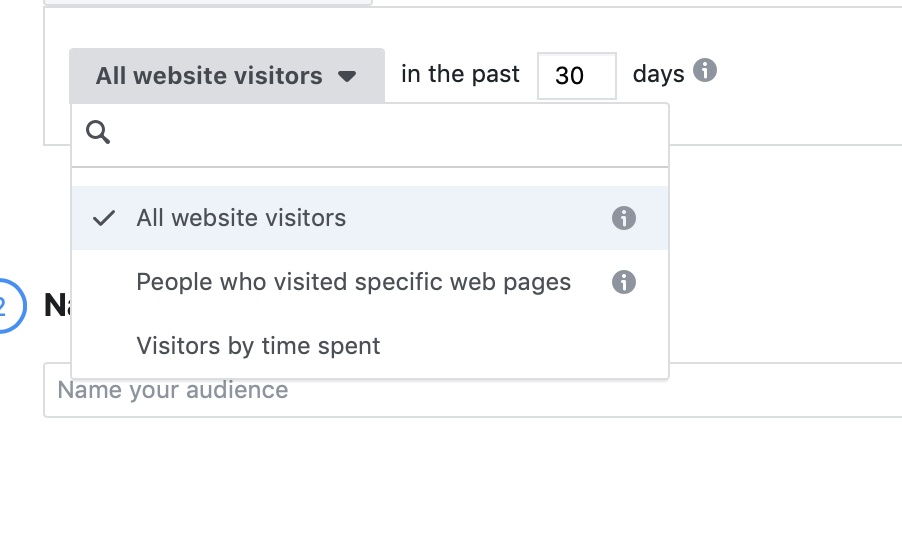
In order to retarget previous visitors and customers, you need to create a custom audience based off your stores pixel data.
To do this, login to your Facebook Business Manager and head over to the audiences section.
Next, click on “Create a Custom Audience”
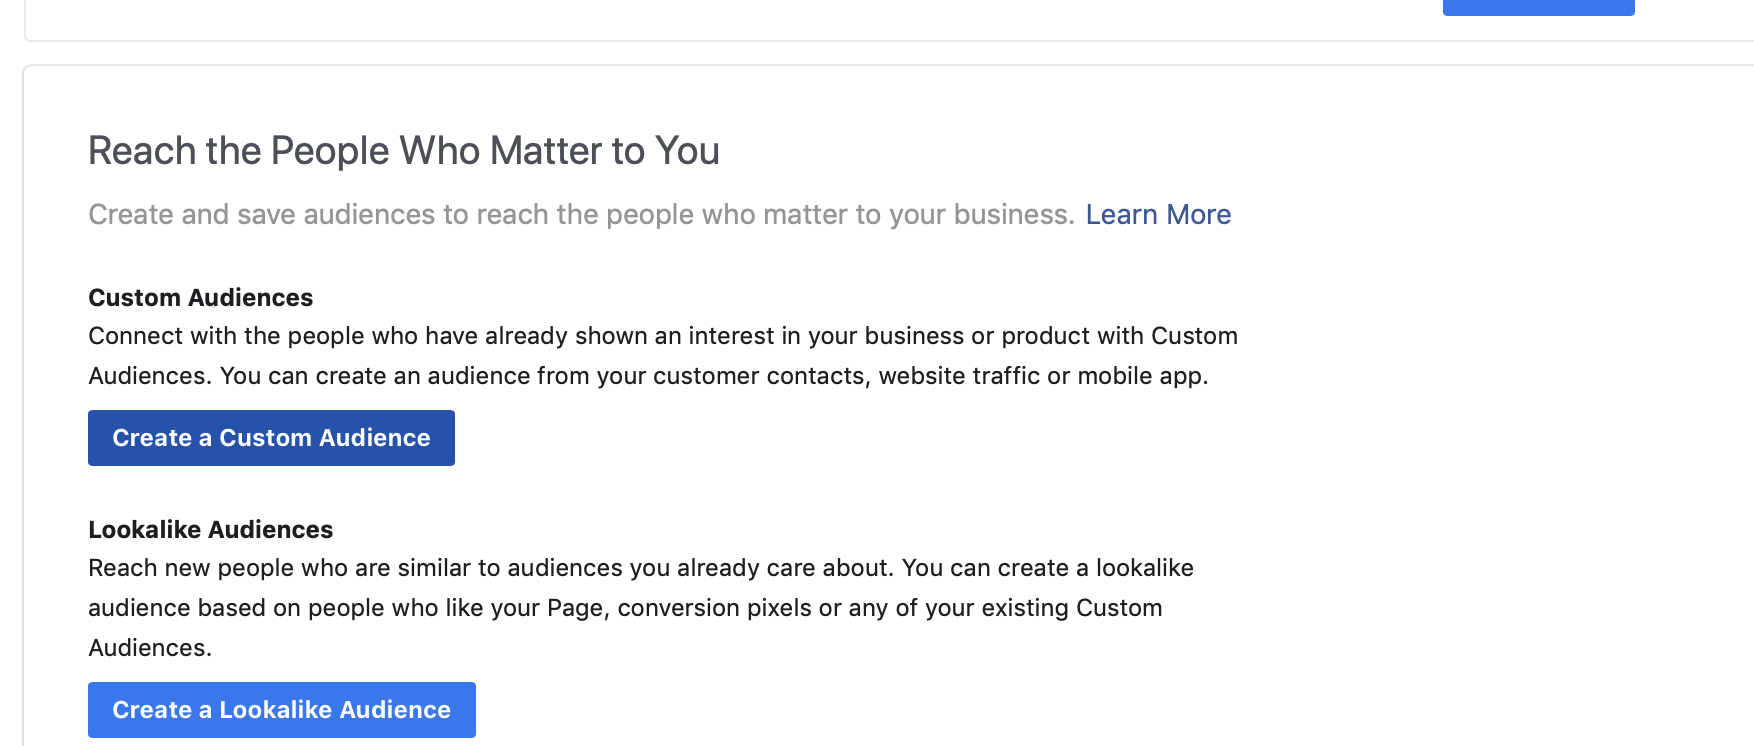
Then select website.
![]()
Finally, fine tune the criteria from the pixel data, name your custom audience and save it.
Once you have created the audience, you simply build facebook ads (covered in previous lesson) and select that newly created Audience when setting them up.
General Admin
General admin to keep things ticking over.
Managing Returns & Refunds
Returns and refunds are a fact of running an online store. How you deal with the situation is important to future sales and trustability of your site.
What should I do?
Straight up, if someone wants a refund, give it to them. Obviously request they return the item to an address but handle the request with a kind tone and don’t get frustrated with customers.
50% of the time, a customer will end up not sending back the package even though they requested a refund and that will be end of the case. For the ones that do return, simply issue a refund and case closed.
Complaints
If a customer hasn’t requested a refund yet but has an issue with the item, deal with it again in a kind manner and without frustration. You should look to resolve the issue as easily as possible. Sometimes you can respond like “Sorry to hear this, we can offer you a 50% refund and you keep the item“.
This is a good result because more often than not you will still be making a profit and you haven’t lost a future customer.
As you are dealing with low cost items, at worst you will be losing a few dollars on an order and the amount of returns/refunds is usually under 1% provided you are running an efficient store with plenty of customer information and support.
Conclusion (and future)
This isn’t the end but the beginning…
Fresh Content
Once you have a Shopify store live and running, you will be focused on getting sales. However, don’t get complacent. Its always sensible to change images on homepage slideshows, rework product descriptions to improve sales, add new products relevant to your niche and write blog posts to improve SEO content.
If a store becomes stagnant, returning customers will notice this and may be deterred. Also, if you aren’t adding fresh content and moving your store with the times, other stores will be doing this and you could lose out to them.
It can take less than a minute to change a slideshow or 10 minutes to write a blog post. These little updates can have a great impact on your stores future sales.
Outro
That concludes our course on creating, building and growing a Shopify store.
You should have a solid grasp on Shopify by now and have the tools to create and run a profitable business. Now, despite this course fast-tracking you through the setup and running, you still need to put the hours in to insuring it is a success. Also, don’t beat yourself up if it doesn’t happen overnight, it’s not supposed to.
Set small goals and tackle them one by one.
Your milestones when starting will be greatly different to when you are 1 year down the line and established. The first milestone is always to get that first sale. The next is to reach 10. Then multiple sales in one day. Then $100 days, the $1000 weeks, then $10,000 months and so on. You need to go through the milestones to get to the bigger numbers, there isn’t a shortcut.
If something isn’t working, ask yourself why. Try and fix it. If after these efforts, it still isn’t working then try another direction. You can have great success with 1 product and the perfect ad, it can go viral and net you a ton of sales. You need to position yourself in the first place for this to become a reality though. Constant trial and error, improving your store, working on content, mastering ads, finding winning products are the ingredients for success.